Tag Archives: ecosalon

Lentil Dip


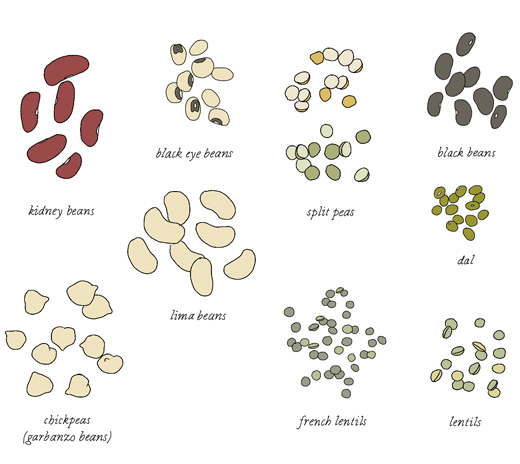
It may be silly to suggest cooking dried legumes when you can get them ready to eat in a can. But I still insist that there are so many benefits to cooking them yourself that it’s worth every step. And it’s pretty easy to do. You can also cook large quantities at a time and store smaller portions in your freezer.

Legumes like lentils or beans work all year round in different ways. Cold in salads and warm as a side to eggs, beets or with any green vegetable. Chickpeas are wonderful as a starter together with toasted almonds. Green lentils with beets, feta and parsley create a simple and delicious salad alone or together with baked vegetables or meat. Hummus or any other dip (see below) are perfect treats and easy to whip up with any fresh produce that the summer can provide.

I always cook my legumes together with some herbs, vegetables and salt (see simple version below). Sometimes I add bones or small pieces of meat when cooking the legumes. It gives a specific flavor but it’s far from necessary. Cooking time depends on what type of legumes you have, for example cooking lentils is far quicker than chickpeas. It also depends what you are planning to do. If you are making hummus you may want to cook the chickpeas until they are almost mushy but for a salad they should just be soft.

Some legumes such as most beans and chickpeas you will need to soak for at least 8-10 hours (but longer is better). Change the water a couple of time to keep them fresh (it can smell really bad). Lentils, split peas and mung beans do not need soaking.

The lentil dip below can be served together with fresh vegetables such as raw carrots, cucumber and celery. Slightly cooked cauliflower and broccoli also work well. You can also use the dip as a spread on freshly baked bread and crackers. Enjoy!

lentil dip
(Plenty of dip)

one cup dried french lentils (almost 2 cups cooked)
1-2 bay leaves
A sprig of sage
½ onion (and/or other vegetable scraps such as carrot, celery or fresh fennel)
about one tablespoon of salt

for the dip
about 2 cups cooked lentils (as above)
one shallot
chili (more or less depending on how spicy you want it)
2-3 garlic cloves
2 teaspoon coriander*
2 teaspoons cumin*
one teaspoon fennel*
reserved lentil liquid
juice from a ½ lime

seasoning
smoked paprika powder (e.g. bittersweet Pimentón de la Vera)
sea salt
some olive oil
cilantro

First step is to cook the lentils. Rinse the lentils and cook them gently together with about two cups water, bay leaves, sage, salt and onion (etc) until soft (about 15-20 min). You may need to add a little more water. It’s important that you don’t cook the lentils dry and there should be about a cup of tasty liquid left when the lentils are done. When done reserve the liquid as it will be used later. Let the lentils cool and remove all bits and pieces of the sage, bay leaves, onions etc.

Chop the shallot into tiny pieces. Saute on very low heat until it starts to caramelize. Raise the temperature a little and add chili together with the spices. Stir everything together and add the lentils to the pan. Poor some of the water over and let cook for just a little bit. (You could stop the cooking here and just enjoy the lentils as a side to eggs, meat or vegetables).

Let the lentils cool a little before blending together with garlic in a food processor. Add lime juice plus some of the reserved lentil liquid to create a smooth texture. Season with flakes of sea salt and smoked paprika powder. Lastly add as much cilantro as you wish. Just before serving add some olive oil and a splash on top.

* I prefer to toast whole coriander, fennel and cumin in a skillet at high heat. When they start to “pop” remove them immediately from the pan into a mortar and pestle. Grind until fine. The flavor will be richer.

 This article was originally published at EcoSalon on 10 July 2012.

Pickled Mustard Herring

KINDVALL-herring_updated

This year I will be celebrating midsummer here in NY. Midsummer is the day when Swedes like me celebrate the longest and brightest day of the year. We eat plenty of herring, new potatoes (that you buy freshly picked and dirty), aged cheese on “knäckebröd“, drink aquavit and sing songs. The dessert is always strawberries which are often eaten plain with just a little sugar and cream (either whipped or mixed with milk.) Some make creamy strawberry cakes while I serve mine with dark chocolate cake and whipped cream.

For practical reasons the midsummer holiday is always on the Friday closest to the actual summer solstice day which this year will be on Friday the 22nd of June.

The traditional herring you eat for midsummer is Matjes. It’s an excellent herring typically spiced with sugar, allspice, cinnamon and cloves. Traditionally you eat this type of herring with sour cream topped with chopped chives and new potatoes & fresh dill. I love this meal so much that I keep eating it throughout the whole summer.

Other common flavors are mustard, onion, lemon or dill herring. More rare or rather unexpected flavors are tomato, garlic or curry herring (not my cup of tea though). You can find these different types at any supermarket in Sweden or more homemade styles in most Swedish fishmongers.

If you can get hold of fresh herring, the best experience is to cure and flavor herring yourself. This can be a tough task if you are outside Scandinavia. In New York City I have only seen fresh herring a couples of times. In the city it’s possible to find simple cured herring in vinegar. You don’t really need to do anything if you find this kind of herring but with just a few simple additions like mustard and dill you will raise this fish to another level (see below).

the cure
(if you can get hold of fresh fish otherwise skip this part)

  • about 1 lb filets of fresh herring*
  • ½ cup white vinegar (6%)**
  • 2/3 cup water
  • 2 tablespoon sugar
  • 2 tablespoon salt

Rinse the herring in cold water. If you like you can skin the herring but I normally do that after the cure as it gets off easier then. Mix the white vinegar together with the salt and the sugar. When the sugar and salt are totally dissolved in the liquid add the water. Place the herring in a bowl and pour the vinegar mixture over. Set aside in the fridge for about 24 hours. Stir in between to make sure that all fillets gets properly cured. Its done when all fillets have become white in color.

Let the fillets drain properly in a strainer while you prepare the sauce. Remove the skin with your fingers or use a knife to peel it off. Cut the fillets with a scissor into bite size pieces.

mustard herring

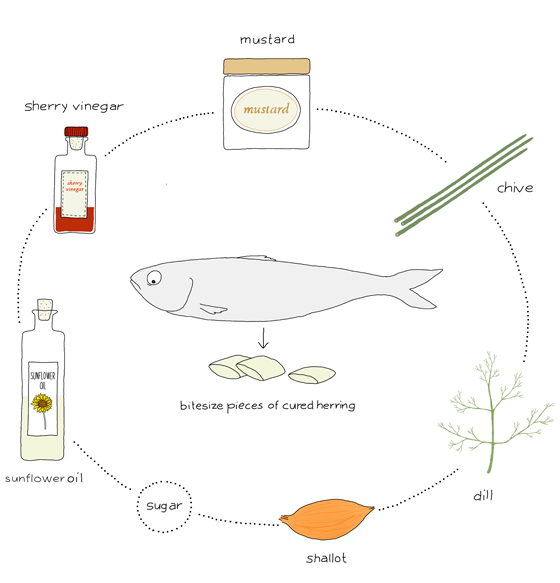
  • about one lb cured herring(as above or get simple herring in vinegar. Only use the herring pieces, removing all liquid, onion, etc.)
  • 3 tablespoons sweet mustard
  • one tablespoon dijon mustard
  • one tablespoon brown sugar
  • one teaspoon sherry vinegar (apple cider vinegar works as well)
  • 50 ml sunflower oil (or other neutral vegetable oil)
  • ½ cup dill
  • one shallot

for decoration
chopped chives

Mix together mustard, sherry vinegar and sugar. Add carefully the  oil drop by drop while stirring. Chop the shallot and dill finely and add it to the sauce. Season with salt and freshly milled black pepper. Place the herring pieces into the sauce and stir carefully around so the sauce gets around the fish evenly. Let the fish rest for a couple of hours, preferably 24 hours but I can never wait that long. Before serving chop the chives into 1/4” pieces and sprinkle on top. Serve the herring with new potatoes or just on dark rye bread with sliced boiled eggs. Enjoy!

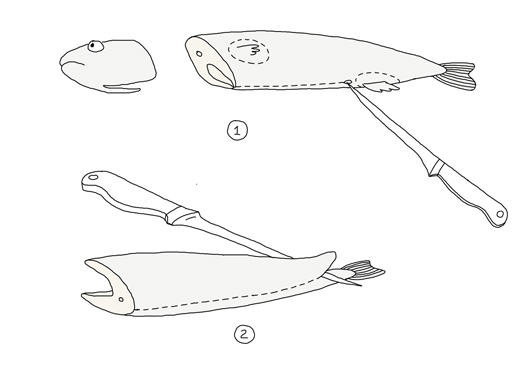
* It’s not impossible to fillet the fish yourself but you need some practice. This is one way: Cut off the head and tail. Open up the stomach with a small knife (or even your fingers) to take out the innards. Make it as clean as possible. Now comes the tricky part where you use your thumbs to loosen the backbones by pressing your thumb under it. When it starts to loosen grab the top of the backbone and pull it off. You now have both fillets connected together. Remove the fins with a scissor and rinse the fillet in cold water. You will get a hang of it after some practice. If you think this is too messy, just ask your fishmonger to do it for you.

** If you only find 5% white vinegar you should use a little less water.

Before buying any fish check with Seafood Watch for the most sustainable options.

Thei article was originally published at EcoSalon on 19 June 2012.

Mazariner – a Swedish Pastry Classic (collaboration)

Story by Anna Brones • Illustration by Johanna Kindvall • Recipe by both

Put two Swedes who love to cook in a kitchen together and there will be an immediate discussion of what baked good needs to be concocted for afternoon coffee. After all, we don’t mess around with our coffee breaks, and a serious coffee break deserves a serious pastry. So we settled on mazariner.

Mazariner are the darling of Swedish cafes, a balance of buttery pastry and almond filling topped with a thin layer of icing; the type of thing you bite into and wonder where this food has been all of your life. They’re just fancy enough that you don’t keep them on hand at all times, but you don’t have to put them on a serving tray.

Made in small oval tart tins, they can seem daunting to make, but as it turns out, are easy enough that you don’t need to cruise to your local IKEA to track down the mass produced version – although they do have them if you’re in a Swedish food pinch.

Our recipe search started with a few Swedish cookbooks and a call to my mother who was immediately reciting the ingredients from a page she had ripped out of a Swedish magazine sometime in the late 80s – when you come across a good recipe, you hold on to it. Johanna, being a more skilled pastry “chef” than myself did a creative combination of the many versions, and we both decided that plain icing just wouldn’t suffice. Add a little orange juice and you have a real masterpiece.

Make a batch of these, brew a French press and it will almost be like you’re sitting at a cafe in Stockholm. Almost.

mazariner

dough
7 oz butter (almost 2 sticks)
2 cups regular flour
¼ cup sucanat or organic cane sugar
2 teaspoons whole cardamom (crushed in a mortar, or slightly ground in a coffee grinder)
one small egg

filling
one cup blanched, ground almonds (can be replaced with almond meal)
2 bitter almonds (about 1 teaspoon almond extract, or more depending on how strong you want the taste)
2.5 oz butter
½ cup sucanat or organic cane sugar
3 small eggs

icing
juice from an orange
¼ cup confectioner’s sugar

In a large wide bowl cream together butter, egg and sugar. With your hands, mix in flour – this can be done either in the bowl or directly on a clean counter top. Crush the cardamom with a mortar and pestle as fine as you wish. If you don’t have a mortar or grinder, you can use pre-ground cardamom. Add it to the dough and blend well. Let the dough rest in a cool place for at least 30 minutes.

While the pastry dough rests, blanch the almonds by pouring boiling hot water over them and letting soak for a few minutes. They are ready when the skin slips off easily. Skin all of the almonds and grind them into a fine meal in a food processor. In a small saucepan, melt the butter and set aside to cool. Whisk the eggs together with sugar to a porous batter and add in almonds, almond extract (if you didn’t use bitter almonds) and butter. Stir together until well blended.
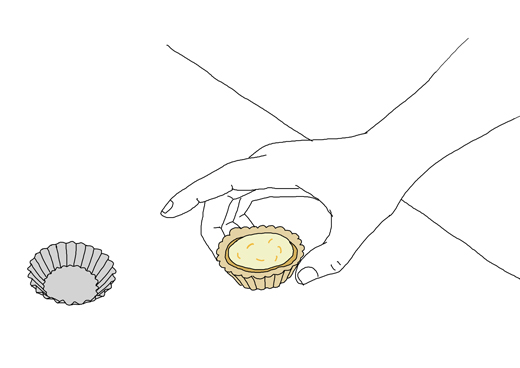
Grease small tartlet tins* (see illustration above) with butter. Line the molds with a thin layer of dough (about 1/8”) and fill them almost to the top with the almond mixture. If there is any leftover dough you can freeze it and use it some other time.
Bake in the oven at 400°F for about 15 minutes. The cakes should have got a slightly brown color on top. Let them cool a little before removing the cakes from the mold.

While the mazariner bake, prepare the icing. In a small bowl add the confectioner’s sugar and drip in some orange juice. The icing should be a little thick but still easy to drizzle over the mazariner. Wait until the mazariner have cooled before icing them.

Serve the mazariner for an afternoon tea or coffee break, you’re sure to make some new friends if you pull these out.

*If you don’t have small single cake molds as described you can use mini muffin trays or similar forms. In Sweden, disposable aluminum forms are often used, but stay away from single-use containers and do the best with what you have. We always encourage creativity!

Other Swedish baked classics

Semlor – cardamom rich bun is filled with almond paste and heavy whipped cream
Kanelbullar – Swedish Cinnamon Bun
Lussebullar – Saffron Buns
Pepparkakor – Ginger Bread Cookies (at EcoSalon)

This article was originally published at EcoSalon, 15 May 2012


Two Different kinds of Pesto: Sorrel and Basil & Celery

Some may think it’s silly to grow your own sorrel when you have it growing wild just around the corner. As the cultivated sorrel has a slightly milder and nicer flavor I believe its a great idea to include this sour and lemony herb in a  garden plot.

Its best is to harvest the young light green leaves, as when the leaves gets older and larger (darker green) they get tough and unpleasantly sour. Sorrel can be cooked like spinach for soups and omelets or raw in salads and pesto (see below). I also think the sourness in this pesto works terrifically well with fish, poached or cured. Spread on cracker this sorrel pesto can be a simple and delicious appetizer.

Sorrel Pesto

about 2 cups of young sorrel leaves
2 garlic cloves
a handful of walnuts
fresh red chili to your own taste (I use about ½”- 1″ depending on hotness)
½ cup grated parmesan
olive oil
a few sprigs of parsley (optional)
season with: salt and pepper

Pick about 2 cups of very young Cultivated Sorrel leaves. Rinse the leaves in cold water and drain while you prepare the other ingredients. Chop the walnuts and the chili a little. Grate the Parmesan roughly.
When the sorrel is dry, run them in the food processor (or use a mortar and pestle). Add chopped garlic and run the machine a bit before adding chili, walnuts, (parsley) and parmesan. Drizzle some olive oil over. Blend the mixture carefully as it should have a crunchy texture. If necessary add some more olive oil. Season with salt and fresh pepper.

Note: Sorrel contains plenty of vitamins but the plant contains some oxalic acid which is not healthy if eaten too much (especially if your body easily creates kidney stones). I think to have sorrel on a few occasions over the summer can hardly harm you.

This spring I have seeded plenty of basil and they are now all growing on my window sill. They are doing well but are still too small to be harvested. If you don’t have the patience to seed basil you can of course buy a plant from the plant shop. You can also sometimes find small pots at the vegetable shop which work really well replanted in a larger and nicer pot. I use basil to spice up almost any vinaigrette and as a main herb when making hazelnut baked cauliflower. Why not try basil as a flavor in cocktails! I like it with cucumber in my favorite summer drink pimm’s cup. Even if it’s well known, I still think basil on fresh tomatoes and mozzarella is magical.

This basil pesto is made with the addition of celery stems (and leaves) that gives a nice grassy flavor. Instead of pine nuts I use walnuts (or roasted sunflower seeds). I use this basil pesto with spaghetti, as side to vegetable patties or on bread topped with tomatoes.

Basil & Celery Pesto

2 stems of celery
about 2 cups basil leaves
two cloves of garlic
handful walnuts (or sunflower seeds)
½ cup fresh grated parmesan
olive oil
salt and pepper

Rinse the basil leaves carefully under cold water. Set aside and let dry while preparing the other ingredients. Chop the celery and garlic into small pieces. If the celery comes with leaves I would add them to the pesto as well. Mix all ingredients in a blender, starting with the basil, garlic and some olive oil. Add the celery, walnuts and lastly the grated cheese. Season with salt and pepper. Add as much olive oil as you like. Use less if you like to spread the pesto on bread and more if serving with pasta.

Both of these pesto variations, when packed nicely in a jar, are a great summer present – especially when you have a place in your garden where sorrel or basil grows better than any flowers.

If you like to learn more about sorrel I suggest reading Sarah Smith’s article about sorrel at The Foodie Bugle and Clotilde Dusoulier’s 50 Things To Do With Fresh Sorrel post.

Over at Food52 you can follow Amy Penningtons City Dirt column on how to grow plants from seeds etc.

this article was originally published at Ecosalon


Cured Trout for Easter

It’s Easter again and I’m planning to treat myself and guests to some cured trout. To cure trout I use the same method and ratio as when I make traditional Scandinavian gravlax. The recipe below is plain and simple. Not much more is needed for this delicate treat, but if you want to try something different you can add other flavors. Ederflower, ginger, crushed juniper or a shot of aquavit work really well. The list is endless.

Besides salmon and trout you can use this same method to cure other types of fish. Mackerel is an excellent option, and Keiko over at food blog Nordljus cured a good looking seabass with a scent of licorice. As I love licorice, I decided to add some toasted fennel seeds to my cure this Easter, which I think will go really well with the mild trout flavor.

for the curing you will need

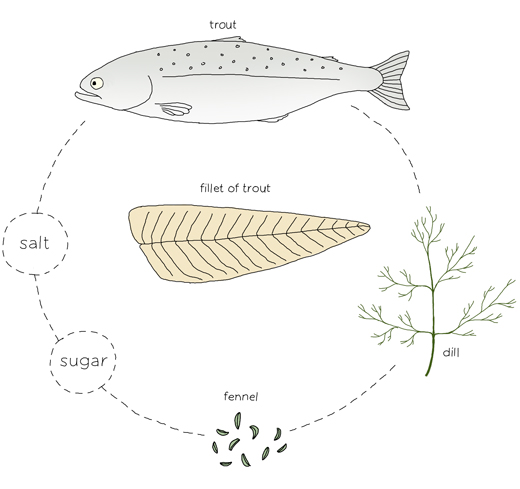
1 kilo (2 lb) trout fillet
1 teaspoon freshly milled white pepper
4 tablespoons salt
4 tablespoons sugar
bunch of dill

toasted whole fennel seeds (optional)

for decoration
fresh dill
lemon

Note: The trout should be frozen one or two days before you start the curing. The freezing will eliminate unnecessary bacteria.

It’s not hard to fillet your trout yourself. The benefit is that you can use the remaining parts (except for the guts) to make an excellent stock together with bay leaves, carrot, celery, onions, dills stalks, some herbs like thyme, salt and pepper.

If you still think this is too messy, ask your fishmonger to fillet the fish for you but remind them that the skin should be kept on.

When you have your fillets ready. Rinse them in some cold water and pull out, if there are any, remaining bones with a pair of pliers.

Mix together salt, sugar and pepper. Rub the fillet with some of the mixture and sprinkle the rest on top of the fillets. Wash the dill and chop finely. Put the fillets together, meat against meat with the chopped dill and (if you like) some toasted fennel seeds (slightly crushed) in between. Wrap the fish in a plastic foil. Let the fish cure in the fridge with something heavy on top for 48 hours. Turn them now and again.

After two days, unwrap and clean the fillets. Start to slice the trout at the end of the fish into thin diagonal slivers using a fillet knife (or any other suitable knife). Garnish with some dill branches and slices of lemon. They can be served on toast or dark bread. However this fish is sensational on a thin “knäckebröd” topped with a drip of Hovmästarsås. Enjoy!

Hovmästarsås
Stir together 3 tablespoons mustard, 1 egg yolk, 1 tablespoon apple cider vinegar, 1 tablespoon brown sugar with plenty of chopped dill. Slowly start dripping in a little less than a 1/2 cup of olive oil into the mixture while stirring continuously (just like you make mayonnaise). If you add the oil too quickly the mixture can separate. The result should be a thick sauce. Season with salt and fresh ground pepper.

Before buying any fish check with Seafood Watch (US) for the most sustainable options.


This article was originally published at Ecosalon, 5 April 2012