Tag Archives: ecosalon

Minty Zucchini Salad

Every summer I enjoy fresh mint from my own little garden. I grow three quite common types: pepper, lemon and water mint. All three work really well for cooking and I use them regularly in teas or as a flavor in different kinds of drinks. A few crumpled leaves together with elderflower cordial are a perfect match (with or without gin). Crushed with ice and Lime Mint makes for fantastic mojitos or a refreshing ingredient in a Pimm’s Cup.

It’s easy to grow mint but if you’re not careful, mint plants can rapidly take over your garden plot. Their roots are aggressive and hard to exterminate, so best to plant them in pots or at an unused part of the garden where they can grow freely without interfering with other growing treasures.

There are many different types of mint, some more common and others more rare. A more rare example are mint plants that have the scent of different kinds of fruits such as pineapple and strawberries. There is even a mint that has a clear flavor of chocolate. Not sure what I would do with this kind of mints but it’s funny as pineapple, strawberries and chocolate are all great companions to mint. For example in this strawberry salad, you can switch basil for regular mint.

Earlier this year in Marrakesh, I got inspired by the simple way they use mint in different kinds of salads. The salads were often just tomato, peppers and red onion cut into tiny pieces and blended together with finely chopped mint leaves, a squeeze of lemon and olive oil. Simple and delicious.

Anna Brones‘s mother makes a fresh mint pesto and it sounds perfect drizzled over a potato salad or even a grilled lamb chop. When the summer is here you may prefer something cool to eat instead of hot meals from the stove. A fresh red pepper and tomato salsa is an excellent choice. And a watermelon and feta salad makes a perfect starter or as a side for grilled meat and vegetables.

One of my latest treats is this simple and warm Zucchini & Feta Salad that is great to serve together with vegetable patties.

Warm Zucchini & Feta Salad

(for 2-4 people)

one – two zucchini
olive oil
some salt
some chili (fresh or flakes)
one or two clove of garlic
lime
¼ lb (100 g) feta
about 10 leaves of fresh mint

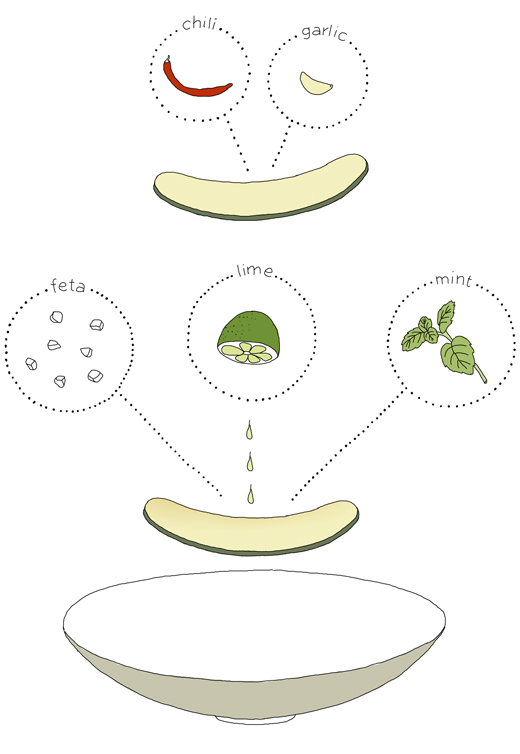
Wash the zucchini and cut thin slices along the long side (you may want to cut the zucchini in half crosswise first). Sprinkle some salt and olive oil over. Heat up a pan with some chili and fry the zucchini slices at a semi high heat (you may also put them on the grill or roast them if you like). Just take a few at a time as they shouldn’t touch each other while cooking. When the slices start to brown, turn them over. Just before they are done squeeze some garlic over. When the garlic has melted and the zucchini has a nice color, transfer them over to a serving dish. Repeat until all zucchini slices are done. Squeeze some lime and drip it all over the salad. Cut or crumble the feta and sprinkle it over the salad together with finely chopped mint. Season with salt and pepper if needed. Serve immediately.

 This recipe was originally published at EcoSalon on 22 March 2012

Spätzle – German Egg Noodles

Årsta fältet, a flat field in a suburb of Stockholm, may not be the most exotic place to visit in the capital city of Sweden. But somewhere in that field I had one of my most peculiar food memories ever. It was there I ate spätzle (or maybe it was Hungarian nokedli) for the first time in my life. The spätzle was served with a rich goulash that we made in a hanging cast-iron pot over an open fire. This is that kind of moment that is hard to recreate.

The goulash was amazing but it was the spätzle that won my heart. Since then I’ve been treated to spätzle again and again and I love it as much every single time. However not many cooks have been able to share their recipe as they cook it by instinct without any instructions. Fair enough, I just had to start figuring out my own way.

I started by playing around with different recipes I found online. The result was often not that great which probably had more to do with the choice of flour than the recipe. I discovered that, for example, pastry flour (why use that in the first place?) made the batter taste really floury in an unpleasant way. I also tried adding fresh grated potatoes but then it became halušky (potato noodles). At some point I gave up and started to use just regular wheat flour. The result made me very happy and pleased!

Recently I followed Steen Hanssen’s recommendation to use dinkelmehl (spelt flour). The spätzle became darker and had a slight nutty taste. I liked it.

for the batter
(2-3 people)

3 eggs (depending on size)
¼ cup of lukewarm water
about 1¼  cups of spelt flour or regular flour
pinch of salt
some freshly grated nutmeg
a couple of tablespoons of butter

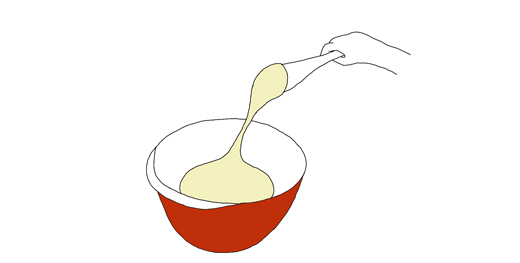
Heat up some water until its just lukewarm. Mix together eggs, water, nutmeg and a pinch of salt. Gradually start adding flour, little by little. Make sure to avoid creating lumps. The dough has got enough flour when its a little stretchy and easily falls off you spatula without breaking. If you get the dough too stiff, just add some more water. Let the dough rest for about half an hour.

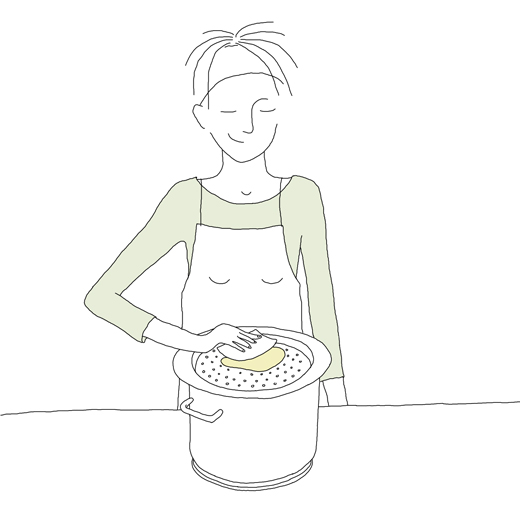
There are many different ways to “form” the spätzle and its probably very individual which method you may prefer. I have tried some techniques with more or less success. I think using a spätzle lid is the easiest and my kitchen doesn’t ends up in a mess (see image above).

Heat up some salted water in a large pot that will fit the spätzle lid nicely (see below for other methods). Bring the water to a boil. Lower the heat. Place the lid on top of the pot and add ¼ of the dough on top. Start to press the dough down with a spatula (often comes w/ the lid). Stir around the spätzle a little so they don’t stick together. The spätzle are done after about 2-3 minutes when they float up to the surface. Use a skimming ladle to fish them up. Repeat above steps until the dough is finished. Adjust the heat if necessary. Add some melted butter to the spätzle so they don’t stick together.

Serve the  spätzle with a rich goulash, creamy mushrooms or baked in the oven topped with cheese.

Other methods (and there are more)
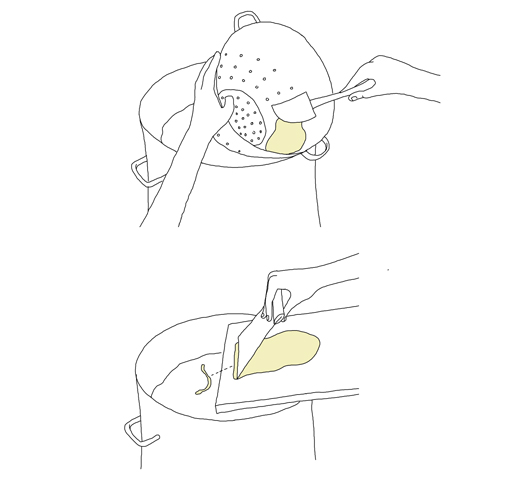
Another technique is to use a pasta strainer, preferably those with larger wholes. My stainless steel strainer worked fine, even if it was a little clumsy, the spätzle came out pretty nice, tiny and delicate! Just let the strainer rest at an angle on the edge of the pot (see image above) and use a soft spatula to press down the batter through the holes into the hot water.

If you want larger spätzle you can use a smaller chopping board and a chef knife or a bench scraper. Place one batch of dough on the chopping board and let it rest at an angle at the edge of the pot. Start to cut small pieces of the dough right into the boiling water. It worked okay and probably would be better with practice.

Recipe and drawings was originally published at EcoSalon, on 11 March 2012

Roasted Mackerel

Lately I haven’t cooked or eaten fish that often. There is no good excuse for this other than I have been confused about which fish is ‘correct’ and safe to eat. Many of you probably already know that we should be careful which salmon, shrimps and tuna we choose to eat, that we should really start to cook and eat other fish that are more sustainable and healthy. But that is not an easy task, as which fish to eat varies from country to country (and it can vary even in the same country).

I’m happy that one of my favorite fishes, mackerel, seems to be a safe choice, both in Sweden and the US . According to Vanessa Barrington, at EcoSalon, Mackerel doesn’t have high levels of mercury (except for the king mackerel which has) and the fishing method used doesn’t damage the bottom of the sea. Mackerel has a rich flavor and you don’t really need to add much to enjoy this fish. It’s great in soups, filleted or cooked whole (see below) and can be roasted, baked or poached. You can also smoke or cure it.

Mackerel makes me long for summer, especially Swedish summers when the sun doesn’t go down until around 11pm. When I was a little girl we often went to the west coast to rent a boat and fish all day. Mostly we caught cod and mackerel but sometimes we also got garfish (not listed). In the evening when we all were hungry and tired we would get back on land or find some tiny unsettled rocky island, collect firewood and broil mackerel over an open fire. The whole fish was stuck on a wooden stick (cleaned and gutted) and just simply seasoned with salt and lemon.

Now this is not easily done every day but there are definitely ways to enjoy fish at home all year around. My latest recipe was created after I got inspired by Melissa Clark’s recent article on whole roasted fish. The article was such a great reminder that its about time I start to cook whole fish again.

Roasted Mackerel with Buttered Shallots
for two

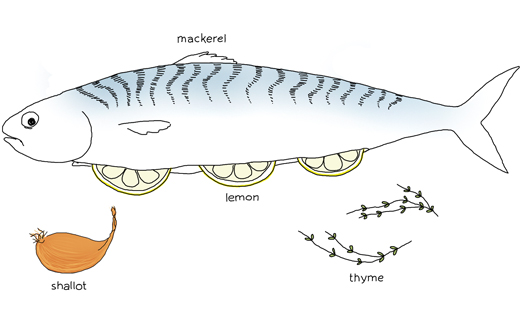
one or two whole mackerel (about 1-1 ½ lb)
one lemon
freshly grounded pepper
a splash of olive oil
one shallot
10 sprigs of fresh thyme
about 2 oz butter

Clean and gut the mackerel. Take a paper towel to pat the fish dry. Rub inside and outside of the fish with one or two slices of lemon. Sprinkle salt and pepper all over the fish. Slice the rest of the lemon thinly and chop the shallots finely. Fill the stomach of the mackerel with some of the slices and leave about half for later when serving the fish. Place ½ of the shallot into the cavity together with a few sprigs of thyme. Place the fish in a greased baking pan. You can also bake on top of foil on a baking tray. Sprinkle some olive oil over and roast the fish at 400°F for about 20-30 minutes. The fish is done when the meat is white and the meat easily loosens from the bones.

While the fish roasts, melt about half of the butter and saute the shallots on a really low heat until soft. At the end add more butter and plenty of thyme.

Serve the fish with buttered shallots together with roasted vegetables such as parsnips and carrots. The mackerel is also great with a simple salad made of roasted red pepper, feta, watercress and toasted sunflower seeds.

Here is some more good stuff about fish…

The good Fish of the Pacific Coast by Becky Selengut

Seafood Watch (US) (check out their app for Android and iPhone)

WWFs fisk guide (Sweden)


This article was originally published at EcoSalon, 2 February 2012 

Cooking in Marrakesh – Semolina Pancakes


The best tagine I have ever had is the one I cooked myself while attending a cooking class in Marrakesh, Morocco. Its probably also the only proper tagine I have ever had. Raja (the cook) who really did most of the work that day, also led me carefully through and demonstrated every step in how to make other traditional Moroccan dishes such as salad, Berber bread and chocolate layered semolina pancakes. I watched and learned. Smelled and ate. It was absolutely my best day in Marrakesh.

The day started at an indoor market in Mellah (one of the neighborhoods inside Medina) where I could pick meat and vegetables for the cooking lesson. The market had everything from meat (even live chickens), vegetables, bread and milk. We got some beef, carrots, zucchini, tomatoes, potatoes, chili and olives for the tagine and some apricots, eggs and dark chocolate for desert.

The salad we made was really simple and fresh. Just finely chopped onion, cucumber, yellow pepper and tomato. Seasoned with a splash of olive oil, salt and freshly chopped mint.

The beef tagine was cooked in a traditional ceramic tagine cookware on low heat for about 3 hours. At the bottom we arranged onions, garlic and chopped fresh cilantro. The cookware was placed on the stove and the heat was set to low. The meat was placed on top and spices (ginger powder, cumin, paprika, salt and black pepper) were added at the edges around the meat. When the meat had been turned once we arranged carrots, potatoes, zucchini, one whole chili, ½ lemon, olives and parsley on top. Lastly we poured in a mixture of both olive and sunflower oil. Before the tagine “hat” was placed on top, a little water was added. Now and again we scooped up the cooking liquid and poured it over the vegetables and meat. In this way all ingredients got a nice taste of the spices without moving them around.

The semolina Berber bread  we made was baked on top of the stove in a skillet. In Morocco, bread is  served to almost any meal during the day and a must when having tagine. Raja’s recipe used only semolina flour but I stumbled upon some breads in the city that seem to have a mixture of semolina and wheat flour. Unfortunately they were not as nice. Our local deli (a hole in the wall) in Kasbah sold something that looked like a rye version of the bread. That was amusing!

The sweet dessert semolina pancakes were really the thing that won my heart and also something that was new to me. These pancakes should not be mistaken for the more well known pancake, begrhir. Begrhir is a yeast based semolina pancake that is often served for breakfast with honey. These pancakes are baked on only one side and the yeast create decorative holes on the surface. Raja’s dessert pancakes were sweeter and made with baking powder. They create similar decorative holes but are baked on both sides.

Below I have tried to translate Raja’s semolina pancake recipe as best I could. Raja used a typical Moroccan teacup when measuring the ingredients, so her cup measure was slightly less than a standard measuring cup. My recipe is as close as I could come!

Sweet Semolina Pancakes
serves 2-4 people

one egg
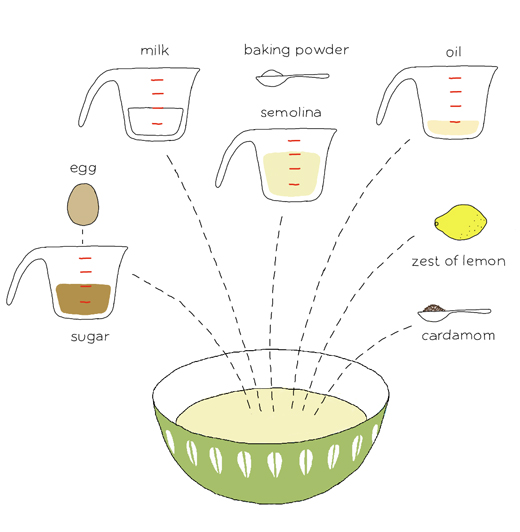
½ cup sugar ( I used sucanut)
½ cup milk (+ more if batter is too thick)
¾ cup semolina
one teaspoon baking powder
¼  sunflower oil (optional)*

zest from one lemon**
one teaspoon ground cardamom**

I don’t really remember the order Raja mixed the ingredients together but I did it this way: Whisk egg and sugar until well blended before adding the milk. Mix together semolina flour and baking powder. Add the semolina mixture to the batter and whisk well together (make sure there are no lumps). Add the oil, lemon zest and cardamom. Let the batter rest for 15-30 minutes before baking the pancakes.

Heat up a frying pan with some neutral oil (if using nonstick you don’t need any oil in the pan). When the pan is hot lower the heat to medium. Spoon up some batter in the pan with a sauce ladle (You may need to add more milk to the batter if it’s too heavy. It should be fairly easy to pour into a pan). When the pancake has nice decorative holes and starts to get firm on top flip the pancake over. The other side should now have a nice brown color. Press down the pancake with your spatula so the pancake doesn’t rise. Continue until done. Repeat until batter is finished.

It may take some time to get used to how much batter you need for every pancake. A finished pancake should be about 1/8” thick.

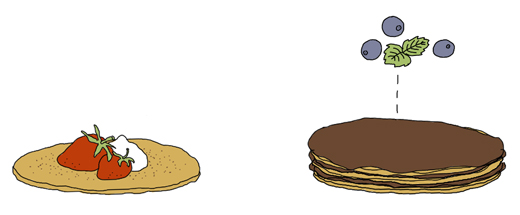
Serve the pancakes with sour cream and seasonal fruit and berries for breakfast or brunch. I loved it with a simple apple & orange fruit salad spiced with mint and chopped pistachio. The pancakes can also be done as Raja’s desert, layered with melted dark chocolate (she added some neutral oil to the chocolate) and topped with fresh mint and fruit of your choice. Serve it cool when the chocolate is firm.

*Raja used some neutral oil in the batter and fried the pancakes in a non-stick frying pan. As I didn’t use a non-stick pan I learned that the pancakes got a little greasy with oil both in the batter and in the pan.  They still tasted great but got firmer and easier to handle with oil only in the pan.
**Raja didn’t flavor her pancakes with cardamom and lemon, instead she used 1-2 teaspoons vanilla sugar. I just didn’t have any at home when re-creating the recipe. Both versions are equally delicious.

If you planing to go to Marrakesh and want to participate in a cooking class, I can warmly recommend Raja’s class. Contact Jean Peres at Riad Dar One for details and booking.

Story and recipe was originally posted at EcoSalon on 19th January 2012.

Glögg (Swedish Traditional Mulled Wine)

With or without snow there’s not much that’s as heart warming as glögg (Swedish traditional mulled wine). In wintertime, around Christmas, the rich smell is so welcoming its no wonder its such a successful way to treat your guests. Last winter I had to warn my guests that even though the wine was served hot it was not low on alcohol. They didn’t believe me, so I was happy they could all walk home safely after our joyful evening together.

Like other Swedes I’m used to buying glögg already spiced at the Systembolaget, which is the one and only company that can sell liquor in Sweden. Systembolaget has an impressive selection of wine from all around the world and they have over 40 different kinds of glögg, both with and without alcohol. There is even a white glögg which is commonly served cold as an apertif at parties around Christmas. With a selection that great it’s hard to even think of making your own, unless you are a Swede like me living abroad. So I started, and today I can’t ever imagine going back. At Christmas I want my own glögg. And the glögg has to be done with some drama by caramelizing the sugar.

glögg recipe

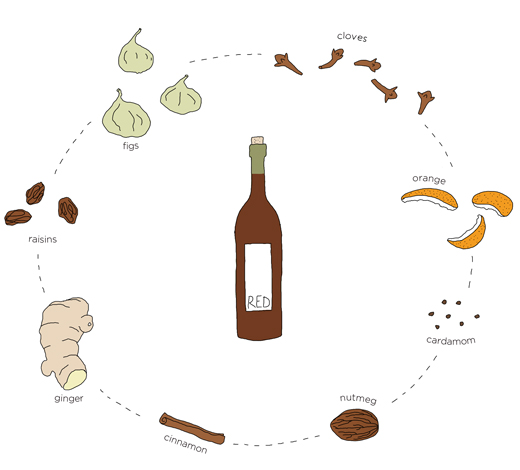
one bottle of red wine (a decent full bodied wine such as Cabernet Sauvignon, Syrah)

spices
3 cinnamon sticks
one teaspoon whole cloves
one teaspoon ground nutmeg
2 peels of an orange
5 whole cardamom pods
one small piece of ginger, chopped
20 raisins
a couple of dried figs

for caramelizing
one cup (240 ml) rum
1/3 cups (75 ml) brown sugar

to serve with
blanched almonds
raisins

Heat up the wine but be careful, the wine should not boil. Drop all the spices into the warm wine, turn the heat off and let rest covered for at least 4 hours (best overnight).

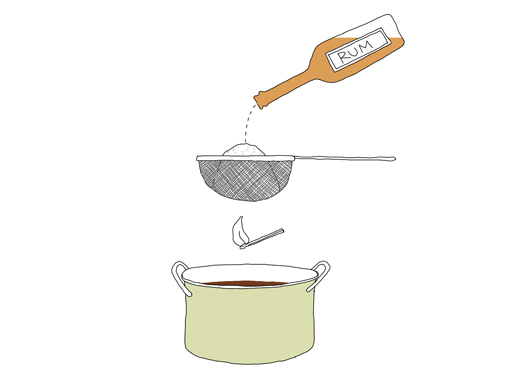
Sieve the spices from the wine and heat it up in a saucepan. Again make sure it doesn’t boil. In the meantime prepare a stainless strainer filled with the sugar. When the wine starts to get hot, place the strainer over the saucepan. Pour the rum over the sugar and light the alcohol steam below. Let some of the sugar drip into the wine mixture before adding all to the wine (if you wait for all the sugar to melt the alcohol will disappear with the flames). Take the saucepan from the heat and cover with a lid to stop the flames. If you think the glögg is too sweet you may add some more wine or rum.

Serve the glögg in small cups together with some blanched almonds and raisins in every glass. Glögg is also great with gingerbread cookies.

Story and recipe was originally posted at EcoSalon on 21st December 2011.