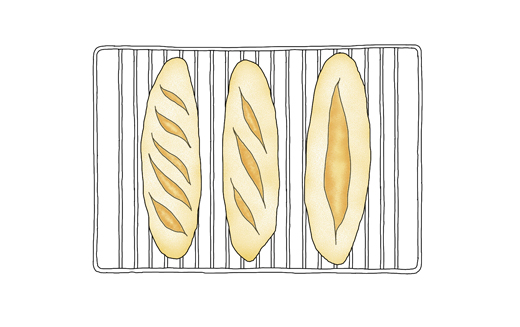
Tag Archives: starter

Sourdough Starter Diagram

© Johanna Kindvall

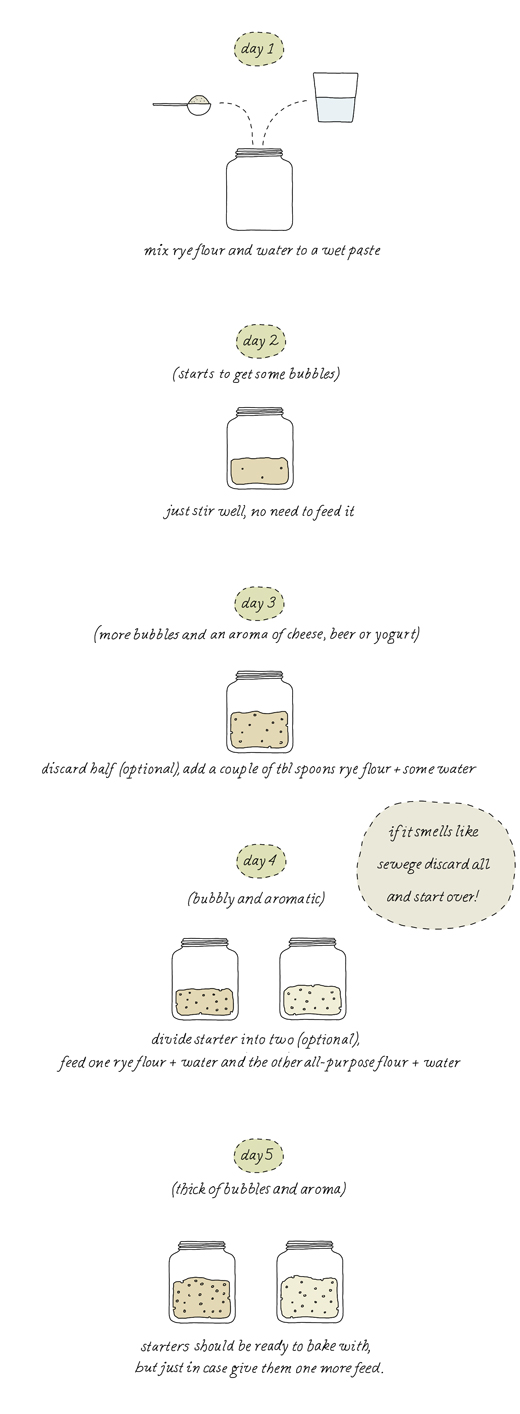
Currently I’m working on a new design of kokblog. I’m planning to launch the new design next week. In this process I have decided to turn some of my pages into posts. And one of them is my diagram on how to make a Sourdough Starter.

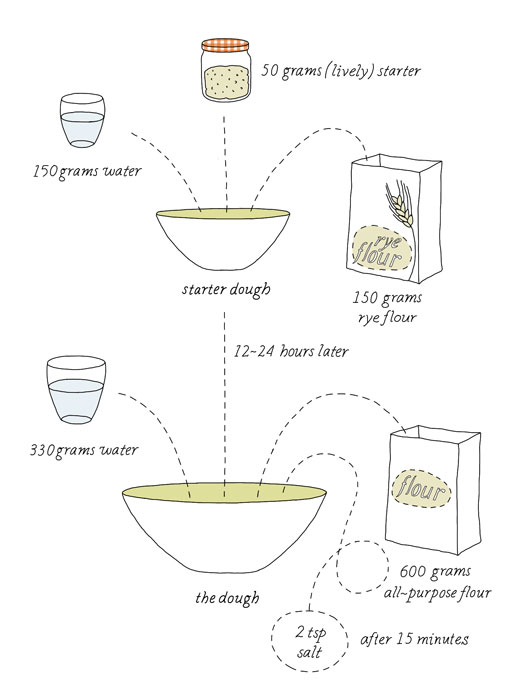
Description: The above diagram is just one way to start a sourdough starter. At the end you will have one rye and one wheat starter. I use either starter for most of my breads. The wheat starter can also be used in a sweeter dough like for e.g. Cinnamon Buns etc. I bake with my starters 1-2 times a week (sometimes even more). I keep them in my fridge and take either of them out one or two days before I want to bake. Depending on how long it has been without ”food”, I feed it once or twice with a few tablespoons of flour and a little water. I keep my starters small, in that way I always have just enough and there is no need to discard anything. I have kept a starter in the fridge (without feeding it) for up to 3 weeks (not recommended). You can also freeze the starter if you are not planning to bake for a longer time. Just give the starter some time to recover by feeding it once or twice every day for a couple of days before baking. When the starter is lively and full of bubbles it’s ready to bake with. My diagram is based on Iban Yarza‘s How to Make a sourdough starter video.

NOTE: Since I published this last year, I have discarded my rye starter (I simple baked it up). It was just easier to keep one. If I ever want to use a rye starter I feed one part of my all-purpose starter with just rye flour for a couple of days.

*
Links to my sourdough breads

Sourdough Bread with Rye

Plain Sourdough Bread

Wild Fennel Knäckebröd at Case Vecchie


Sourdough Bread with Rye

One of my fun jobs this summer was to design chocolate packaging for Francoise Villeneuve at Wiggley Leroux Confections. My job was to create a label and a chocolate bean pattern for the chocolate bar wrapping paper. It was such a pleasure to work with Francoise on this project and her delicious confections are now available at BaconN’Ed’s food truck, Reston Station, Washington, DC.

Last week I was in Laramie, Wyoming to draw animals for the public art installation AnimalEyes by Walczak & Heiss at the Berry Biodiversity Center. It was great fun and I learned loads of cool stuff about local animals such as horned lizards, prairie dogs and bumble bees etc. Did you know that an ant queen can reach an age of 30 years? And that there used to be camels here?

On this trip I brought bread, which our hosts welcomed enormously. They served it with their in-house Roman dried tomatoes and pheasant gizzard confit. Wonderful!

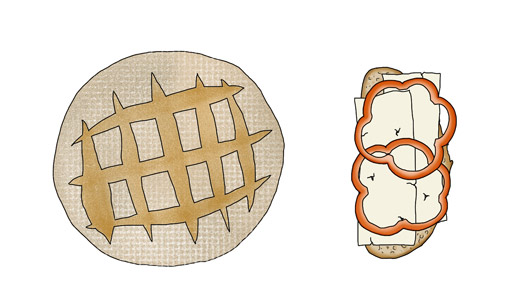
This bread is also excellent, sliced thin, topped with aged cheddar and slices of fresh red pepper. This Autumn, I will have it as much as I can with a cup of strong black tea in front of the fireplace (or with my feet up on the radiator).

Sourdough Bread with Rye
one small boule

starter dough
50 gram well fed and lively sourdough starter
150 gram water (about 2/3 cup)
150 gram (1¼ cup) rye flour

2nd dough
330 gram (about 1 1/3 cups) water
600 gram (about 4¼ cups) all purpose flour
2 teaspoons salt

starter dough: For the 1st dough, mix together the starter together with water and rye flour. Cover and let sit for 12-24 hours in room temperature.

the dough: Add water to the starter dough and stir before adding the flour. Mix everything well together. Let rest for 15-30 minutes before adding the salt. Work the dough some more to distribute the salt evenly and form a ball (I find it easier to do this directly on the countertop). Place in a slightly greased bowl. Cover with a plastic bag.

Stretch and fold 3 times with 45 min intervals. After last stretch and fold let the dough rise for about one hour.

Shape the dough into one round boule. Set aside for about 10 minutes and shape again. Place it with the seam side up in a round floured banneton. You can also use a normal bowl with a well floured tea towel.

Cover with the plastic bag and let prove for 2-4 hours.

About 30 – 60 minutes before baking your bread, set the oven to 500°F (260°C). Place a baking sheet or baking stone into the oven. A stone will need more time to heat up than a baking sheet. If you want steam during baking, place a tray under the baking sheet. I fill it with boiling hot water just before I bake the bread.

When it’s time, take out the warm baking sheet (or stone) from the oven. Carefully transfer the shaped boule onto the hot baking surface. Score the dough (see scoring links below) before transfer it to the oven. Lower the heat to about 450°F (230°C). Bake for 15 minutes, open the oven door to let out some steam. The bread should have risen up nicely and started to get some nice golden color. Bake for another 30 – 45 minutes.

The bread is done when it sounds hollow when knocking on the bottom. You can also check the breads inner temperature, which should be around 208°F (98°C).

Let the bread cool completely uncovered on a cooling rack before slicing.

*

More sourdough breads on kokblog

Plain Sourdough Bread
Sourdough Knäckebröd

Other useful links

Slashing or Scoring your Dough by Azelia’s Kitchen
Scoring Bread – post at Fresh Loaf


Plain Sourdough Bread

About two years ago I started my two sourdough starters, wheat and rye. Both of them are still active and have been with me back and forward to Sweden, London and Brooklyn. This summer I will bring them to Sicily and Amsterdam.

The breads I bake are often simple, with or without extra flavor (for e.g. Caraway, fennel or anise seeds, rosemary etc). The flours I mostly use are regular unbleached flour, whole wheat, dinkel or rye flour (mixed with regular flour or 100%). I have also baked with the addition of sunflower seeds, linseeds, prunes and with beer or my home made kefir instead of water. I also bake sourdough knäckebröd.
(I will share more of this eventually). The variations are endless, but I am always amazed how good just flour, water and a little salt can taste.
Plain Sourdough Bread
adapted from Peter Reinhart’s recipe of San Francisco Sourdough Bread, “artisan  bread every day”, Ten Speed Press, 2009.

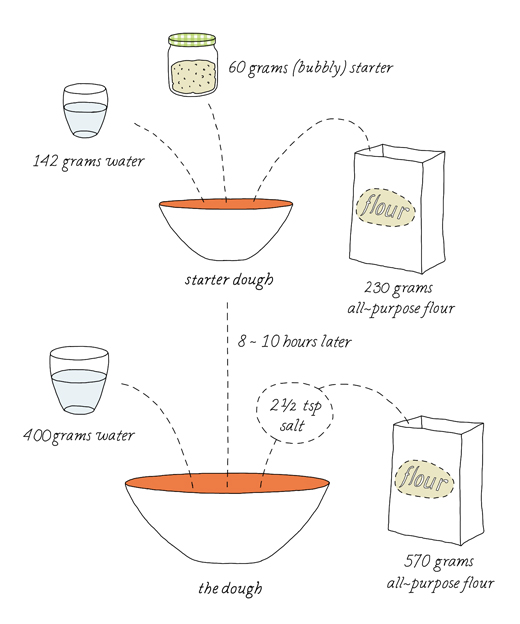
gives 1 large, 2 medium or 3 smaller loaves

starter dough

60 grams (about ¼ cup, 60 ml) lively starter (rye or wheat), at room temperature
142 grams (2/3 cup,  a little less then 150 ml) water, at room temperature
230 grams (1 2/3 cups, 400 ml) all-purpose flour (unbleached)

the dough
(8-10 hours later)
all of the first starter dough
400 grams (1 ¾ cup, 400 ml) water, at room temperature
570 grams (4 cups, 945 ml) all-purpose flour (unbleached)
2½ teaspoon salt

starter dough (I suggest in the morning)
Mix together starter with water and flour until well blended and you can form a ball (this starter dough should feel like a dough and be sticky). Transfer to a slightly floured flat surface and knead for about a minute. Place the dough in a bowl and cover with plastic wrap. Let rise for 8-10 hours (or overnight).

the dough (for e.g in the evening)
Divide the dough into 10 equal pieces. Place them in a bowl and pour over the water. With your fingers or a spoon loosen the pieces up in the water.
Add the flour and salt and mix together until well blended.
Let the dough rest uncovered for about 5 minutes.

The dough should feel slightly sticky and be flexible (add more flour or water if necessary). Transfer the dough to a slightly floured flat surface and knead for about 1-2 minutes.
Let the dough rest uncovered for 10 minutes.

Stretch and fold the dough. Form the dough to a ball and place in a bowl (slightly oiled), cover with some plastic wrap. Repeat the stretch and fold 1 – 2 times with 10 – 30 min rest in between.

Let the dough rise at room temperature for 1½ hour to 2 hours and place it in the fridge overnight.

The dough should have grown a little larger and it will increase in size some more in the fridge. (if you want to skip a slow rise in the fridge just let the dough rise outside for 3 – 5 hours before shaping).

Take the dough out of the fridge at least 4 hours before you plan to bake the bread in the oven.
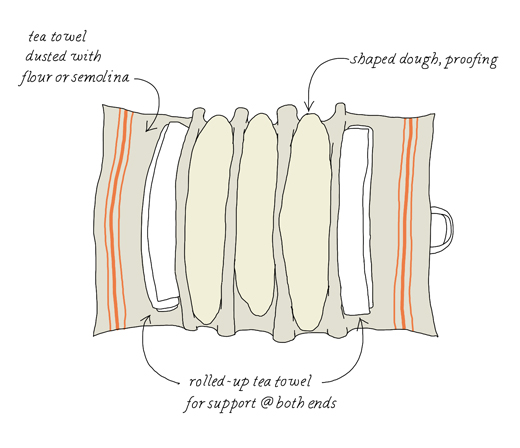
After about 2 hours, shape the bread into 1, 2 och 3 loaves.

Flour all around and place on a floured (all purpose or semolina flour) tea towel (or use a bakers couche), see illustration above. Cover with a tea towel and let proof for about two hours.

About ½ hour before baking, preheat the oven to 250ºC (480ºF). Place a baking sheet in the oven plus a smaller baking tin (for water to create steam while baking) on a rack underneath. If using a baking stone (which I don’t) you will need to preheat the oven earlier.

When it’s time, take out the warm baking sheet from the oven. Carefully transfer the shaped dough and drop each one onto the hot surface. Score the dough in a pattern you like with a sharp knife or a bread slashing tool (I use my sharp serrated bread knife).

Place the baking sheet in the oven. Pour some water, hot or cold into the baking tin below. Close the door.

After 15 minutes, open the oven door to let out some steam. The bread should have risen up nicely and started to get some nice golden color. Depending on size, bake for another 15 to 30 minutes.
Repeat opening the oven door every 5 to 10 minutes (I have been told that this should give the bread a nice crust). You can also turn the breads upside down to get a nice brown color all around.
The bread is done when it sounds hollow when knocking on the bottom. If you are not sure just bake it a little longer.

Let the breads cool on a cooling rack before slicing, at least 1 hour.

This bread is a quite simple bread that works by itself, dipped in olive oil or spread with butter. Its also great with cheese (goat cheese with honey and thyme is my favorite), thinly sliced dried sausage or toasted with jam for breakfast.

* You can of course shape this bread into rounds as well. Place them in bread baskets (banetons) or like me in small serving bowls lined with a floured tea towels.

some more links

Sourdough Bread with Rye
Sourdough knäckebröd by kokblog
How to make a sourdough starter – movie by Iban Yarza (this is how I learned it)

3-2-1 Contact! – notes by Andrew Janjigian on how he feed levain (starter).
Pain de Martin’s bread movies
More shaping by Mark @ the Back Home Bakery
scoring bread post by the Fresh Loaf
Dan Lephard’s sourdough starter with raisins and yogurt post by Azelia’s Kitchen
Grilled Spicy Shrimps

Instead of enjoying the Swedish summer by growing vegetables and foraging for berries and mushrooms, I have been stuck with NY’s summer heat. I can’t say it has all been miserable though, it just hasn’t been the same. In Sweden I would have picked wild black cherries instead of gluttonized on local peaches. I would also have picked yellow chanterelles instead of trying to grow my own oyster mushrooms. Its all good as both places have their own unique quality.

I have found it a little hard to be in my kitchen cooking when the city gets too hot and humid. Some nights I end up just eating cold watermelon with feta or something like that. Delicious and simple. Luckily we have had direct access to a really lovely garden so many dinners have been cooked outside on the terrace. Often vegetables such as eggplant, zucchini and field mushrooms (sliced up and simply marinated with herbs, garlic, olive oil and tamari) served together with steak, just barely grilled and thinly sliced.Other specialties are BBQ’d mussels and shrimps (see below). The mussels can be BBQ’d as is and eaten with squeezed lemon. You can also precook them and grill them topped with garlic butter and breadcrumbs.

Grilled Spicy Shrimps

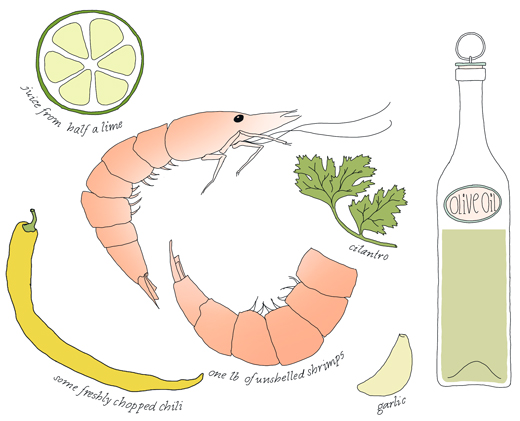
one lb un-shelled raw shrimps, small or medium
about ½ cup olive oil
juice from ½ a lime
fresh chili (what kind depends on how spicy you want the shrimps)
two cloves of garlic
plenty of cilantro
sea salt (seasoning)

Rinse the shrimps and let them dry. Mix together olive oil, lime juice and finely chopped cilantro, garlic & chili. Season with sea salt. Place all the shrimps on the grill on high temperature (but no flames). Turn the shrimps over to the other side when they have got some nice color (after about a minute). They are done when they are cooked through and they all have a nice pink color.
Drop the shrimps directly from the grill into the olive oil mixture. Stir around and serve immediately together with bread and salad.

This article was originally published at Honest Cooking, 27 August 2012

Before buying any fish check with Seafood Watch (US) for the most sustainable options.

Minty Zucchini Salad

Every summer I enjoy fresh mint from my own little garden. I grow three quite common types: pepper, lemon and water mint. All three work really well for cooking and I use them regularly in teas or as a flavor in different kinds of drinks. A few crumpled leaves together with elderflower cordial are a perfect match (with or without gin). Crushed with ice and Lime Mint makes for fantastic mojitos or a refreshing ingredient in a Pimm’s Cup.

It’s easy to grow mint but if you’re not careful, mint plants can rapidly take over your garden plot. Their roots are aggressive and hard to exterminate, so best to plant them in pots or at an unused part of the garden where they can grow freely without interfering with other growing treasures.

There are many different types of mint, some more common and others more rare. A more rare example are mint plants that have the scent of different kinds of fruits such as pineapple and strawberries. There is even a mint that has a clear flavor of chocolate. Not sure what I would do with this kind of mints but it’s funny as pineapple, strawberries and chocolate are all great companions to mint. For example in this strawberry salad, you can switch basil for regular mint.

Earlier this year in Marrakesh, I got inspired by the simple way they use mint in different kinds of salads. The salads were often just tomato, peppers and red onion cut into tiny pieces and blended together with finely chopped mint leaves, a squeeze of lemon and olive oil. Simple and delicious.

Anna Brones‘s mother makes a fresh mint pesto and it sounds perfect drizzled over a potato salad or even a grilled lamb chop. When the summer is here you may prefer something cool to eat instead of hot meals from the stove. A fresh red pepper and tomato salsa is an excellent choice. And a watermelon and feta salad makes a perfect starter or as a side for grilled meat and vegetables.

One of my latest treats is this simple and warm Zucchini & Feta Salad that is great to serve together with vegetable patties.

Warm Zucchini & Feta Salad

(for 2-4 people)

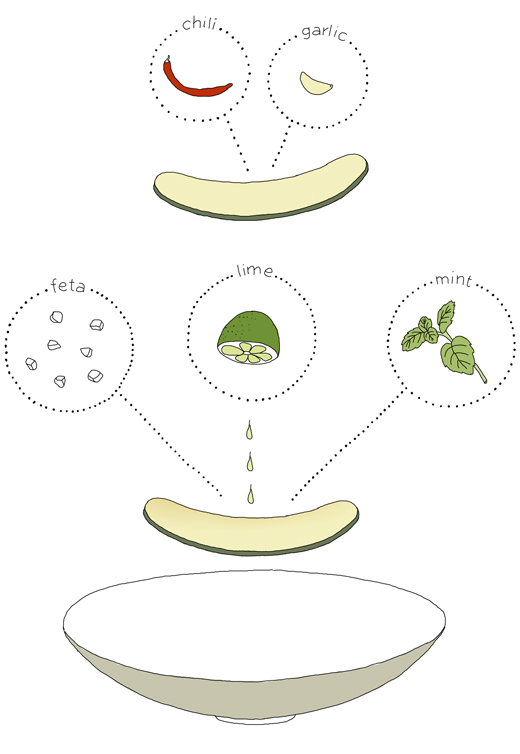
one – two zucchini
olive oil
some salt
some chili (fresh or flakes)
one or two clove of garlic
lime
¼ lb (100 g) feta
about 10 leaves of fresh mint

Wash the zucchini and cut thin slices along the long side (you may want to cut the zucchini in half crosswise first). Sprinkle some salt and olive oil over. Heat up a pan with some chili and fry the zucchini slices at a semi high heat (you may also put them on the grill or roast them if you like). Just take a few at a time as they shouldn’t touch each other while cooking. When the slices start to brown, turn them over. Just before they are done squeeze some garlic over. When the garlic has melted and the zucchini has a nice color, transfer them over to a serving dish. Repeat until all zucchini slices are done. Squeeze some lime and drip it all over the salad. Cut or crumble the feta and sprinkle it over the salad together with finely chopped mint. Season with salt and pepper if needed. Serve immediately.

 This recipe was originally published at EcoSalon on 22 March 2012