Category Archives: condiments

Concept of Smörgås & Snittar

In my latest cookbook, Smörgåsbord: The Art of Swedish Breads and Savory Treats, I want to encourage you to make small portions of a classic Swedish Smörgåsbord. A little like a Smörgåsbord tapas! Together with a flavorful bread, it’s a concept that works for everyday smörgås (open-faced sandwich) meals as well as for festive starters.

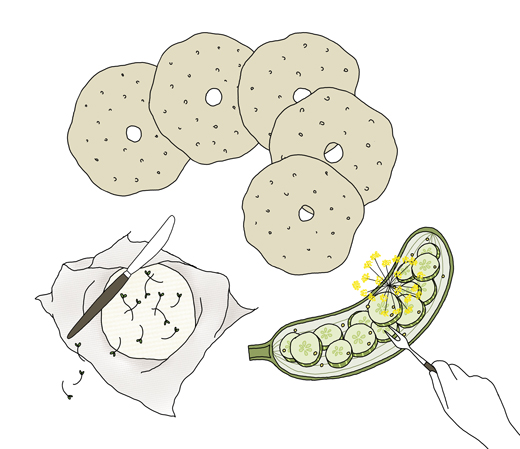
The first chapter is dedicated to Nordic breads, both classic and new creations, baked with either yeast or sourdough starter. As rye bread is the most distinctive type of bread throughout the northern countries, I have included five different types. But there are some tasty wheat based breads too and a stove-top baked flatbread made with barley flour.

The rest of the chapters concentrate on spreads and toppings you can serve with the breads for every day smörgås, seasonal treats or more festive occasions. The last chapter is where you will find condiments like pickles, whole grain mustard, crispy onions, and classic sauces. It’s that addition that can turn any dish or open-faced sandwich into something more special. In my opinion the best smörgås is built up with several combined toppings.

As a starter for your upcoming holiday dinner parties or just as a treat for yourself, I suggest you serve a few of the dishes arranged separately at the counter and have everyone build their own little treat. You can also create snittar, Swedish tiny open-faced sandwiches, by cutting the bread into squares, rounds or triangles, and top them with any spreads of your choice. Here are a few of my favorites snittar that are based on recipes from the book:

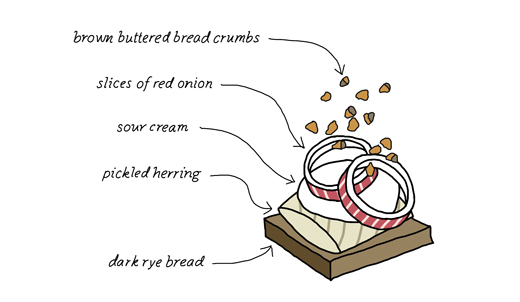
Pickled Herring with Sour Cream, Red onions & Brown Buttered Bread Crumbs – Pickled herring is a staple in Sweden and comes in many different flavors, either in vinegar or with cream. I love herring and like many Swedes I eat it all year around. In the book I share two of my favorites, a creamy mustard herring and a vinegar based herring spiced with rhubarb, cloves, and cinnamon.

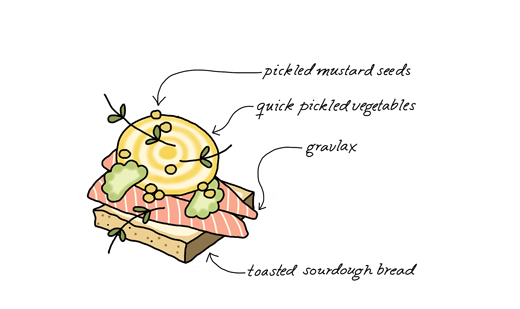
Gravlax on Toasted Sourdough Bread topped with Fresh Pickled Vegetables and Pickled Mustard Seeds – If you plan ahead, gravlax is a simple and festive smörgås topping that can be flavored and paired in many different ways. The most classic is to serve it with simple mustard sauce or as in Finland with Fresh Pickled Cucumber (pressgurka). My version of gravlax is cured with fennel seeds and I warmly recommend it served on toasted sourdough bread and topped with Quick Pickled Vegetables and Pickled Mustard Seeds. (You can find all these recipes in the book).

Roast Beef with Danish Remoulade and Crispy Onions on Danish Rye Bread – This is a very common smörgås or smørrebrød combination in both Sweden and Denmark. The remoulade, which is a mayonnaise based sauce spiced with curry, pickles, capers, parsley and tarragon, is simply whipped together and pairs surprisingly well with roast beef and crispy onions (rostad lök). The Danish rye bread, baked with loads of whole rye berries, sunflower seeds, flax seeds, and toasted sesame seeds, is a delicious and wholesome bread. Instead of roast beef, I’m sure this little treat can easily be done with some leftover Thanksgiving turkey.

For every recipe in the book you will find several more pairing suggestions. I hope you will find it useful and inspiring enough to find your own special Smörgås combinations.

And there is of course always the option to create a whole feast too! If you plan it well, it doesn’t have to be that complicated and for many dishes like cured ham, gravlax, and pickles most of the process takes place when you are at work or doing other things.

If you bake or cook anything from the book, I would love to see it! Please share it with me here in the comments or tag it with #ArtofSmorgasbord on instagram, twitter, or facebook.  A selection will be re-posted or linked to here on kokblog.

*

Smörgåsbord
cooking & baking by others:

Danish Rye Bread & Rustic Rye Bread
baked by Kira Nam Greene

Tweaked version of Rustic Rye Bread
baked by Jeremy Shapiro

Rustic Rye Bread
baked by Kira Nam Greene (1st bake)

*

other related links

upcoming Smörgåsbord events

talking Smörgåsbord on Off the Menu
with Dara Moskowitz Grumdahl
at WCCO | CBS Local Minnesota
(October 28, 2017)

Foodrepublic
want to make Smörgåsbord tatoos

Smörgåsbord interview
on Martha Stewart

you can read more about the book
here and here


Don’t have your own copy of Smörgåsbord? You can get it in almost any bookstore online all over the world! Here are a selection of bookstores… Random House, Barnes & Noble, Indie BoundAmazon (US), and Amazon (UK).

Cult Vinegar and Fresh Pickled Cucumbers

The other day I was in London and met up with Jonathan Brown in Kings Cross to taste vinegar. Even though we never met in real life, it was like meeting an old friend. We met through twitter via our shared interest in Nordic cuisine and mushroom picking several years ago. In 2012 I had the pleasure of drawing mushrooms for Jonathan and his wife Sarah’s wedding. Each mushroom was made into a cute place card to organize the guests during their wedding feast. Jonathan and I also share an interest in sourdough, pickling, and other fermenting things. So when earlier this year I discovered that Jonathan had gone into business to make vinegar I felt it necessary to meet up in person when passing by London.

And o’boy his Cult vinegar rocks!

During a wonderful lunch (mushroom toast with some deep fried squid) Jonathan let me taste about 10 different kinds of his Cult Vinegar collection (several of which you can purchase online). For example; red wine vinegar (perfect in a dressing over sun ripe tomatoes), white wine vinegar (think mustard sauce and Hollandaise), moscatel vinegar (sweet and sharp like a white balsamic vinegar), ruby port vinegar (deliciously sweet and perfect in red meat sauces, waldorf salad dressing or together with blue cheese), sherry vinegar, German Riesling vinegar (perfect in a Fresh Pickled Cucumbers, recipe below), sake (should work beautifully in a dumpling dipping sauce), apple cider vinegar, and champagne vinegar (curiously citrusy and sharp which I liked on the fried squid).

In 2011 Jonathan and Sarah traveled to Burgundy, France to hunt for their wedding wine. In a country side kitchen just outside Beaune they got introduced to a vinaigrier container; a very traditional ceramic vessel that lets natural bacteria in the kitchen turn leftover wine into vinegar. The initial incubation takes about 6 to 8 weeks – once alive it will last forever if topped up with the occasional half glass of wine.

Jonathan quickly got addicted to the living smell of vinegar, so back home in London he started to make his own while playing with the idea of creating a modern version of a traditional French vinaigrier. A few years later after visiting a local ceramic school he connected with ceramicist Billy Lloyd and together they took on the challenge to design a new version. The result is the Cult Ceramics Vinegar Vase which is both beautiful and clever. With it’s hexagon shape and three different colors on the lids (red, white, and yellow) you can easily group several vases together and have different types of vinegar in the making at the same time. The vase comes with a handy “How-to- Guide” booklet and a bottle of a vinegar culture (the “mother”) so you can start your own vinegar production as soon as you have unpacked the vessel.

Back in Brooklyn I have now started my first batch of white wine vinegar. Every time I walk by the vessel I can’t stop myself from lifting the lid to have sniff. I think I’m addictive already!

Here is a classic recipe for pressgurka, Swedish fresh pickled cucumbers. Normally these pickles are made with distilled white vinegar but some German Riesling Cult vinegar will make it extra special. If you don’t have a Riesling vinegar on hand, substitute with Champagne vinegar or a good quality white wine vinegar. Try the pickles with meatballs, gravlax, or on a smörgås (Swedish open-faced sandwich) with cheese.

Swedish Fresh Pickled Cucumbers
(adapted from my recipe in Smörgåsbord)

serves 4 to 6 as a side

1 medium (about 12 ounces, 340 grams) English cucumber
1 teaspoon kosher salt
1/4 cup (60 milliliters) German Riesling Cult vinegar + more if needed
1/4 cup (60 milliliters) water + more if needed
2 tablespoons sugar
2 tablespoons finely chopped dill or parsley
freshly ground white pepper, for seasoning

Rinse the cucumber in cold water. Slice it with a mandoline, cheese slicer, or potato peeler as thin as you can.

Arrange the slices in a wide colander and sprinkle them with the salt. Toss gently to distribute the salt evenly. Press the cucumbers down with a plate that fits within the colander and place something heavy on top. Let sit for about 30 minutes, at room temperature. (The salt and the heavy weight will help drain the water from the sliced cucumber.)

In the meantime, prepare the pickling liquid. In a small bowl, mix together the vinegar water, sugar, and dill. Mix until the sugar is completely dissolved. Adjust the acidity with more vinegar or water to your liking.

Remove the weight and the plate and squeeze gently with your hands to remove any excess liquid. Place the cucumbers in a bowl or in a clean glass jar and pour the pickling liquid over them. Let sit at room temperature for at least an hour before serving.

These pickles are best eaten fresh so consume them within a few days. Store in the refrigerator in a sealed container.

*

related links

read more about Jonathan and his story here

fungathlon – half marathon with mushroom foraging,
invented and practiced by Jonathan Brown

Cult Ceramics & Cult Vinegar on Instagram

more work by Billy Lloyd

Classic Hollandaise Sauce by Ruhlman

How to make French Vinaigrette by David Lebovitz

Apple Cider Vinegar – kokblog recipe

*

Chile Crisp by Andrew Janjigian

kokblog-chili-crisp-jar

A few weeks ago I got an interesting package in the mail. I had no idea what it could be, but as it was from my friend Andrew Janjigian I suspected it was something tasty. It was a jar of his homemade chili crisp. It looked enticingly appealing with its ruby red texture. And when trying it on rice I found it incredibly delicious. My husband instantly switched out his store bought chili condiment and ended up having it on everything. Now neither of us can think of anything else. So when Andrew asked me to share it on kokblog I was over the top excited.

Andrew is an associate editor at Cook’s Illustrated Magazine, a passionate baker and a mycologist. He is regularly holding bread and pizza classes at King Arthur and on top of everything he is an excellent photographer. Andrew and I have collaborated on several things (mostly baked goods) and here on kokblog he is behind one of the most popular posts: Mushroom Confit

Chile Crisp
by Andrew Janjigian (illustrated by Johanna Kindvall)

Chile crisp is my version of Lao Gan Ma or ‘Godmother Sauce’, a spicy Chinese condiment that is a cross between a hot sauce and a crunchy salsa. But I like to think of it as chile crack, because everyone I share it with becomes just as addicted to it as I am. It tickles nearly all of my culinary erogenous zones: spice (both from chiles and the buzz of Sichuan peppercorns), sweet (from the fried shallots and garlic), umami (from fermented black beans), and heady aromatics from most of the above, along with toasted sesame oil and all the dried spices.  

It’s essential on noodles, fried rice, or just steamed white rice. It makes eggs infinitely better. Combined with a little black vinegar and soy sauce, it makes a great dipping sauce for dumplings. Stir it into a little mayonnaise and it becomes a killer spread for sandwiches. Or (as I do on a daily basis) it can be simply eaten with a spoon right from the jar.

(The recipe is actually fourfer, since its byproducts are a large amount of aromatic chile oil, along with extra fried garlic and shallots. And credit where credit is due: The starting point for my recipe is the version I found in the Mission Chinese Food Cookbook.)
kokblog-crispy-onions

Microwave-fried garlic
makes 3/4 cup (180 ml) garlic and 1 cup (240 ml) garlic oil

Remove the garlic from the oil a few shades lighter than you want it, as it will continue to darken as it cools. Dusting with confectioner’s sugar helps prevent clumping and tempers the garlic’s bitter edge. Fried garlic will keep for several months if stored in a sealed container. (If you don’t have a microwave, the garlic can be fried on a stovetop in a nonstick skillet over medium high heat, 10 to 12 minutes.)

1 cup (150 g) garlic cloves, minced
1 cup (240 ml) vegetable oil
2 teaspoons confectioner’s sugar
1/2 teaspoon kosher salt

Combine garlic and oil in medium bowl. Microwave on high power for 5 minutes. Stir well and cook for 2 minute intervals until just beginning to brown, 2 to 12 minutes total. Stir well and cook for 30 second intervals until evenly light brown, 30 seconds to 1 minute total. Strain garlic through fine-meshed strainer set in bowl, and reserve oil. Drain garlic on paper-towel lined plate. Dust with sugar, season with salt, and allow to cool.

Microwave-fried shallots
makes 3/4 cup (180 ml) shallots and 1 cup (240 ml) shallot oil

Remove the shallots from the oil a few shades lighter than you want them, as they will continue to darken as they cool. They will still be soft at this point, but will crisp up as they cool. Fried shallots will keep for several months if stored in a sealed container. (If you don’t have a microwave, the shallots can be fried on a stovetop in a nonstick skillet over medium high heat, 10 to 12 minutes.)

2 cups (175 g) thinly-sliced shallots
1 cup (240 ml) vegetable oil
1/2 teaspoon kosher salt

Combine shallots and oil in medium bowl. Microwave on high power for 5 minutes. Stir well and cook for 2 minute intervals until just beginning to brown, 2 to 12 minutes total. Stir well and cook for 30 second intervals until evenly light brown, 30 seconds to 1 minute total. Strain shallots through fine-meshed strainer set in bowl and reserve oil. Drain shallots on paper-towel lined plate. Season with salt and allow to cool.
kokblog-chili-crisp-4

Chile Crisp / Chile Oil
makes 3 cups (700 ml) chile crisp and 3 cups (700 ml) chile oil

Using harder-to-find (but delicious) Sichuan chile flakes (“facing heaven” peppers) will make the crisp slightly hotter. Chile crisp will keep for two months or more in the refrigerator. Chile oil will keep for up to two months at room temperature.

1 cup (240 ml) Korean chile flakes (gochugaru) or Sichuan chile flakes
(or a combination of both)
4 teaspoons Sichuan peppercorns, finely ground
½ cup (120 ml) sesame seeds
4 cups (950 ml) vegetable oil (including oils from shallots and garlic above)
3 (3-inch) cinnamon sticks
6 star anise pods
6 black cardamom pods, lightly crushed
1 (3-inch) piece ginger, peeled and thinly sliced
10 cloves garlic, lightly crushed
1/2 cup (120 ml) toasted sesame oil
1/4 cup (60 ml) fried garlic (see recipe above)
1/2 cup (120 ml) fried shallots (see recipe above)
1/2 cup (120 ml) fermented black beans, chopped
2 teaspoons kosher salt

Place chile flakes, Sichuan peppercorns, and sesame seeds in large heatproof bowl. Heat oil, cinnamon, star anise, cardamom, ginger, and garlic in large saucepan over medium heat until it reaches 375ºF (190ºC). Pour oil through fine-meshed strainer slowly over chile mixture (be careful, mixture will foam initially). Discard solids in strainer. Allow mixture to cool to room temperature, 1 to 2 hours.

Add sesame oil and stir to combine. Strain through fine-meshed strainer set over bowl.
kokblog-fermented-black-beans2

Transfer solids from strainer into second bowl. Add fried garlic, fried shallots, black beans, and salt, along with enough chile oil to produce a loose, salsa-like consistency, about 1 cup (240 ml).

Transfer chile crisp to jar and refrigerate. Transfer chile oil to jar and store at room temperature.

*

We like this condiment:

as a dipping sauce for dumplings by Rabi Abonourat at Serious Eats

on handpulled noodles by Tim Chin at Cook Science

as a garnish for congee (rice porridge) – recipe from Saveur

and Leftover fried onions are excellent topping
on a classic smørrebrød with roast biff and Danish remoulade

or Middle Eastern mejadra

*

More of Andrew

Fresh Flour Power for Cook’s Science Magazine

From Beehive to Barrel: A Tale of Two Ovens for Edible Boston

Mushroom Confit for kokblog (equally addictive as the Chili Crisp)

Follow Andrew on twitter & instagram


Quick Pickled Cucumber

kindvall-salt-gherkin

In our garden we had an earth cellar that my mother stocked with treats during the outdoor season. The whole family went for weekend walks in the woods to forage for plants, berries and mushrooms. Some of the fruit and vegetables came from our own garden or nearby orchards and neighbor’s vegetable gardens. My mother made strawberry and raspberry jam, cooked apple compote, pickled gherkins and beets. With a steam juicer she made both elderflower cordial and black currant juice. She also made lingonberry jam that is very common as a side for typical Swedish everyday dishes such as meat balls, potato pancakes, kroppkakor and blood pudding. Some Swedes even enjoy this jam with fried herring. My father made different kinds of spirits (blackthorn and figs), that they stored and forgot until it was found (to their happy surprise) several years later.

Some of these wonderful treats I do myself today, but at a much smaller scale as I don’t have the storage or a family of five to feed.

My latest favorite are these quick pickled cucumbers that I created from memory from a restaurant visit to Amsterdam last summer. The original origin is definitely not Dutch or European,  it’s more likely Korean or Japanese.  These pickles can be done just a couple of hours before serving. They are fresh and crunchy and the rice vinegar together with the  sesame oil give them a very pleasant sweet and sour flavor. I love it as a small treat before dinner, just as it is or together with cured fish. Its also excellent as a side for BBQ, stews and sandwiches.

kindvall-pickling

Quick Pickled Cucumber

2- 3 (about 10 ounces, 280 – 300 gram) kirby cucumber
2 teaspoon salt

2 tablespoon rice vinegar
2 tablespoon sugar
1 teaspoon sesame oil

½ teaspoon chili flakes
1 teaspoon finely grated ginger
black pepper, freshly milled
fresh chopped dill
toasted sesame seeds

Wash the cucumbers and cut them into small bite size pieces.

Place them in a bowl and add the salt. Toss well and let sit for 15-30 minutes.

In the meantime, whisk together rice vinegar, sugar and sesame oil. Whisk or stir until sugar is dissolved. Add the chili flakes, ginger and season with pepper and fresh dill.

Rinse the salted cucumber lightly with fresh water. Squeeze them slightly to remove water and pat them dry with a paper towel. When dry add them to the vinegar mixture. Toss well until all pieces are well coated. Season with more salt if necessary. Let sit for about an hour.

Sprinkle some roasted sesame seeds over before serving.

Please note that these pickles are not meant to be stored for a long time. The pickles should be stored in the refrigerator and I recommend you eat them within a few days.

You can tweak this in many ways. For example you can take out the sesame oil and switch the rice vinegar to distilled white vinegar and use horseradish instead of ginger.

*

related recipes

Raw Stirred Cranberries (kokblog recipe)
Orange Cured Carrots by Sofi Meijling
Lemon & Olive Oil Preserved Asparagus by Amy Pennington
Superfast Salt-and-Sugar Pickles by Dave Chang

Red Gooseberry Jam with Thyme

KINDVALL-goosberryjam-02

Every morning my husband walks out and pick handfuls of red & black currants, strawberries, raspberries or red gooseberries. He cooks the berries slightly into a sauce together with cardamon & cinnamon and serves it together with his oatmeal. Unfortunately I’m not a porridge girl so I just simply have it with some Swedish traditional filmjölk.

Gooseberries are one of our favorites. When really deep red and totally soft and ripe they taste a little like grapes. Last week I picked the ones we had left and made some jam.

Red Gooseberry Jam with Thyme

2 cups red gooseberries
a bunch of fresh thyme, cleaned and striped from branches
½ – ¾ cup (100 – 150 grams) natural cane sugar*

Clean the gooseberries and remove the top and tail. Place the gooseberries together with the sugar and thyme in a medium sized pan. Bring to a boil and cook over medium heat until your desired thickness has been reached (between 15 – 30 minutes).

To check the consistency, take a spoonful of jam onto a chilled saucer, leave to cool for a minute or so before run your finger through it. It’s ready if the jam wrinkles up. If not, let it cook for another few minutes before testing again.

When ready, remove the jam from the heat and pour into a clean sterilized jar. Screw on the lid and turn the jar upside down to create a vacuum. Let cool completely.

Store the jam in the refrigerator for up to a month. If you want to store it longer, place the jam in the freezer.

The jam is nice on top of aged cheese and toast.

* I recommend to start with the lower amount and add more sugar if you want a sweeter jam.

Related recipes

Sofi’s Caramelized Rhubarb Jam
Pear Marmalade (and the boy who poisoned a whole scout camp)
Canning How To – Prepping & Sealing Jars – by Amy Pennington
Rosemary Flavored Plum Jam – by Ilva Beretta
Orange Blossom Jam – by Anissa Helou
Cherry compotê – by Rachel Alice Roddy