Tag Archives: food illustration

Cured Trout for Easter

It’s Easter again and I’m planning to treat myself and guests to some cured trout. To cure trout I use the same method and ratio as when I make traditional Scandinavian gravlax. The recipe below is plain and simple. Not much more is needed for this delicate treat, but if you want to try something different you can add other flavors. Ederflower, ginger, crushed juniper or a shot of aquavit work really well. The list is endless.

Besides salmon and trout you can use this same method to cure other types of fish. Mackerel is an excellent option, and Keiko over at food blog Nordljus cured a good looking seabass with a scent of licorice. As I love licorice, I decided to add some toasted fennel seeds to my cure this Easter, which I think will go really well with the mild trout flavor.

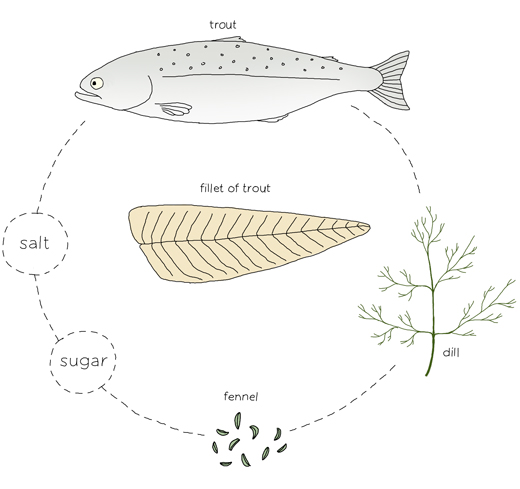
for the curing you will need

1 kilo (2 lb) trout fillet
1 teaspoon freshly milled white pepper
4 tablespoons salt
4 tablespoons sugar
bunch of dill

toasted whole fennel seeds (optional)

for decoration
fresh dill
lemon

Note: The trout should be frozen one or two days before you start the curing. The freezing will eliminate unnecessary bacteria.

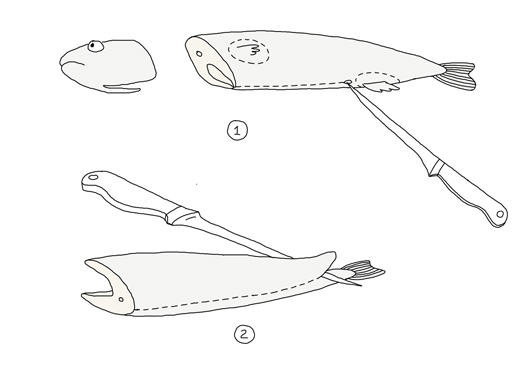
It’s not hard to fillet your trout yourself. The benefit is that you can use the remaining parts (except for the guts) to make an excellent stock together with bay leaves, carrot, celery, onions, dills stalks, some herbs like thyme, salt and pepper.

If you still think this is too messy, ask your fishmonger to fillet the fish for you but remind them that the skin should be kept on.

When you have your fillets ready. Rinse them in some cold water and pull out, if there are any, remaining bones with a pair of pliers.

Mix together salt, sugar and pepper. Rub the fillet with some of the mixture and sprinkle the rest on top of the fillets. Wash the dill and chop finely. Put the fillets together, meat against meat with the chopped dill and (if you like) some toasted fennel seeds (slightly crushed) in between. Wrap the fish in a plastic foil. Let the fish cure in the fridge with something heavy on top for 48 hours. Turn them now and again.

After two days, unwrap and clean the fillets. Start to slice the trout at the end of the fish into thin diagonal slivers using a fillet knife (or any other suitable knife). Garnish with some dill branches and slices of lemon. They can be served on toast or dark bread. However this fish is sensational on a thin “knäckebröd” topped with a drip of Hovmästarsås. Enjoy!

Hovmästarsås
Stir together 3 tablespoons mustard, 1 egg yolk, 1 tablespoon apple cider vinegar, 1 tablespoon brown sugar with plenty of chopped dill. Slowly start dripping in a little less than a 1/2 cup of olive oil into the mixture while stirring continuously (just like you make mayonnaise). If you add the oil too quickly the mixture can separate. The result should be a thick sauce. Season with salt and fresh ground pepper.

Before buying any fish check with Seafood Watch (US) for the most sustainable options.


This article was originally published at Ecosalon, 5 April 2012

Minty Zucchini Salad

Every summer I enjoy fresh mint from my own little garden. I grow three quite common types: pepper, lemon and water mint. All three work really well for cooking and I use them regularly in teas or as a flavor in different kinds of drinks. A few crumpled leaves together with elderflower cordial are a perfect match (with or without gin). Crushed with ice and Lime Mint makes for fantastic mojitos or a refreshing ingredient in a Pimm’s Cup.

It’s easy to grow mint but if you’re not careful, mint plants can rapidly take over your garden plot. Their roots are aggressive and hard to exterminate, so best to plant them in pots or at an unused part of the garden where they can grow freely without interfering with other growing treasures.

There are many different types of mint, some more common and others more rare. A more rare example are mint plants that have the scent of different kinds of fruits such as pineapple and strawberries. There is even a mint that has a clear flavor of chocolate. Not sure what I would do with this kind of mints but it’s funny as pineapple, strawberries and chocolate are all great companions to mint. For example in this strawberry salad, you can switch basil for regular mint.

Earlier this year in Marrakesh, I got inspired by the simple way they use mint in different kinds of salads. The salads were often just tomato, peppers and red onion cut into tiny pieces and blended together with finely chopped mint leaves, a squeeze of lemon and olive oil. Simple and delicious.

Anna Brones‘s mother makes a fresh mint pesto and it sounds perfect drizzled over a potato salad or even a grilled lamb chop. When the summer is here you may prefer something cool to eat instead of hot meals from the stove. A fresh red pepper and tomato salsa is an excellent choice. And a watermelon and feta salad makes a perfect starter or as a side for grilled meat and vegetables.

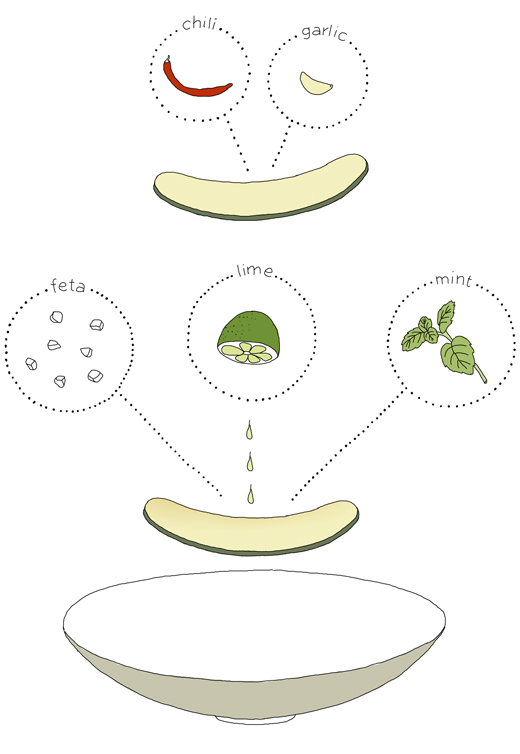
One of my latest treats is this simple and warm Zucchini & Feta Salad that is great to serve together with vegetable patties.

Warm Zucchini & Feta Salad

(for 2-4 people)

one – two zucchini
olive oil
some salt
some chili (fresh or flakes)
one or two clove of garlic
lime
¼ lb (100 g) feta
about 10 leaves of fresh mint

Wash the zucchini and cut thin slices along the long side (you may want to cut the zucchini in half crosswise first). Sprinkle some salt and olive oil over. Heat up a pan with some chili and fry the zucchini slices at a semi high heat (you may also put them on the grill or roast them if you like). Just take a few at a time as they shouldn’t touch each other while cooking. When the slices start to brown, turn them over. Just before they are done squeeze some garlic over. When the garlic has melted and the zucchini has a nice color, transfer them over to a serving dish. Repeat until all zucchini slices are done. Squeeze some lime and drip it all over the salad. Cut or crumble the feta and sprinkle it over the salad together with finely chopped mint. Season with salt and pepper if needed. Serve immediately.

 This recipe was originally published at EcoSalon on 22 March 2012

Sopa de Ajo – Traditional Spanish Bread Soup (by Ibán Yarza)

Ibán Yarza is a self-taught baker (and bike mechanic) based in Barcelona where he organizes baking classes and promotes good bread for everyone. I first got to know of him through his site ¿Te quedas a cenar? (“Are you staying for dinner?”) and for the last few years we have been talking through twitter, mostly about baking, cookbooks and Sweden. Iban runs two other websites that are only dedicated to bread, La Memoria del Pan where he shares stories and interviews and El Foro del Pan which is the leading bread forum in Spain (they have one section in English).

Ibán has been to Sweden several times and he probably knows much more about traditional Swedish baked goods than many Swedes. Last year he worked as a volunteer at Ramsjö Gård, an organic farm in Björklinge (north of Stockholm) where he followed their daily work for 2 months. Lately Ibán has been seen on Spanish Television where he bakes together with David Jorge and Robin Food. In one episode he bakes my absolute favorite, a classic Swedish Cardamom bun.

Ibán has an education in journalism and translation. In 2010 he translated Dan Lepard‘s book “The Handmade Loaf ” from English to Spanish.

I’m so happy I finally asked Ibán to be my guest here on Kokblog. Welcome!

Sopa de Ajo – Traditional Spanish Bread Soup
by Ibán Yarza

There is a certain austerity to many traditional Spanish dishes that I find utterly appealing. It probably has to do with the fact that I grew up with my grandparents, my grandmother being a classic example of a Spanish cook: hardly any spice in the cupboard, simple and honest ingredients bought daily at the local market and cooked in the simplest of ways (stewed, boiled, braised, fried) always respecting the flavor of the ingredients in the pan. Simple as they can be, some recipes that date back to the Middle Ages can bring unique emotions to our table, well in the 21st century. Sopa de ajo (literally “garlic soup”) is one of those dishes, an example of the great cuisine of bread, the kingdom of leftovers and the audacity to make the best out of what’s in the larder. A simple and filling meal made out of stale bread, what many Spaniards would definitely refer to as their favorite wintertime comfort food (another soup, gazpacho, most likely being its summertime counterpart).

If one had a look at the menu of top-notch Spanish restaurants over the last years, a clear Asian influence would be easily noticeable, in the form of a zen-esque approach to elaborations and presentations. However, if you dive deep enough into traditional Spanish cookbooks, simple, minimal recipes appear with an almost-spiritual scarcity of means and ingredients that could seduce any Zen master. A famous Spanish writer and gourmet, Xavier Domingo, once described traditional Spanish cookery as “a minimal cuisine”, with only three basic foundations: olive oil, garlic and bread. Sopa de ajo remains a peerless example of this.

Then there is something about the word “sopa” (soup) and bread, the essential food. They go hand in hand in the mind and speech of Spaniards. Even to this day, the first meaning of this word in Spanish does not refer to the liquid food, but to a piece of bread soaked in liquid. In fact, “hacer sopas” (literally “to make soups”; this is, to soak bread in stock, coffee or whatever is at hand) seems to remain a favorite way of eating in my homeland, both pleasant and nutritious. You can find soups made with bread throughout Spain, from North to South, from Majorca to Andalucía, cold and hot, thick and light, meaty or full of vegetables. The recipe below is perhaps the best known version, where only four ingredients (bread, garlic, olive oil and paprika) are able to convey childhood memories and a bit of daydreaming on a dull winter evening. As any traditional meal, recipes vary from one family to another.

Seasonal hint: because of the lack of meat, this soup has traditionally been a Lent dish; in fact, the whole concoction is plain and clear frugality. Rejoice.
Sopa de Ajo
(serves 4)

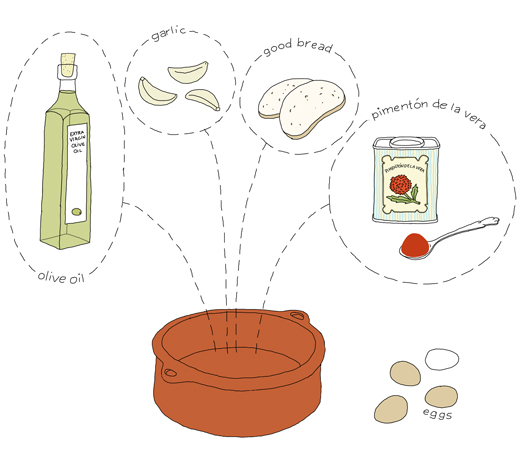
150 – 200 g of good bread, stale. Life is too short to eat bad bread, even if it’s stale. I like to keep the crust for flavor, color and texture. Traditionally we would use a white dense wheat loaf, but feel free to use wholemeal, sourdough… I’ve even cooked delicious sopas de ajo using rye bread (to my fellow countrymen’s disdain)

3-5 cloves of garlic, sliced

3 tsp paprika. The best you can find, my favorite is smoked bittersweet Pimentón de la Vera, available nowadays in gourmet shops worldwide

1 – 1,5 dl extra virgin olive oil. Again, try to find good oil: dense, deep and fragrant. We are using few ingredients, so try to find the best

1,5 liter water (or stock, if you happen to have it at hand; but water is more than OK).

4 eggs (optional)

Traditionally, in Spain you would use a clay pot for this recipe, but any deep pot would do. Slice the cloves of garlic and fry them in olive oil until they’re golden (I tend to think that the amount of olive oil we use in Spain would seem rather large abroad; just don’t be shy, pour it in). Take the pieces of garlic out of the pan and keep them aside so they don’t burn and turn bitter. Now place the bread in the pan and fry in the remaining oil (it will soak up part of the oil). Take the pot off the stove, add the paprika and stir with the bread and oil making sure it doesn’t burn, otherwise it would lose its wonderful fragrance and turn bitter and tart. Once this is done, add the water (or stock) and garlic, and let it simmer for some 10-15 minutes. At the very beginning, it will probably not look the most appetizing of meals, but just be confident, time will bind the soup and the result will be simply delicious.
Some people like to have their sopa de ajo really thick and dry (some even finish it in the oven), I prefer to keep mine just on the creamy side of the term soup, with thick blobs of creamy bread that melts in your mouth. Once the soup has thickened, and while I set the table, I like to take the pot off the stove and use the remaining heat to poach one egg per person. Once at the table, the yolk will break in each guest’s bowl, taking the sopa the ajo experience to its very limit, so to speak. Sometimes I also like to sprinkle a bit of ground cumin. Feel free to add anything you like.
Roasted Mackerel

Lately I haven’t cooked or eaten fish that often. There is no good excuse for this other than I have been confused about which fish is ‘correct’ and safe to eat. Many of you probably already know that we should be careful which salmon, shrimps and tuna we choose to eat, that we should really start to cook and eat other fish that are more sustainable and healthy. But that is not an easy task, as which fish to eat varies from country to country (and it can vary even in the same country).

I’m happy that one of my favorite fishes, mackerel, seems to be a safe choice, both in Sweden and the US . According to Vanessa Barrington, at EcoSalon, Mackerel doesn’t have high levels of mercury (except for the king mackerel which has) and the fishing method used doesn’t damage the bottom of the sea. Mackerel has a rich flavor and you don’t really need to add much to enjoy this fish. It’s great in soups, filleted or cooked whole (see below) and can be roasted, baked or poached. You can also smoke or cure it.

Mackerel makes me long for summer, especially Swedish summers when the sun doesn’t go down until around 11pm. When I was a little girl we often went to the west coast to rent a boat and fish all day. Mostly we caught cod and mackerel but sometimes we also got garfish (not listed). In the evening when we all were hungry and tired we would get back on land or find some tiny unsettled rocky island, collect firewood and broil mackerel over an open fire. The whole fish was stuck on a wooden stick (cleaned and gutted) and just simply seasoned with salt and lemon.

Now this is not easily done every day but there are definitely ways to enjoy fish at home all year around. My latest recipe was created after I got inspired by Melissa Clark’s recent article on whole roasted fish. The article was such a great reminder that its about time I start to cook whole fish again.

Roasted Mackerel with Buttered Shallots
for two

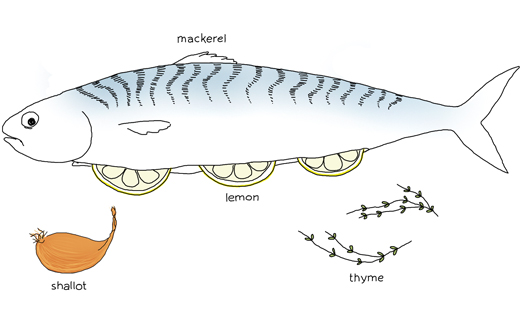
one or two whole mackerel (about 1-1 ½ lb)
one lemon
freshly grounded pepper
a splash of olive oil
one shallot
10 sprigs of fresh thyme
about 2 oz butter

Clean and gut the mackerel. Take a paper towel to pat the fish dry. Rub inside and outside of the fish with one or two slices of lemon. Sprinkle salt and pepper all over the fish. Slice the rest of the lemon thinly and chop the shallots finely. Fill the stomach of the mackerel with some of the slices and leave about half for later when serving the fish. Place ½ of the shallot into the cavity together with a few sprigs of thyme. Place the fish in a greased baking pan. You can also bake on top of foil on a baking tray. Sprinkle some olive oil over and roast the fish at 400°F for about 20-30 minutes. The fish is done when the meat is white and the meat easily loosens from the bones.

While the fish roasts, melt about half of the butter and saute the shallots on a really low heat until soft. At the end add more butter and plenty of thyme.

Serve the fish with buttered shallots together with roasted vegetables such as parsnips and carrots. The mackerel is also great with a simple salad made of roasted red pepper, feta, watercress and toasted sunflower seeds.

Here is some more good stuff about fish…

The good Fish of the Pacific Coast by Becky Selengut

Seafood Watch (US) (check out their app for Android and iPhone)

WWFs fisk guide (Sweden)


This article was originally published at EcoSalon, 2 February 2012 

Äggakaga (Eggy Cake)

Äggakaga (Eggy Cake) is a South Swedish thick pancake that’s baked on top of the stove. This cake is rich in eggs and baked with plenty of butter and pork fat (not for a slim diet). Its creamy and hearty and fills the stomach with pleasure and warmth. Traditionally the cake is served for both lunch or dinner with plenty of smoked bacon and lingonberry jam. As a lunch it will give you strength for a hard day’s work. For dinner it gives you comfort and a good night’s sleep. It will also be enjoyable as a brunch served with ale instead of mimosas.

My version is made with an addition of fresh rosemary and brown sugar is used instead of regular white sugar. The rosemary works really well with smoked bacon and adds a nice touch to this old traditional dish.

Äggakaga with Rosemary 
for 2 servings

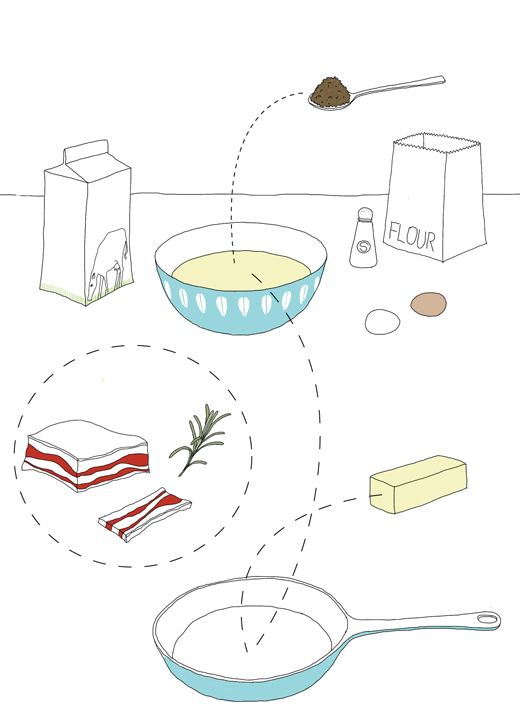
4 eggs
1 2/3 cup (400 ml) milk
¾ cup (175 ml) regular flour
1 ½ tablespoon brown sugar
1 teaspoon salt

plenty of butter for frying

½ lb (250 g) smoked bacon, sliced
2 sprigs fresh rosemary, chopped

Crack the eggs in a bowl and whisk them together with the milk. Add salt and sugar. Sift the flour into the batter little by little to avoid lumps. The mixture is done when all is well mixed and has become a smooth batter. Let it rest on the counter while you fry the smoked bacon. Add the rosemary to the bacon when its almost done. Set the bacon aside and reserve the fat, as that will be use when cooking the pancake.

The pancake should be about 1- 1 ½” thick so a regular frying pan (about 10″-11″ wide) that can fit the whole batter will work perfectly. Heat up the pan  and melt a large lump of butter. Lower the heat to medium and pour in the batter. With a spatula, scrape the bottom and move the firm batter into the middle of the pan to prevent the mixture being burnt. Continue until all batter is firm. Turn the cake by covering the pan with a plate before turning. Add some more butter if necessary before sliding the cake onto the pan again, raise the temperature slightly and cook until the cake has browned underneath. Turn one more time. This time add the bacon fat before sliding the cake onto the pan. The cake is done when it’s golden brown on both sides.

Top the cake with the fried Rosemary bacon and enjoy with lingonberry (or cranberry jam). Best served with either milk or beer.

This recipe was first published at Honest Cooking26 January 2012.