
This Christmas I’m looking forward to being with my family and friends in Sweden. I will fill the house with the right holiday flavor by lighting candles, bake pepparkakor (ginger cookies) and brew glögg spiced with cinnamon, cardamom, cloves, orange and ginger. I will bake dark rye bread (recipe below) and have plenty of mustard herring and slices of aged cheese (with my homemade akvavit). The evenings I will spend in front of the fireplace, crawled up on the couch with a glass of madeira and a handful (or more) of chocolate toffees.
The rye bread is based on a Swedish traditional bread called skållat rågbröd (scalded rye bread). When baking the bread you start by scalding the rye flour with boiling hot water and let it sit over night. This method makes a rich and flavorful bread. Traditionally you bake this kind of bread with mörk sirap (dark syrup) but by using cranberries instead I have given this bread a more fruity flavor.
This bread is excellent with julskinka (salt cured ham that have been cooked in aromatic broth), which is one of the classic spreads on a Swedish julbord (Christmas table which is the most common Smörgåsbord in Sweden). But the bread really works with many other things too, like herring, gravlax, cheese or leftover meatballs.
Last Sunday this bread was part of an food art installation by Ursula Endlicher at Air Circulation gallery in Bushwick here in Brooklyn. Then we topped it with pate, pickled gherkins and fresh pomegranate seeds. I also baked caraway thin crisps and specially created a hazelnut & star anise cookie for her installation. The show will be on view every Sunday until January 24.
I bake this bread all year around as M and my friends don’t seem to get enough of it. My neighbors have even requested I start selling it as they think it’s the best bread in the neighborhood. (which is quite easy to beat as there is no bread bakery around here that bakes a dark rye bread like this).
Psssst! This bread got listed by Marisa McClellan at Local Mouthful, Philadelphia as one of her favorite things in 2015. Woohoo! I’m super honored.
Skållat Rågbröd with Anise Seeds (Scalded Rye Bread)
adapted from my Rye Bread recipe in Fika: The Art of the Swedish Coffee Break*
2 loafs
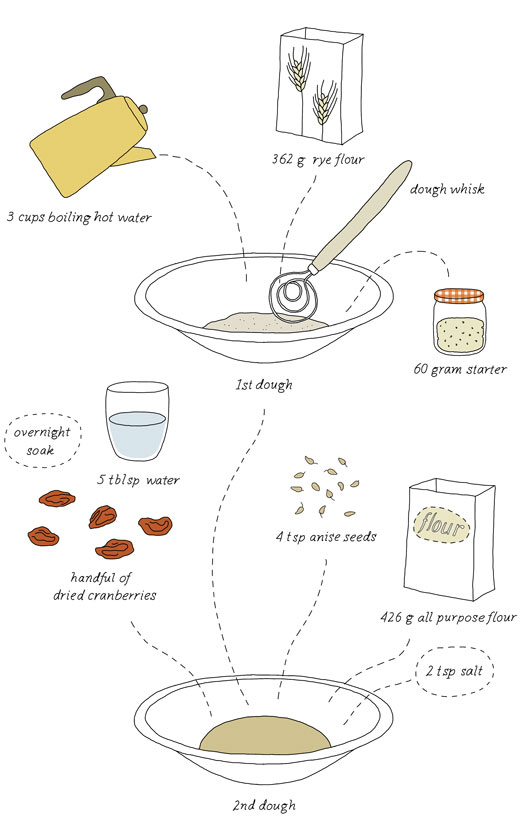
1st dough
3 cups (720 ml) water
3 cups (12.75 ounces, 362 grams) rye flour
60 gram (2.125 ounces) starter
overnight soak
handful (about) 1/3 cup dried cranberries
5 tablespoons water
2nd dough
3 cups (15 oz, 426 grams) all purpose flour (plus extra as needed)
2 teaspoons salt
4 teaspoon anise seeds
preparing the 1st dough
Bring the water to a boil and pour it over the rye flour. Work the flour and the water with a large spoon or spatula until even (sticky) dough. Let the dough cool down to about 98°F (37°C) before adding the starter. Cover with plastic wrap or a damp tea towel. Leave at room temperature overnight or at least for 6 to 8 hours.
Soak the cranberries in 5 tablespoon water overnight or for at least a couple of hours.
preparing the 2nd dough
Mix the soaked cranberries in a food processor into a smooth sticky mixture. Crush the anise seeds slightly with a mortar and pestle. In a large wide bowl mix together wheat flour, salt and anise seeds. Add the 1st dough together with the cranberries. Work everything well together until all flour is mixed. Transfer the dough to your counter top and knead the dough with as little extra flour as possible. The dough will be sticky and dense. Let the dough rise for 2-3 hours.
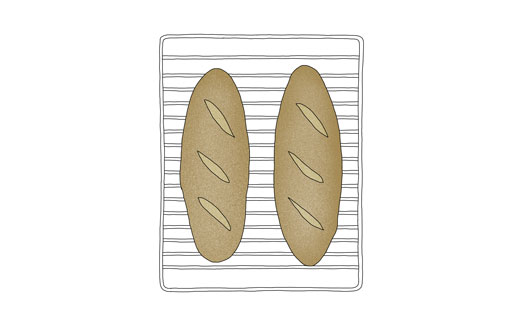
Divide the dough into two pieces and shape into 12-inch long loaves. Dust some flour all around and place them on a well floured tea towel. Cover and and let rise for about 2 hours. The bread will have small cracks on the surface.
About 30 – 60 minutes before baking your bread, set the oven to 450°F (230°C). Place a baking sheet or baking stone into the oven. (please note that a stone will need more time to heat up than a baking sheet).
When it’s time, carefully transfer the shaped loaves onto the hot baking surface. Score (as you like) and bake for 40-50 minutes. The bread should have a dark brown color and if you knock at the bottom of the loaf it should have a hollow sound. Let them cool completely on an oven rack before cutting the bread.
The bread will keep fresh in room temperature for a couple of days. For longer storage, freeze, sliced or whole.
* The original recipe from the Fika book, which is equally addictive is baked with active dry yeast and uses prunes instead of dried cranberries. I have also baked this version at a higher temperature which gives the bread a slightly harder crust.
*
related links
learn more about the Swedish Christmas table in my book
Smörgåsbord: The Art of Swedish Breads and Savory Treats


