Tag Archives: starter recipe

Quick Pickled Cucumber

kindvall-salt-gherkin

In our garden we had an earth cellar that my mother stocked with treats during the outdoor season. The whole family went for weekend walks in the woods to forage for plants, berries and mushrooms. Some of the fruit and vegetables came from our own garden or nearby orchards and neighbor’s vegetable gardens. My mother made strawberry and raspberry jam, cooked apple compote, pickled gherkins and beets. With a steam juicer she made both elderflower cordial and black currant juice. She also made lingonberry jam that is very common as a side for typical Swedish everyday dishes such as meat balls, potato pancakes, kroppkakor and blood pudding. Some Swedes even enjoy this jam with fried herring. My father made different kinds of spirits (blackthorn and figs), that they stored and forgot until it was found (to their happy surprise) several years later.

Some of these wonderful treats I do myself today, but at a much smaller scale as I don’t have the storage or a family of five to feed.

My latest favorite are these quick pickled cucumbers that I created from memory from a restaurant visit to Amsterdam last summer. The original origin is definitely not Dutch or European,  it’s more likely Korean or Japanese.  These pickles can be done just a couple of hours before serving. They are fresh and crunchy and the rice vinegar together with the  sesame oil give them a very pleasant sweet and sour flavor. I love it as a small treat before dinner, just as it is or together with cured fish. Its also excellent as a side for BBQ, stews and sandwiches.
kindvall-pickling

Quick Pickled Cucumber

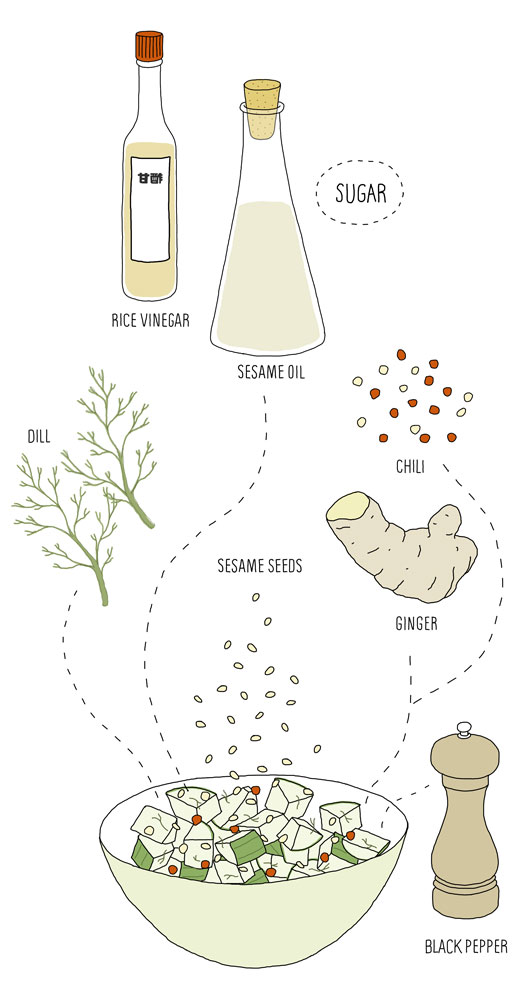
2- 3 (about 10 ounces, 280 – 300 gram) kirby cucumber
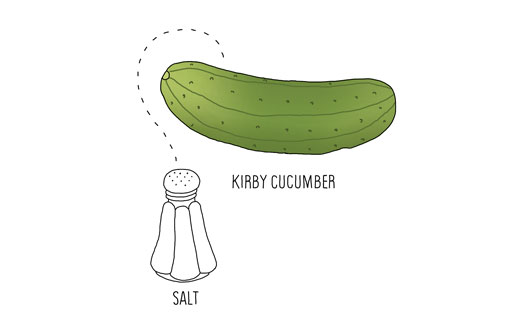
2 teaspoon salt

2 tablespoon rice vinegar
2 tablespoon sugar
1 teaspoon sesame oil

½ teaspoon chili flakes
1 teaspoon finely grated ginger
black pepper, freshly milled
fresh chopped dill
toasted sesame seeds

Wash the cucumbers and cut them into small bite size pieces.

Place them in a bowl and add the salt. Toss well and let sit for 15-30 minutes.

In the meantime, whisk together rice vinegar, sugar and sesame oil. Whisk or stir until sugar is dissolved. Add the chili flakes, ginger and season with pepper and fresh dill.

Rinse the salted cucumber lightly with fresh water. Squeeze them slightly to remove water and pat them dry with a paper towel. When dry add them to the vinegar mixture. Toss well until all pieces are well coated. Season with more salt if necessary. Let sit for about an hour.

Sprinkle some roasted sesame seeds over before serving.

Please note that these pickles are not meant to be stored for a long time. The pickles should be stored in the refrigerator and I recommend you eat them within a few days.

You can tweak this in many ways. For example you can take out the sesame oil and switch the rice vinegar to distilled white vinegar and use horseradish instead of ginger.

*

related recipes

Raw Stirred Cranberries (kokblog recipe)
Orange Cured Carrots by Sofi Meijling
Lemon & Olive Oil Preserved Asparagus by Amy Pennington
Superfast Salt-and-Sugar Pickles by Dave Chang

Ceviche with Mango and Avocado

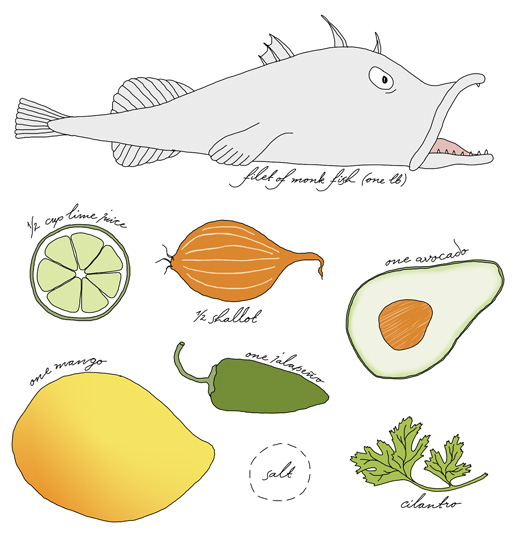
Ceviche has been one of those dishes I have wanted to make for a very long time. And now I can’t stop. I like it as the illustrated recipe above, which has a great balance of spice and fruitiness. I have tried other versions as well but this one is so far my favorite.

My recipe is based on a ceviche I was treated to on my last day of 2013. The host made it with cod, which was excellent and he also included freshly cooked shrimps, which I haven’t. The lime ratio I got from Michael Ruhlman’s gorgeous looking Red Snapper Ceviche recipe as it sounded like a good measure. My recipe suggests monkfish but it works with any other white firm sea fish such as cod, tilapia, halibut etc.

1 lb (about 1/2 kg) fresh monkfish*, whole or fillets
1/2 cup (120 ml) lime juice (4-6 limes, dep. on the fruit’s juiciness you might need more or less)
1/2 shallot
one jalapeño
one mango
one avocado
cilantro
salt

If not using fillets, bone and remove skin from the fish. Rinse. Cut the fillets into small pieces (approximately 1/2″ cubes). Chop the shallot very fine.  Place fish and shallots in a bowl and cover with lime juice. Make sure everything is evenly coated. The process can go quite quickly and some say it may be done in 10 minutes. All depends on how thin or thick your pieces are. I often let it marinate for 2-3 hours before I serve it. During this time, keep it cool in the refrigerator. You may check on it and stir it around a little every so often. When ready, the fish should be white and not translucent.

Just before serving: remove the seeds and chop the jalapeño finely. Cut the mango and avocado into small cubes. Place everything including the fish in a large serving bowl. Season with salt. Decorate with plenty of fresh cilantro. Serve with tortilla chips or as I sometimes do, thin knäckebröd.

* To be on the safe side it’s a good thing to get frozen fish or even freeze the fish for 2 – 3 days before making ceviche. The freezing will kill any possible parasites in the fish. I have had good results both ways. Please note that the fish, frozen or not still has to be of good quality. Here is an old article at New York Times about it.

Before buying any fish check with Seafood Watch for the most sustainable options.

*

Other ceviche recipes
Swordfish Ceviche with an Asian Flair by Winnie Abramson at Food52
Sea Urchin Ceviche by norecipes

Guest Post: Mushroom Confit by Andrew Janjigian

I think the first time I talked with Andrew Janjigian (on twitter) was when he suggested an excellent trade: homemade sujuc (spicy sausage from the Middle East) for an illustrated Pide t-shirt!

Andrew is an associate editor at Cooks Illustrated Magazine, a passionate baker and a mycologist! It’s no wonder we connected on twitter, as you know, baking and mushrooms (especially foraging) are two of my favorite things (besides drawing of course). However, compared to me, Andrew is a master, in fact he teaches classes in both subjects in Cambridge, MA where he lives. He is also an organic chemist, professional cook and as a pizza enthusiast (he used to be a regular contributor at Slice & Serious Eats), he recently he built his own pizza oven. Impressive!

As if the above weren’t enough I just recently discovered he is, on top of everything, an excellent photographer. He has a great eye for detail, but most of all he can really capture the characters of people, women and men. His photos can be staged or captured in the moment, they can be funny or very serious and intimate. At the moment, a selection of his photos are showing at Gallery 263, in Cambridge.

Its a great pleasure to have Andrew as a guest here on koblog and I can reveal that there will be more by us soon.

Mushroom Confit
by Andrew Janjigian

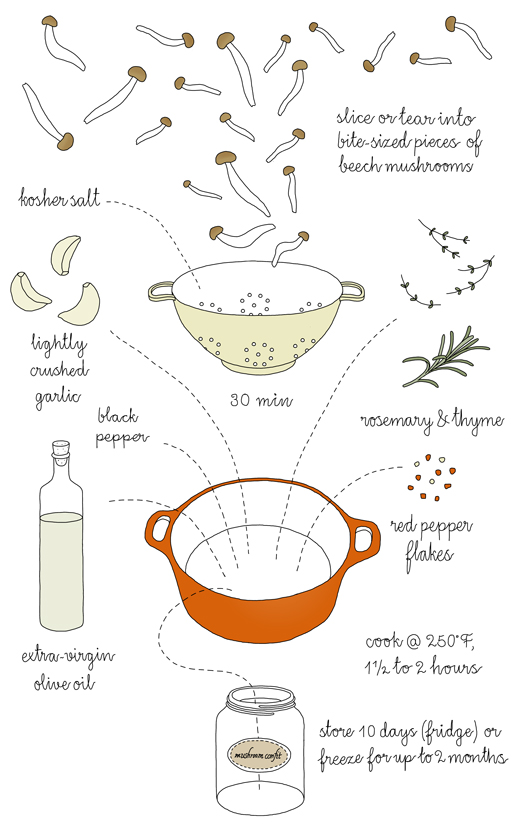
This confit is one of my favorite ways to preserve mushrooms of nearly any kind. Delicately flavored mushrooms such as chanterelles or morels are best used by themselves, or paired with milder ones such as oysters or—as seen in Johanna’s lovely illustration—beech mushrooms. Other varieties may be combined however you like.
As for the confit’s uses, they are nearly endless. As a sublime topping for pizza, of course. Added to sautéed greens. Mixed into an omelet or scrambled eggs. Spooned over crusty bread or crackers, perhaps along with a funky cheese. Or just eaten with a spoon, right from the jar. Once you taste it, I’m sure you’ll think of plenty more.

Mushroom Confit Recipe
makes about 4 cups

2 pounds fresh mushrooms of any kind, cleaned, woody stems removed
2 teaspoons kosher salt
4 cloves garlic, peeled and lightly crushed
2 sprigs fresh thyme
1 sprigs fresh rosemary
2 bay leaves
1/4 teaspoon red pepper flakes
1/2 teaspoon freshly-ground black pepper
2 cups extra-virgin olive oil, plus more as needed

1. Adjust rack to lower-middle position and preheat oven to 275°F (135°C). Slice or tear mushrooms into bite-sized pieces (smaller ones may be left whole). Place in colander set into large bowl, toss with kosher salt, and let stand for 30 minutes, stirring occasionally. Discard any water collected in bowl. (Mushrooms can be further dried of excess moisture in a salad spinner, if available.)

2. Transfer mushrooms to Dutch oven, along with garlic cloves, thyme, rosemary, bay leaves, red pepper flakes, and black pepper, and toss to combine. Add oil, stir to combine, and transfer to oven.

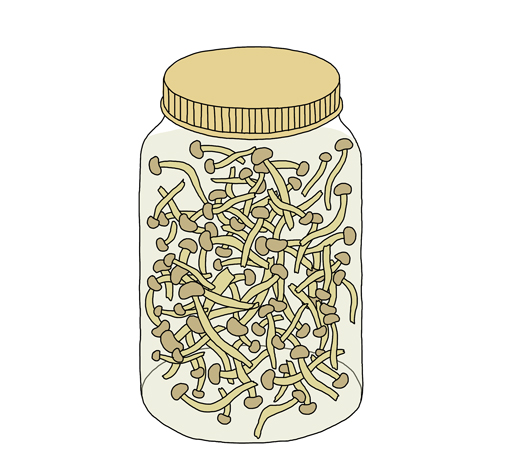
3. Cook, stirring occasionally, until mushrooms are tender, 1-1/2 to 2 hours. Allow to cool. Discard herb stems and bay leaves. Pack mushrooms in jars, along with enough oil to cover. (Excess oil may be reused or repurposed.) Seal and refrigerate for up to 10 days, or freeze for up to 2 months. (For long-term shelf stability, jars can be pressure canned for 2 hours at 15 psi.)


More with and about Andrew

Cooks Illustrated’s Thin-Crust Pizza: Works Like a Charm
post by Adam Kuban at Serious Eats

How editor Andrew Janjigian took the fear factor out of souffle, Cooks Illustrated

Follow Andrew on
Twitter, Instagram and Tumblr.

*

Just want to say mushroom confit is one of my favorite recipes here on kokblog. Most of the time I serve it as starter together with home made bread and a spread of dishes like paté, pickles, dried sausage and chickpea & almond salad. I also like it with pasta. It’s such a great treat.

Cured Trout for Easter

It’s Easter again and I’m planning to treat myself and guests to some cured trout. To cure trout I use the same method and ratio as when I make traditional Scandinavian gravlax. The recipe below is plain and simple. Not much more is needed for this delicate treat, but if you want to try something different you can add other flavors. Ederflower, ginger, crushed juniper or a shot of aquavit work really well. The list is endless.

Besides salmon and trout you can use this same method to cure other types of fish. Mackerel is an excellent option, and Keiko over at food blog Nordljus cured a good looking seabass with a scent of licorice. As I love licorice, I decided to add some toasted fennel seeds to my cure this Easter, which I think will go really well with the mild trout flavor.

for the curing you will need

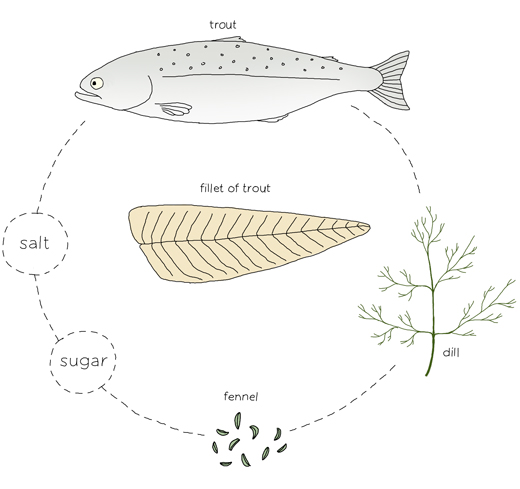
1 kilo (2 lb) trout fillet
1 teaspoon freshly milled white pepper
4 tablespoons salt
4 tablespoons sugar
bunch of dill

toasted whole fennel seeds (optional)

for decoration
fresh dill
lemon

Note: The trout should be frozen one or two days before you start the curing. The freezing will eliminate unnecessary bacteria.

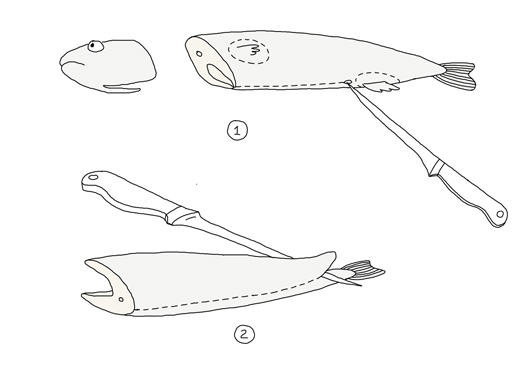
It’s not hard to fillet your trout yourself. The benefit is that you can use the remaining parts (except for the guts) to make an excellent stock together with bay leaves, carrot, celery, onions, dills stalks, some herbs like thyme, salt and pepper.

If you still think this is too messy, ask your fishmonger to fillet the fish for you but remind them that the skin should be kept on.

When you have your fillets ready. Rinse them in some cold water and pull out, if there are any, remaining bones with a pair of pliers.

Mix together salt, sugar and pepper. Rub the fillet with some of the mixture and sprinkle the rest on top of the fillets. Wash the dill and chop finely. Put the fillets together, meat against meat with the chopped dill and (if you like) some toasted fennel seeds (slightly crushed) in between. Wrap the fish in a plastic foil. Let the fish cure in the fridge with something heavy on top for 48 hours. Turn them now and again.

After two days, unwrap and clean the fillets. Start to slice the trout at the end of the fish into thin diagonal slivers using a fillet knife (or any other suitable knife). Garnish with some dill branches and slices of lemon. They can be served on toast or dark bread. However this fish is sensational on a thin “knäckebröd” topped with a drip of Hovmästarsås. Enjoy!

Hovmästarsås
Stir together 3 tablespoons mustard, 1 egg yolk, 1 tablespoon apple cider vinegar, 1 tablespoon brown sugar with plenty of chopped dill. Slowly start dripping in a little less than a 1/2 cup of olive oil into the mixture while stirring continuously (just like you make mayonnaise). If you add the oil too quickly the mixture can separate. The result should be a thick sauce. Season with salt and fresh ground pepper.

Before buying any fish check with Seafood Watch (US) for the most sustainable options.


This article was originally published at Ecosalon, 5 April 2012

Wildboar Paté

wildboar road


about 1 lb (450 gram) spinach or chard
2-3 cloves of garlic
some chili flakes
1 lb  (450 gram) minced wild boar (fresh)
salt
milled black pepper
2-4 tablespoons of port
1-2 teaspoons fresh ground black mustard seeds
rosemary (chopped or crumbled if dried)

I sautee the spinach with chili and garlic. Let cool on the side. Squeeze out any juice and mix with the minced meat. Add the port, ground mustard seeds and rosemary. Season with salt and black pepper. I make a seasoning test by frying a small amount of the meat mixture. Add more seasoning if necessary.
Grease a loaf tin with butter and turn the meat mixture into the rectangular baking dish (ceramic or glass). Cover the dish with a buttered sheet of  paper or aluminum foil. Bake the pate in the oven in a water-bath at 330º F for about 45-60 minutes.  Be careful not to over-bake as you don’t want to make the pate dry.
I serve my pate as a starter, cold on dark bread, topped with red currant jam.

The recipe is based on Elizabeth David’s recipe of Pork and Spinach Terrine recipe in the book “South Wind Through the Kitchen”.

*

I suggest you serve this paté with:

Sourdough Knäckebröd (recipe at the end of the post)
Plain Sourdough Bread
Mushroom Confit by Andrew Janjigian