Category Archives: cheese

How to Make Kefir

My temporary landlord Russell Busch, who is also a good friend, just introduced me to kefir making. Kefir is a fermented milk drink that contains plenty of healthy probiotics. To make kefir from milk you need kefir grains which are a live and active culture of yeast and bacteria.

Kefir is a very common drink in Eastern Europe and the Nordic countries. I grew up with it and if I remember correctly, the Swedish kefir is thicker, more sour and has a slightly carbonated feel to it. Swedes often eat kefir (with a spoon) together with muesli, cornflakes, fruit or just with sugar and cinnamon. I like my kefir best just plain with fresh fruit or berries. Others prefer making smoothies with frozen berries and fruits as it takes off some of the strong sour flavor. Luckily Kefir has become increasungly common here in the US.

The kefir making process is super easy and you don’t really need to do much as the kefir grains do most of the work.

to make kefir you will need:

  • kefir grains (which you order online here or here or somewhere else)
  • organic whole milk from cow, sheep or goat
  • glass jar
  • small piece of cheese cloth + rubber band (or similar)
  • wood or plastic spoon/ spatula
  • fine mesh plastic strainer (or stainless steel)

note: no metal such as aluminum etc can be used as it will react with the kefir grains. Although, for some reason stainless steel seems to be OK.

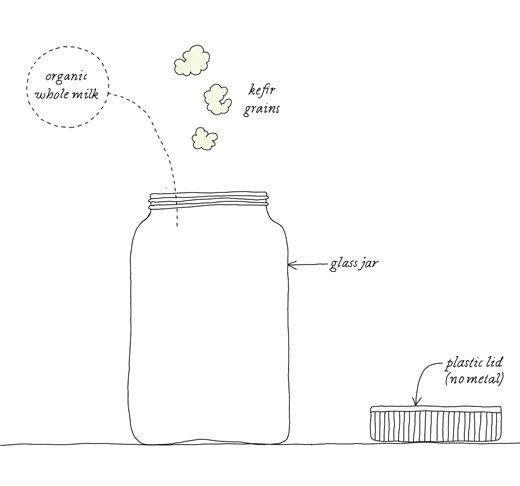
Place the new kefir grains in a clean glass jar (about two tablespoons). Pour about 1 cup organic whole milk over the grains. Cover with the cheesecloth and fasten it with a rubber band to avoid flies (I actually just use a plastic lid that is just placed on top). Leave the jar on the counter in room temperature away from any sun.

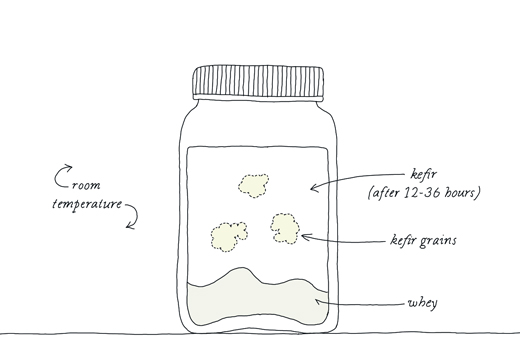
When the kefir has got thicker the kefir is probably done. It should smell pleasantly and have a mild sour taste. At this stage you will have a drinkable kefir. If it stays longer the kefir will start to separate the curdled milk from the whey. Don’t worry, the kefir is still fine, however it will be slightly thicker and have a richer taste. A longer fermentation will also create more probiotics and less lactose. The fermentation will take about 12-36 hours.

When you think you are ready, give the jar a shake and drain it through the plastic strainer to separate the kefir from the grains. It’s important to be gentle with the grains so don’t press them too hard. The kefir grains don’t have to be totally clean from curds for the next batch. The ready-made kefir can be stored in the fridge, preferably in a glass container. It will keep fresh for awhile. If you think the kefir is too loose you can strain it to reduce some of the whey. Leftover whey can be used for many things (see below).
next batch
Prepare the next batch by placing the strained kefir grains into a clean glass jar. This time you should add a little more milk and the fermenting process will probably go faster as the grains have grown larger and become more active.

The more kefir you make the bigger the grains will grow, you will therefore need to adjust the amount of milk depending on their size. At some point you need to split the grains up as there is a limit on how much kefir you can make. I suggest giving some grains to a friend or start making other things with it. You can, for example, make kefir drinks by using almond, soy or coconut milk instead of regular milk. In this kind of process the grains will not grow and therefore not last as long. I haven’t tried it yet but my landlord makes coconut kefir drinks daily.

what to do with the kefir
There are many other things you can do with the kefir if you don’t just want to drink or eat it. Kefir is excellent in dips, dressings, cakes and bread. It can also be used instead of yeast when baking bread or at least that’s what I’ve heard.

Recently I made my own cream cheese or rather fresh cheese by straining the kefir from the whey through a clean kitchen towel or several layers of cheese cloth (takes about 24 hours). This creamy cheese can be served plain or flavored with fresh herbs, garlic or anything you like. Its also great to make pierogi leniwe (Polish lazy pierogi).

You can do many things with the whey such as ferment vegetables, sauerkraut (cabbage) and when diluted 5 times with water it can be used as a fertilizer for your plants. For about a week I collected the leftover whey to make ricotta. I was amazed how well it worked out as the whey just looks like cloudy water.

storing the kefir grains
At some point you may want to have a break in your kefir making and it’s actually possible to store the kefir grains with some milk in your fridge. Just feed them with new fresh milk every now and again. When you start again the grains may not be as active as before the break, so you probably have to start again with just a small amount of milk.
 This article was 1st published at EcoSalon, 31 July 2012

Four-Cheese Ravioli with Tomato Sauce (by Stephane Lemagnen)

One small reason I draw my food is that my cooking results will probably never look as good as Stephane Lemagnen’s creations. It’s silly of me to compare (and I’m not really trying), as Stephane happens to be a well trained chef. On his site Zen Can Cook he shows mouth watering examples of his ability. If you visit the site you’ll also notice that his photography skills aren’t bad either. His cooking and recipes are creative and a great inspiration for many other cooks all over the world. Even if his creations look complicated most of the recipes are easy to follow and can be cooked in a regularly equipped kitchen like mine. My aquavit pork buns were created based on Stephane’s way to cure pork belly.

Stephane grew up in Gascony, France and trained as a cook in the Pays Basque and Paris. In 2006 he opened the avant-garde dessert bar, Room 4 Dessert here in New York City where he offered modern cuisine in the form of a dessert tasting menu. Today, Stephane works as a full time private chef for a well known (secret) client. Lucky them! Recently Stephane started Zenspotting, a space for chefs and serious amateur cooks to publish their photos with links to interesting recipes. I’m flattered to be part of it.

Stephane and I met through twitter two years ago. Ever since then we have had great and inspiring exchanges by email or tweets. I’m happy to host Stephane and I’m really happy how this simple cheese ravioli turned out. Enjoy.

Four-Cheese Ravioli with Tomato Sauce
by Stephane Lemagnen

I’m thrilled to see one of my recipes come to life through Johanna’s illustrations. I have admired her work for a numbers of years now and always loved her recipes and her artistic way of explaining how things are done. And it’s even better with a glass of aquavit! Kokblog is clever, delicious and visually pleasing and it made me wish I stuck with those art classes in 5th grade.

Ravioli are also clever and delicious little morsels of happiness, and for me they are at their best when left simple. An oozy, cheesy filling in a soft envelop of pasta with a tomato sauce flavored with hints of fresh basil is often all you need to put a smile on people’s face. And it’s as easy as… the illustrations. Drawing, in fact, is much harder than ravioli-making and eating them is definitely easier than both. They can be enjoyed right away, or made in batches and frozen for future use which makes them great little discoveries to be made in your freezer.

for the pasta dough

3 cups all-purpose or “00″ flour, plus more for dusting work surface
1/2 teaspoon salt
4 whole eggs
4 yolks
2 tablespoons olive oil

for the cheese filling

8 ounces ricotta (drained)
4 ounces Montasio cheese (grated)
4 ounces Gorgonzola (crumbled)
4 ounces Italian Fontina cheese (grated)
1 egg
½ cup basil leaves, chopped
salt and pepper
nutmeg

to finish

Tomato sauce
Basil

for the pasta dough

Combine the flour, the salt, the eggs, yolks and olive oil in a Kitchenaid bowl and combine on low speed using the dough hook (this also could be done by hand in a large bowl). Increase the speed until you get a rough dough. This should take 1 or 2 minutes.
When the mixture comes together transfer to a floured clean surface and knead the dough, turning the inside-out, until you obtain a dough that’s smooth on the outside, adding flour every time the dough starts to feel sticky. The whole process should take less than 5 minutes. Wrap the dough in plastic wrap and let it rest in the refrigerator for at least 2 hours, or overnight.

Take the dough out from the fridge and place it on a floured surface. Cut it in 4 equal pieces. With a rolling pin make rectangle with the pieces of dough, so that they fit inside the pasta machine. Start rolling pasta sheets on the thickest setting and cut in half (so it doesn’t get too long). Keep rolling reducing the setting every time.
You should be able to see your hand through the pasta sheets when you have reached the right thickness. You want it thin but not so thin that it becomes fragile.

Make an egg wash by beating an egg with a tablespoon of water. Cut sheets of pasta so they have about the same length and lay them on a floured surface.

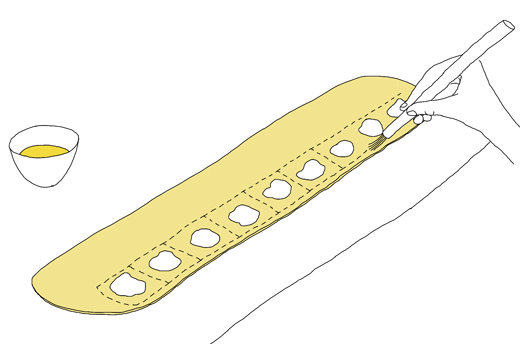
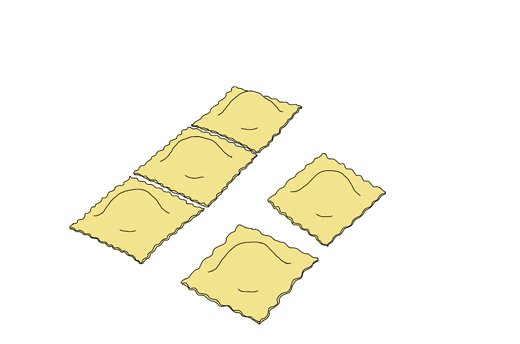
Pipe little mounds of stuffing on the pasta sheets. Brush the edges and the middle sections with egg wash. Cover with another sheet of pasta. Seal with your fingers and push out any air pockets. Use the back of a pastry cutter the size of the mounds to seal each ravioli. Now use a pasta cutter or pastry cutter to portion the raviolis. Reserve on a single layer on a tray dusted with semolina flour.

for the filling

Combine all the ingredients by hand, or in a food processor. Season to taste. Place in a pastry bag with a round 1/2 inch tip.

to finish

Bring a pot of salted water to a boil. Drop the ravioli in the water and cook until they come back to the surface. About 5 minutes. Drain them and toss with tomato sauce. Garnish with basil.

for the tomato sauce

3 tablespoons olive oil
1 small onion, finely chopped
1 clove garlic, finely chopped
1 28 oz. can San Marzano whole peeled tomatoes, including the juice, (or in season 1 3/4 pound of fresh tomatoes, peeled, seeded, and chopped)
2 tablespoons tomato paste
1 large pinch of sugar
1 pinch hot pepper flakes
fresh basil leaves

Heat the olive oil in a saucepan. Add the chopped onion and stir to coat. Reduce the heat to low and let it cook for 15 to 20 minutes, stirring occasionally until soft and translucent. Meanwhile, place the tomatoes in a bowl and crush them with your hands or using a potato masher. Add the garlic to the cooked onions and cook for a minute more. Add the tomatoes, including the juice, a few leaves of basil, the tomato paste and pinch of sugar. Season with salt and pepper and bring to a very low simmer. Cook for 15 to 20 minutes more, stirring occasionally, until it gets thicker. Remove from the heat, if you want you can blend the sauce for a few seconds for a smooth consistency.

Here are some other Ravioli recipes by Stephane:

Veal Ravioli with Culatello, Radiccio, Chanterelles & Sage
Langoustine Ravioli with Citrus-Coconut Sauce, Thai “Bird’s Eye” Chili & Fava Beans
Five-Herb Ravioli with Chanterelles, Roasted Tomato Coulis and Basil Oil

More ravioli reads on Kokblog, Duck Egg Raviolo
Pasta Shaping Work Shop on kokblog

Minty Zucchini Salad

Every summer I enjoy fresh mint from my own little garden. I grow three quite common types: pepper, lemon and water mint. All three work really well for cooking and I use them regularly in teas or as a flavor in different kinds of drinks. A few crumpled leaves together with elderflower cordial are a perfect match (with or without gin). Crushed with ice and Lime Mint makes for fantastic mojitos or a refreshing ingredient in a Pimm’s Cup.

It’s easy to grow mint but if you’re not careful, mint plants can rapidly take over your garden plot. Their roots are aggressive and hard to exterminate, so best to plant them in pots or at an unused part of the garden where they can grow freely without interfering with other growing treasures.

There are many different types of mint, some more common and others more rare. A more rare example are mint plants that have the scent of different kinds of fruits such as pineapple and strawberries. There is even a mint that has a clear flavor of chocolate. Not sure what I would do with this kind of mints but it’s funny as pineapple, strawberries and chocolate are all great companions to mint. For example in this strawberry salad, you can switch basil for regular mint.

Earlier this year in Marrakesh, I got inspired by the simple way they use mint in different kinds of salads. The salads were often just tomato, peppers and red onion cut into tiny pieces and blended together with finely chopped mint leaves, a squeeze of lemon and olive oil. Simple and delicious.

Anna Brones‘s mother makes a fresh mint pesto and it sounds perfect drizzled over a potato salad or even a grilled lamb chop. When the summer is here you may prefer something cool to eat instead of hot meals from the stove. A fresh red pepper and tomato salsa is an excellent choice. And a watermelon and feta salad makes a perfect starter or as a side for grilled meat and vegetables.

One of my latest treats is this simple and warm Zucchini & Feta Salad that is great to serve together with vegetable patties.

Warm Zucchini & Feta Salad

(for 2-4 people)

one – two zucchini
olive oil
some salt
some chili (fresh or flakes)
one or two clove of garlic
lime
¼ lb (100 g) feta
about 10 leaves of fresh mint

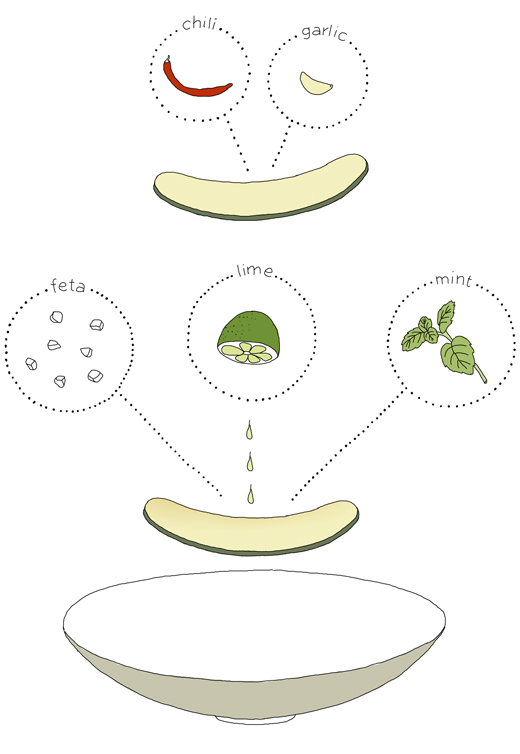
Wash the zucchini and cut thin slices along the long side (you may want to cut the zucchini in half crosswise first). Sprinkle some salt and olive oil over. Heat up a pan with some chili and fry the zucchini slices at a semi high heat (you may also put them on the grill or roast them if you like). Just take a few at a time as they shouldn’t touch each other while cooking. When the slices start to brown, turn them over. Just before they are done squeeze some garlic over. When the garlic has melted and the zucchini has a nice color, transfer them over to a serving dish. Repeat until all zucchini slices are done. Squeeze some lime and drip it all over the salad. Cut or crumble the feta and sprinkle it over the salad together with finely chopped mint. Season with salt and pepper if needed. Serve immediately.

 This recipe was originally published at EcoSalon on 22 March 2012

Hazelnut Baked Cauliflower


This summer, when I’ve had the house full of guests, I’ve been in need of simple things that can be done quickly and feed several people. One of our favorites has been this Hazelnut Baked Cauliflower that we’ve served together with different kinds of salads or BBQ (works both with vegetables and meat).

one head of cauliflower
olive oil
fresh basil and oregano
garlic
handful of hazelnuts
salt and pepper
juice from ½ lemon

grated parmesan

Rinse the cauliflower and break up the florets into smaller pieces. Place them steams down in one layer on an oven dish. Chop basil and oregano finely and mix with olive oil, minced garlic and chopped hazelnut. Season with salt, pepper and some lemon juice. Pour mixture over the cauliflower and blend together. Let soak for 15 minutes. Bake in the oven at 400°F (just over 200°C) until al dente. Sprinkle a rich amount of grated parmesan on top. Serve immediately.

Pear Marmalade

the scout 2

I don’t know what this has to do with marmalade… but I have a friend who once poisoned a whole scout camp, just because he didn’t wash his hands!

for the marmalade you need

some pears
less than a ¼ part of brown sugar
small piece of fresh ginger, minced
a splash of water

Peal the pears and chop them into small pieces. Pour the sugar over the pieces and stir. Add the ginger and a little water. Bring mixture to boil, then lower to a gentle heat and cook for about an hour until pears are soft. If you want a smoother texture, process the jam in a blender. Pour the warm jam into a clean jar, screw the lid on and turn the jar upside down on the counter. Leave to cool. Serve with ripe goat cheese or / and aged cheese that has been taken out of the fridge for at least a half hour.

Note: as this jam is not conserved I suggest you eat it while its fresh!