Tag Archives: illustrated recipe

Fika: Fyriskaka with Pear

kindvall-fyriskaka-pear-4

Last Saturday I hosted a classic kafferep (Swedish coffee gathering with cakes and cookies) to celebrate the release of my book Fika – The Art of the Swedish Coffee Break. I had such a great time talking cookies and cakes while sipping bubbles (not the usual drink for this kind of party but essential when you need to celebrate). For the party I had baked up a selection of the cakes from the book. For e.g. there were Cardamom buns, Finska pinnar, Syltgrottor, Muskotsnittar, Anis & Hazelnut Biscotti, Hazelnut & Coffee Cake, Almond tart and Sticky Chocolate Cake (my neighbor’s son wanted to move in with me after having his first bite).

During the first week, the book made it into New York Times’ T Magazine (review by Lindsey Tramuta), Huffington Post (review by Alison Spiegel), Eater (review by Kat Odell) and many more. The book was also mentioned in the Swedish evening post Expressen.

I’m super flattered and happy how well our book has been received so far.

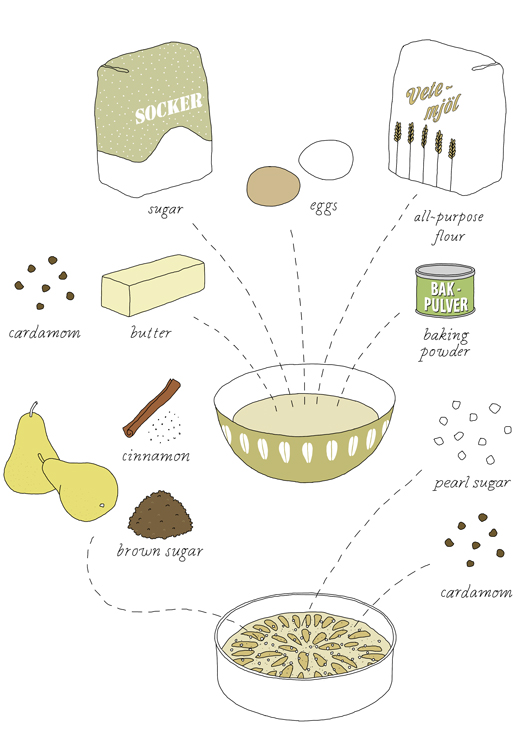
Yesterday I decided to make another version of the Swedish classic Fyriskaka. Fyriskaka is traditionally made with apples (recipe in the book) that are coated with cinnamon. In my version below I’m using pears instead of apples. I’m also suggesting a new topping, cardamom and pearl sugar (pärlsocker). If you can’t get hold of pearl sugar I suggest you use brown sugar. Its not the same, but equally tasty).

Fyriskaka with Pear
(adapted from the recipe in Fika by Anna Brones and Johanna Kindvall, page 94)

9 tablespoons (4½ ounces, 128 grams) unsalted butter
1 teaspoon whole cardamom seeds, crushed
3 to 4 medium-size pears (about 14 oz, (400 grams)
1-2 tablespoons brown sugar
2 teaspoons cinnamon
2/3 cup (4 2/3 ounces, 132 grams) natural cane sugar
2 eggs
1 cup (5 ounces, 142 grams) all-purpose flour
½ teaspoon baking powder

topping
1-2 tablespoons pearl sugar (or brown sugar)
1 teaspoon whole cardamom seeds, crushed

Preheat the oven to 350°F (175°C). Grease and flour a 9-inch (23-centimeter) springform pan.

In a small saucepan, melt the butter. Remove from the heat and add the cardamom, then set aside to cool.

Peel the pears and slice them thinly. In a large bowl, mix together the brown sugar with the cinnamon; then add the pears and carefully turn them so that they are evenly coated. Set aside.

In another large bowl, whisk together the slightly cooled butter and cane sugar. Add the eggs one by one, whisking until evenly blended. Sift in the flour and baking powder and stir together carefully until you get a smooth batter.

Spread the batter in the baking pan. Place the pear slices in the batter in a circular formation; the pieces should be close together. Sprinkle the pearl sugar and crushed cardamom on top.

Bake for 30 to 40 minutes. The cake is done when a toothpick or knife inserted into the center comes out clean. Remove from oven and let cool before serving.

*

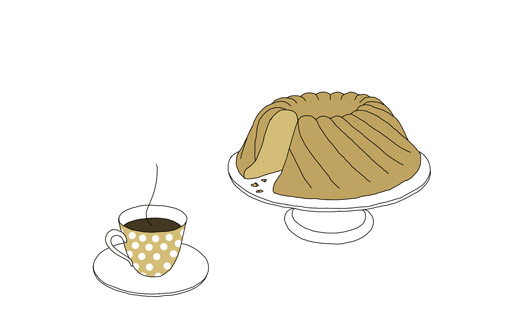
Want more fika ideas? Click the coffee cup icon here to the left, and you will get several of my other fika related recipes.

Links
Behind the Scenes of the making of Fika
R
ead also Anna Brones’ version here
Sourdough Starter Diagram

© Johanna Kindvall

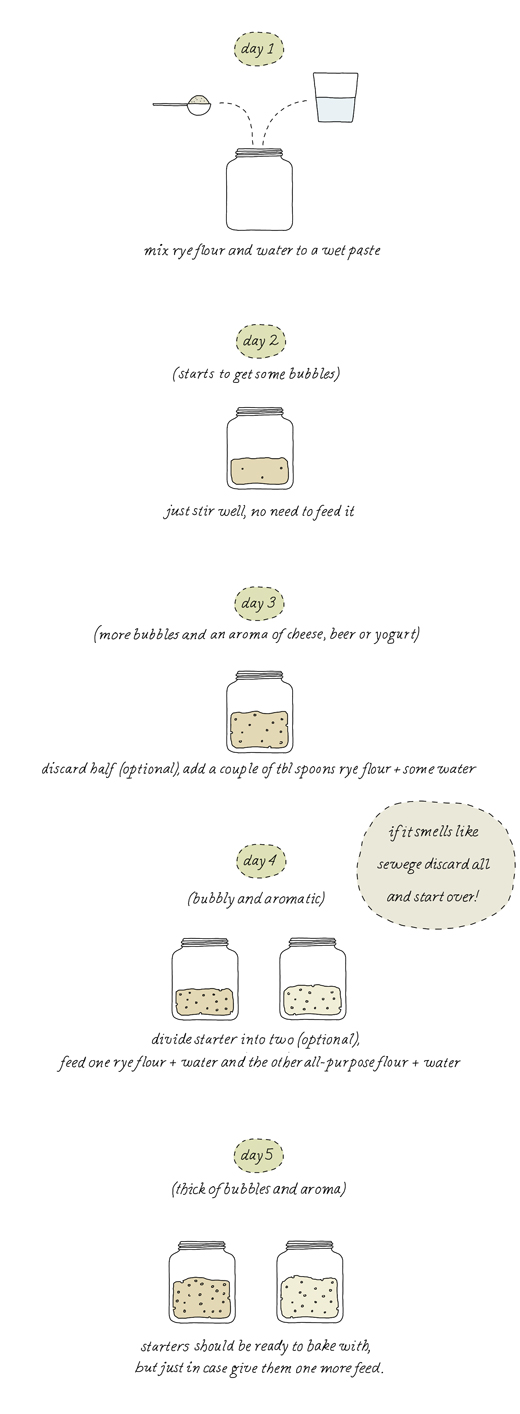
Currently I’m working on a new design of kokblog. I’m planning to launch the new design next week. In this process I have decided to turn some of my pages into posts. And one of them is my diagram on how to make a Sourdough Starter.

Description: The above diagram is just one way to start a sourdough starter. At the end you will have one rye and one wheat starter. I use either starter for most of my breads. The wheat starter can also be used in a sweeter dough like for e.g. Cinnamon Buns etc. I bake with my starters 1-2 times a week (sometimes even more). I keep them in my fridge and take either of them out one or two days before I want to bake. Depending on how long it has been without ”food”, I feed it once or twice with a few tablespoons of flour and a little water. I keep my starters small, in that way I always have just enough and there is no need to discard anything. I have kept a starter in the fridge (without feeding it) for up to 3 weeks (not recommended). You can also freeze the starter if you are not planning to bake for a longer time. Just give the starter some time to recover by feeding it once or twice every day for a couple of days before baking. When the starter is lively and full of bubbles it’s ready to bake with. My diagram is based on Iban Yarza‘s How to Make a sourdough starter video.

NOTE: Since I published this last year, I have discarded my rye starter (I simple baked it up). It was just easier to keep one. If I ever want to use a rye starter I feed one part of my all-purpose starter with just rye flour for a couple of days.

*
Links to my sourdough breads

Sourdough Bread with Rye

Plain Sourdough Bread

Wild Fennel Knäckebröd at Case Vecchie


Classic Chocolate Mousse

© Johanna Kindvall

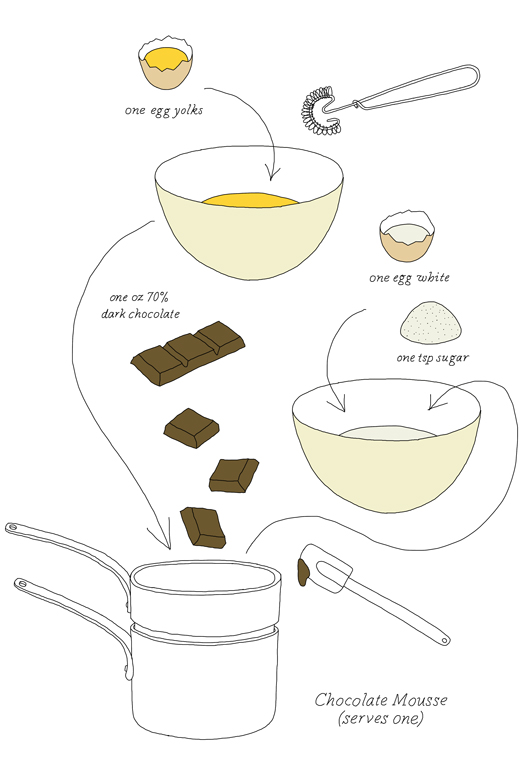
My grandmother always served chocolate coffee mousse for dessert and I loved it. But as a kid, I didn’t really like coffee on its own. The first time I ever drank coffee I kept adding sugar to make it taste better… it just made it worse and it took me years to recover. Today, now that I have learnt to love coffee (especially strong and black), I still can’t imagine drinking coffee with sugar.

Oh well, coffee in cakes, ice cream or chocolate mousse is a always a treat (and in my upcoming book which I co-authored together with Anna Brones, Fika – The Art of the Swedish Coffee Break we share a delicious Hazelnut Coffee Cake recipe). When I started to make chocolate mousse this winter I ended up not flavoring it at all. I just liked it as it was. Thick, chocolaty and totally comforty! The recipe I’m using, is an old classic formula which you can find in Elizabeth David’s book French Provincial Cooking. The recipe is simply described with a few words:

“4 yolks beaten into 4 oz. of melted bitter chocolate, and the 4 whipped whites folded in.”

Her recipe serves 4, which makes this a super clever recipe. You just need to count one egg and one ounce chocolate (about 30 grams) per person.

The illustrated recipe diagram above suggests adding one teaspoon of sugar per serving, which I learnt from Felicity Cloake’s How to make perfect chocolate mousse article in the Guardian.

And I’m sure a little bit of cold coffee, some drops of rum or juice of an orange will work fine to spice it up. As I said, I like it just plain or topped with star anise infused black berries.

*

check also out these chocolate mousse links

Chocolate Mousse (coffee & dark rum) by David Lebovitz (adapted from Julia Childs recipe)
Spizy Boozy Mousse (coffee, cinnamon & ancho chili) by Sara Kate Gillingham @ theKitchn
Swedish Chef making Chocolate Moose – Muppet Show (video)

If you are afraid to get Salmonella by using raw eggs, you can pasteurize them. (I get fresh organic eggs that are free from hormones and antibiotics).

*

The Art of Swedish Holiday Baking (Recipe for Ginger Spice Cake)

kindvall-spicecake-coffee-02

Despite different time zones, my book collaborator Anna Brones and I always find time to bake “together”. And for our regular skype meetings we always treat ourselves with strong coffee and something sweet to nibble.  This week we are celebrating a little extra; Fika just got listed in Saveur Magazine‘s 100 cooks’ edition list! (issue 171, January & February 2015). We wish you all a wonderful and sweet Holiday and a Happy New Year.

Julbak: The Art of Swedish Holiday Baking (With a Recipe for Ginger Spice Cake)
Text by Anna Brones

If there’s one thing that’s essential to a good December in Sweden, it’s julbak. It might come as no surprise that “Christmas baking” is of the utmost importance in a country where December is cold and very dark month; what’s better on a chilly winter day than a warm kitchen wafting of freshly baked gingersnaps? Not a whole lot. Well, except for a kitchen wafting of freshly baked gingersnaps AND a pot of glögg.

Holidays, no matter what they are and what culture they are celebrated in, are often linked to certain foods. The act of preparing a particular dish ties us to the tradition and the celebration. While we may find ourselves far from family, friends and the place that the tradition comes from, if we prepare a certain food, we are immediately transported back.

Julbak is this kind of tradition, and you’d be hard-pressed to find a Swede, whether they’re living in Sweden or elsewhere, that isn’t craving pepparkakor come the month of December.

While julbak can consist of a whole variety of baked goods, there are a few Swedish classics that are indicative of this time of year:

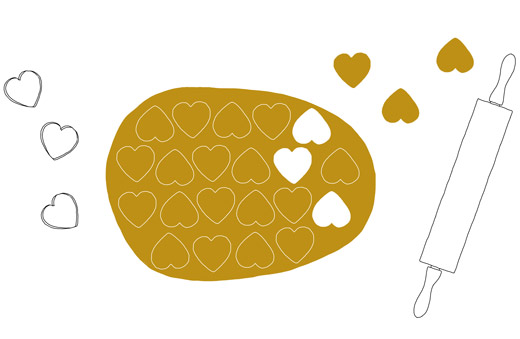
Pepparkakor – Swedish gingersnaps, rolled out thinly and cut into traditional shapes like hearts, pigs and adorable gingermen and gingerwomen. Ready to try pepparkakorHere’s a recipe.

© Johanna Kindvall

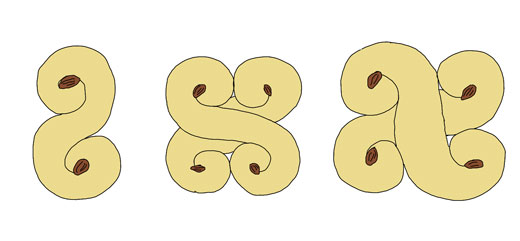
Lussekatter – Also known as lussebullar or saffransbullar, these are the beautiful sweet buns baked into a golden yellow. The color comes from the addition of saffron, and the buns are decorated with currants. They are commonly baked for St. Lucia day. Here’s a recipe if you’re feeling up for it.

kindvall-lussekatter

Glögg – While the Swedish mulled wine isn’t a baked good, you can’t eat all of the julbak treats without a nice mug of glögg to go with them. Here’s a recipe to try.

Of course, the problem with both pepparkakor and lussekatter is that you need time to bake them, and not everyone always has it. But because the flavors are so iconic, in the modern Swedish baking world, you’ll see saffron and the spices used pepparkakor incorporated in a variety of creative ways in other recipes, all helping you get the traditional flavors of December with a little less kitchen work.

Last December, Johanna and I were caught up testing all of our classic Christmas recipes for our book Fika: The Art of the Swedish Coffee Break – which is coming out in just a few months – so this year we thought it might be fun to do something a little different. In Sweden, the pepparkaka can take many forms. In our book for example we have the classic version as well as the softer ginger cookie, which the Swedes smartly call a lunchpepparkaka, because it’s so dense you can in fact eat it for lunch. This recipe takes the form of a soft ginger cake, but still includes all the spices normally used in a traditional pepparkaka. The end result is a tasty gingersnap spice cake of sorts. Perfect with glögg or just a strong cup of coffee.

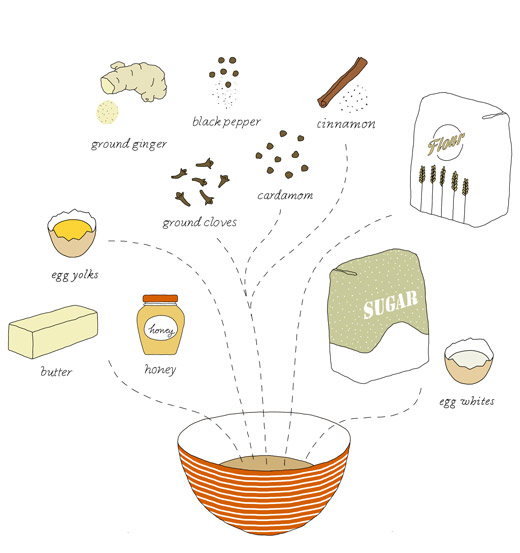
Anna & Johanna’s Ginger Spice Cake
makes one 6-cup Bundt cake

10½ tablespoons (5¼ ounces, 148 grams) unsalted butter
3 egg yolks, room temperature
¼ cup (2½ ounces, 70 grams) honey
2 teaspoons whole cardamom seeds, crushed
2 teaspoons cinnamon
2 teaspoons ground ginger
1½ teaspoon ground cloves
3 tablespoon milk
¾ cup (3¾ ounces, 106 grams) all-purpose flour
3 egg whites, room temperature
¾  cup (5¼ ounces, 148 grams) natural cane sugar 

Preheat the oven to 350°F (175°C). Grease and flour the Bundt pan. 

In a bowl, cream together the butter with the honey until well blended. Add the egg yolks one by one followed by the milk and the spices. Mix the batter together.

Sift the flour, then stir it carefully into the batter, stirring as little as possible until you get an even and sticky batter. The batter is quite stiff but will get lighter in the next step. 

In a separate bowl, whisk the egg whites, ideally with an electric mixer. When soft peaks form, add the cane sugar little by little. Whisk until stiff peaks form. Carefully fold the sugar and egg white mixture into the batter and keep folding until the batter is evenly blended. Be careful not to overstir. Pour directly into the Bundt pan. 

Bake for 40 to 45 minutes. The cake is done when a knife or toothpick comes out clean when inserted at the thickest part of the cake. If the cake starts to get a golden brown color earlier (which can happen after 20 minutes), remove it from the oven, cover it with aluminum foil, and put back in the oven. This will prevent the top of the cake from burning. 

Remove the cake from the oven and let cool for a bit before inverting it onto a plate.

*

more by Anna Brones and me

ToscaKaka with Orange (recipe)
Kanelbullar (recipe)
Mazariner (recipe)
Semlor (recipe)
Amuse Bouche (illustrated food caption series, Foodie Underground 2012-2013)
Fika – The Art of The Swedish Coffee Break (about the book and where to pre-order)


Madame Fromage’s Semolina Crackers (book review)

© Johanna Kindvall

Another cookbook that’s become one of my favorites is Di Bruno Bros. House of Cheese: A Guide to Wedges, Recipes, and Pairings by Tenaya Darlington, aka Madame Fromage (Running Press, 2013). I have mentioned the book here several times but I think the book is worth it’s own post. First of all the book is not just a cookbook it’s an introductions to 170 different cheeses. The book is a collaboration with Di Bruno Bros., a well known cheese shop in Philadelphia.

In the book Tenaya simply tells stories around the selected cheeses, includes several ideas and tips on how to serve, what to drink and pair them with. Tenaya also teaches you how to buy a cheese and how to talk to a cheesemonger. The main purpose of the book is to help the reader find the cheese of their dreams. Unfortunately I want them all!

The book has several recipes for treats that works well with cheese, such as Lavender Mustard, Balsamic Poached Figs and Semolina Crackers (see below). There are also many cheesy recipes, for e.g. Manchego & Marcona Almond Pesto and mouth watering Grilled Peaches with Quadrello di Bufala

I’m so looking forward to her next book, which is a cocktail collaboration with her brother André Darlington. When ever I read something by Tenaya, the book or something on her website I end up hungry with a big smile on my face. Tenaya has loads of humor. Chapters as Baby Faces, Stinkers and Pierced Punks is just a few examples of her excellent wittiness!

I’m dreaming that one day Tenaya will have me over for dinner…
© Johanna Kindvall

Madame Fromage’s Semolina Crackers

(I didn’t counted them but there were plenty to serve with a cheese plate for 4 people)

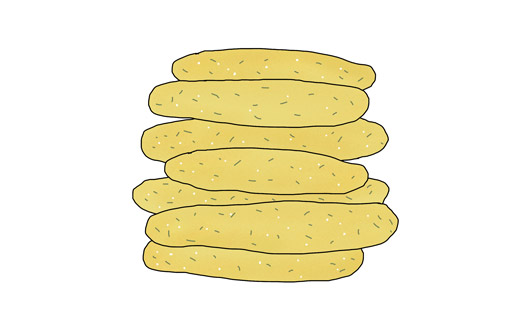
As you know, I like to bake, so after receiving the book last Spring I almost immediately baked Tenaya’s Semolina Crackers (that are adapted from Heidi Swanson‘s recipe).  I like the way Tenaya bakes them, just simply rolled out on a baking sheet, baked, cooled and then “cracked” with your hands before serving.  You can also roll them out with a pasta machine, like I suggest here below. I have halved the recipe and changed the method slightly, otherwise it’s pretty much the same as in the book.

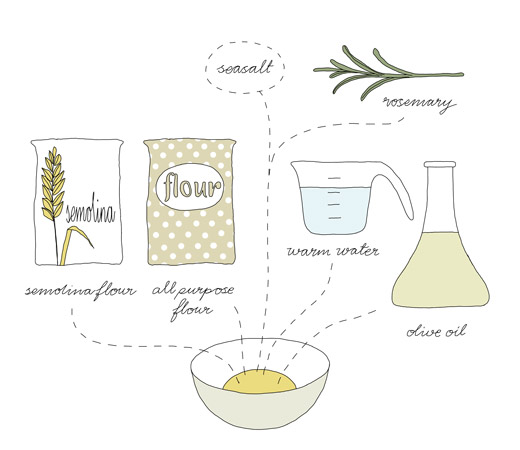
dough
¾ cup (123 grams) semolina flour cup
¾ cups (106 grams) all purpose flour, plus extra for rolling out the dough
one teaspoon flaky sea salt (more if you like saltier crackers)
½ cup (about 120 ml) warm water
about 2½ tablespoon olive oil, plus extra for brushing

flavour
fresh rosemary

Mix together the water and the olive oil in a large bowl before adding the flours, sea salt and chopped rosemary. Work together well with a wooden spoon or spatula.  Transfer the dough to a floured flat surface and knead for about 5 minutes. The dough should feel smooth and not sticky. Shape the dough into a ball. Place in an olive oil greased bowl. Let the dough rest in the fridge for one hour.

Cut out small pieces (size depends on how long crackers you want) and flatten them out slightly with your hands. Roll them out about 2″ wide with a rolling pin or pasta machine. Roll them out as thin as you can and desire. (I roll them out to level 5 in the pasta machine which is less than 1/8 inch thickness). Dust with more flour if the dough feels sticky.

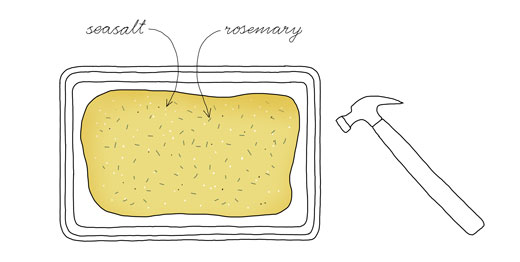
Grease a baking sheet with olive oil. Place the long crackers on the sheet and bake at 350°F  (175°C) for about 15 – 20 minutes until golden brown. Let the crackers cool completely (not stacked) on a flat surface. Store in airtight containers. My crackers never lasted that long, but according to Tenaya they store well up to a week.

© Johanna Kindvall

 *

Tenaya will have some book signings (around Philadelphia) in December (2014).

More with Tenaya Darlington on Kokblog

Your Spring Goat Cheese Primer (part 1)  collaboration between Tenaya & me
Late Summer Cheese Picnic
(part 2) collaboration between Tenaya & me
Smoke and Funk: A Fall Cheese Board (part 3) collaboration between Tenaya & me
How to Turn Your Desk Into a Cheese Board – guest post by Tenaya