Tag Archives: illustrated recipe

Ceviche with Mango and Avocado

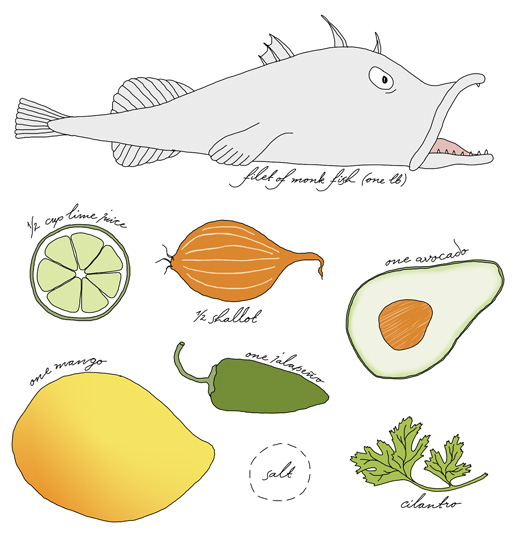
Ceviche has been one of those dishes I have wanted to make for a very long time. And now I can’t stop. I like it as the illustrated recipe above, which has a great balance of spice and fruitiness. I have tried other versions as well but this one is so far my favorite.

My recipe is based on a ceviche I was treated to on my last day of 2013. The host made it with cod, which was excellent and he also included freshly cooked shrimps, which I haven’t. The lime ratio I got from Michael Ruhlman’s gorgeous looking Red Snapper Ceviche recipe as it sounded like a good measure. My recipe suggests monkfish but it works with any other white firm sea fish such as cod, tilapia, halibut etc.

1 lb (about 1/2 kg) fresh monkfish*, whole or fillets
1/2 cup (120 ml) lime juice (4-6 limes, dep. on the fruit’s juiciness you might need more or less)
1/2 shallot
one jalapeño
one mango
one avocado
cilantro
salt

If not using fillets, bone and remove skin from the fish. Rinse. Cut the fillets into small pieces (approximately 1/2″ cubes). Chop the shallot very fine.  Place fish and shallots in a bowl and cover with lime juice. Make sure everything is evenly coated. The process can go quite quickly and some say it may be done in 10 minutes. All depends on how thin or thick your pieces are. I often let it marinate for 2-3 hours before I serve it. During this time, keep it cool in the refrigerator. You may check on it and stir it around a little every so often. When ready, the fish should be white and not translucent.

Just before serving: remove the seeds and chop the jalapeño finely. Cut the mango and avocado into small cubes. Place everything including the fish in a large serving bowl. Season with salt. Decorate with plenty of fresh cilantro. Serve with tortilla chips or as I sometimes do, thin knäckebröd.

* To be on the safe side it’s a good thing to get frozen fish or even freeze the fish for 2 – 3 days before making ceviche. The freezing will kill any possible parasites in the fish. I have had good results both ways. Please note that the fish, frozen or not still has to be of good quality. Here is an old article at New York Times about it.

Before buying any fish check with Seafood Watch for the most sustainable options.

*

Other ceviche recipes
Swordfish Ceviche with an Asian Flair by Winnie Abramson at Food52
Sea Urchin Ceviche by norecipes

Guest Post: Mushroom Confit by Andrew Janjigian

I think the first time I talked with Andrew Janjigian (on twitter) was when he suggested an excellent trade: homemade sujuc (spicy sausage from the Middle East) for an illustrated Pide t-shirt!

Andrew is an associate editor at Cooks Illustrated Magazine, a passionate baker and a mycologist! It’s no wonder we connected on twitter, as you know, baking and mushrooms (especially foraging) are two of my favorite things (besides drawing of course). However, compared to me, Andrew is a master, in fact he teaches classes in both subjects in Cambridge, MA where he lives. He is also an organic chemist, professional cook and as a pizza enthusiast (he used to be a regular contributor at Slice & Serious Eats), he recently he built his own pizza oven. Impressive!

As if the above weren’t enough I just recently discovered he is, on top of everything, an excellent photographer. He has a great eye for detail, but most of all he can really capture the characters of people, women and men. His photos can be staged or captured in the moment, they can be funny or very serious and intimate. At the moment, a selection of his photos are showing at Gallery 263, in Cambridge.

Its a great pleasure to have Andrew as a guest here on koblog and I can reveal that there will be more by us soon.

Mushroom Confit
by Andrew Janjigian

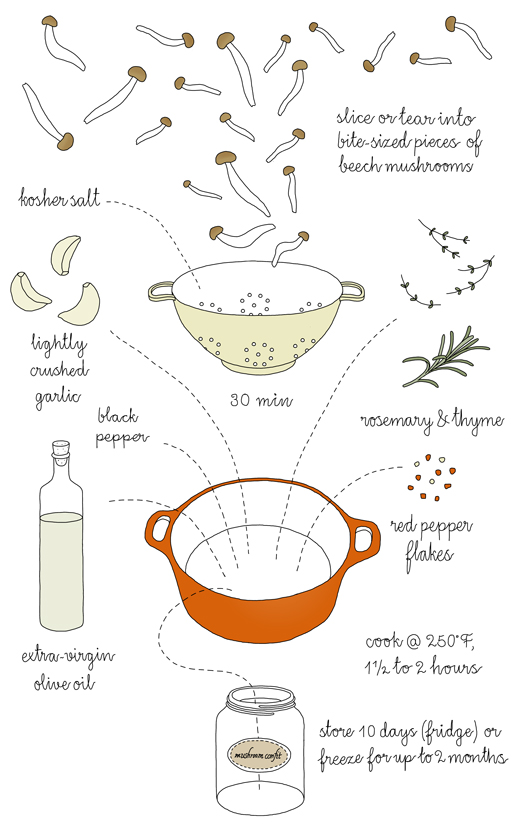
This confit is one of my favorite ways to preserve mushrooms of nearly any kind. Delicately flavored mushrooms such as chanterelles or morels are best used by themselves, or paired with milder ones such as oysters or—as seen in Johanna’s lovely illustration—beech mushrooms. Other varieties may be combined however you like.
As for the confit’s uses, they are nearly endless. As a sublime topping for pizza, of course. Added to sautéed greens. Mixed into an omelet or scrambled eggs. Spooned over crusty bread or crackers, perhaps along with a funky cheese. Or just eaten with a spoon, right from the jar. Once you taste it, I’m sure you’ll think of plenty more.

Mushroom Confit Recipe
makes about 4 cups

2 pounds fresh mushrooms of any kind, cleaned, woody stems removed
2 teaspoons kosher salt
4 cloves garlic, peeled and lightly crushed
2 sprigs fresh thyme
1 sprigs fresh rosemary
2 bay leaves
1/4 teaspoon red pepper flakes
1/2 teaspoon freshly-ground black pepper
2 cups extra-virgin olive oil, plus more as needed

1. Adjust rack to lower-middle position and preheat oven to 275°F (135°C). Slice or tear mushrooms into bite-sized pieces (smaller ones may be left whole). Place in colander set into large bowl, toss with kosher salt, and let stand for 30 minutes, stirring occasionally. Discard any water collected in bowl. (Mushrooms can be further dried of excess moisture in a salad spinner, if available.)

2. Transfer mushrooms to Dutch oven, along with garlic cloves, thyme, rosemary, bay leaves, red pepper flakes, and black pepper, and toss to combine. Add oil, stir to combine, and transfer to oven.

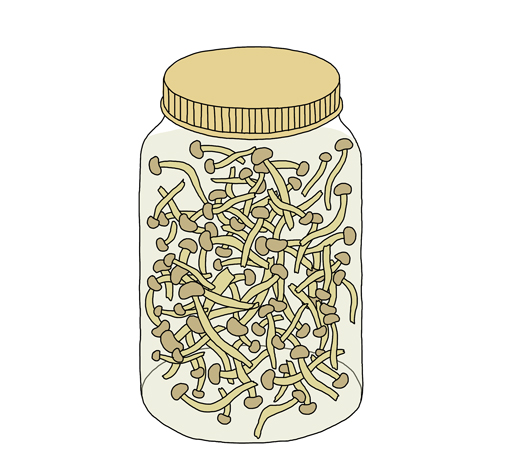
3. Cook, stirring occasionally, until mushrooms are tender, 1-1/2 to 2 hours. Allow to cool. Discard herb stems and bay leaves. Pack mushrooms in jars, along with enough oil to cover. (Excess oil may be reused or repurposed.) Seal and refrigerate for up to 10 days, or freeze for up to 2 months. (For long-term shelf stability, jars can be pressure canned for 2 hours at 15 psi.)


More with and about Andrew

Cooks Illustrated’s Thin-Crust Pizza: Works Like a Charm
post by Adam Kuban at Serious Eats

How editor Andrew Janjigian took the fear factor out of souffle, Cooks Illustrated

Follow Andrew on
Twitter, Instagram and Tumblr.

*

Just want to say mushroom confit is one of my favorite recipes here on kokblog. Most of the time I serve it as starter together with home made bread and a spread of dishes like paté, pickles, dried sausage and chickpea & almond salad. I also like it with pasta. It’s such a great treat.

Toscakaka med Apelsin (Swedish Almond Cake with Orange)

Toscakaka med Apelsin (Swedish Almond Cake with Orange)
by Anna Brones

When spring rolls in, I always think of my mother giving me a package of pink, yellow and blue feathers. They had thin metal wire at the tips, to be wrapped around branches. From the kitchen window I could see my mother cutting thin branches from the birch tree. She would bring them inside, set them in a large glass vase, and I would get to work attaching the feathers.

In Sweden, just like at Christmas you decorate a tree, at Easter time you get out the påskfjädrar and decorate a collection of branches, a tradition that dates back to the late 1800s. And my mother was sure that we always had a few bags of påskfjädrar on hand so as to make our house a colorful celebration of the season.

Many people in Sweden celebrate Easter, whether or not they have religious leanings. In fact, today it’s mostly celebrated as a secular holiday, one where everyone gets time off to celebrate the long weekend. Easter weekend is a time to gather with friends and family and eat good food together. There are the traditional Swedish holiday dishes like pickled herring, but whatever is served on the table is always an indicator of the season, with spring-friendly foods. And there are eggs of course. After a winter of heavy foods, the Easter celebration can be refreshing.

If you’re lucky, you may be gifted a cardboard egg, full of sweets, and if that isn’t enough for you, there’s sure to be an assortment of cakes to go with coffee. Because in Sweden, there is always cake and coffee.

Which brings us to the question: what kind of cake to serve?

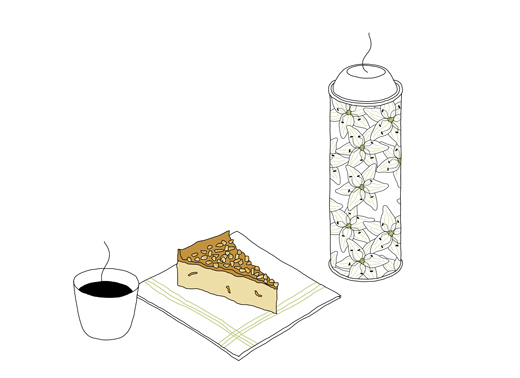
Toscakaka is a classic Swedish recipe; you’ll find it in many an old cookbook, and it’s often an option at pastry shops. Its almond and caramel top makes it a step above ordinary cakes, which makes it a good option for a festive and celebratory meal. But the magic of this recipe is when the caramel seeps into the cake during baking, making for a moist and flavorful cake.

As we come out of the winter and citrus season, we thought it only fitting to celebrate the arrival of spring with an infusion of orange. The orange zest and juice in the cake pair well with the rich caramel on top, and giving it the perfect balance of flavors. You’ll often find this type of cake made with baking powder, but we opted to make it rise by separating the eggs and whisking the egg whites, similar to making a meringue.

Glad påsk!
Anna & Johanna’s Toscakaka with Orange

one 9” cake

cake
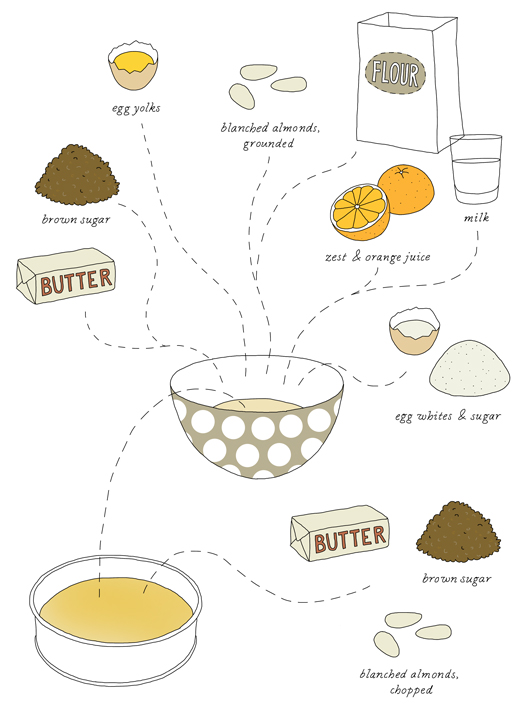
3 ½ oz (100 grams) unsalted butter, room temperature
¾ cup (3 ¾ ounces, 106 grams) blanched almonds
3 egg yolks, room temperature
3 egg whites, room temperature
1/2 cup (3 ¾ oz, 106 grams) brown sugar
1/2 cup (3 ½ oz, 100 grams) natural cane sugar
1/2 cup (2 1/2 ounces, 71 grams) all-purpose flour
3 tablespoons milk
1 tablespoon orange zest + 3 tablespoons orange juice

almond & caramel topping
3 ½ oz (100 grams) butter
1/3 cup (2 ½ ounces, 71 g grams) brown sugar
3/4 cup (3 ¾ ounces, 106 grams) blanched almonds

Preheat the oven to 350°F (175°C).

Grease a 9” spring form pan and sprinkle some breadcrumbs evenly.

Grind the blanched almonds for the cake in a food processor until almost finely ground; there could still be a little chunks of almonds left.

Cream together butter and brown sugar until well blended and creamy. Add one egg yolk at the time and mix it well together. Sift in the flour and carefully fold it into the batter together with the ground almonds. Add in the milk and orange zest. Stir as little as possible until you get an even and sticky batter.

In a grease-free bowl, whisk the egg white with an electric whisk (or by hand). When soft peaks forms add in the cane sugar little by little. Whisk until stiff peaks forms. Carefully fold the sugar and egg white mixture into the batter and keep folding until the batter is evenly blended. Be careful not to over stir.

Pour the batter into the greased and breaded spring form pan.

Bake at 350°F (175°C) for 25 minutes at the lower part of the oven. While cake is baking prepare quickly the almond & caramel topping.

Melt the butter together with the brown sugar. In the mean time chop the rest of the blanched almonds roughly. When the butter and sugar is melted add the almonds and stir together until it thickens.

Take out the cake from the oven (if the cake feels too wobbly let it bake a little longer). Poor the almond & caramel over, carefully spread it evenly. Bake the cake for another 10 – 15 minutes or until cake had got a nice color and a toothpick comes out clean when inserted to the thickest part of the cake.

Remove the cake from the oven and let cool. Once cool, remove the cake from the pan.

*

This post was also published at Foodie Underground.


Other articles by Anna & Johanna

Mazainer – Swedish Pastry Classic
Lussebullar – Swedish Saffron Buns
Kanelbullar & kardemummabullar
and
Anna is also my partner for my 1st book (Ten Speed Press, Spring 2015)
Guest Post: Cocktails by Walczak & Heiss


I first met Marek Walczak in Sweden, late 2002. He was showing one of his interactive art works “Apartment” and at the opening he mistook me for my twin sister (who was the curator of the show). Ever since then we have lived and worked together. Besides other things we have designed and renovated 2 houses from scratch and we have also built a tiny little studio house together.

About five years ago Marek started to work with Wes Heiss who he has known for a long long time. Like me, both of them have a background in architecture. Besides many other things, Wes knows how to build cars and violins. Over the last few years he has also become an expert in operating 3D printers of various kinds. Together, Marek and Wes has become a perfect team that can design and build really cool media-based public art installations.

One of their latest works (which I made some illustrations for) is an art installations in Denver, called 14th Street Overlay. This installation consist of 23 individual small cast bronze sculptures of optical instruments like binoculars, iPhones and movie cameras that are embedded along 14th street. Each object gives you a view of the existing street merged with narratives and projections of the past.

I really enjoy working with Marek & Wess. I also enjoy their skills in making cocktails and drinks. With them, there is always a new drink that needs to be mixed and tested. It could be a classic but also something totally new. With their help I have picked out three drinks from their cocktail collection, The Saint, Tatanka (a Polish classic) and Gingerish.

Cheers!

UPDATE: Just heard that Walczak & Heiss won the commission for Public Art for the gardens of the Berry Center, Wyoming. Congratulations to both of you!

*

* St. Germain is an Elderflower liquor which you probably can substitute with something similar. You can also switch out this part with equal amount of Elder Flower cordial.

** Zubrówka is a Polish vodka flavored with bison grass.

*** For best flavor, infuse the ginger with the whiskey for at least 4 hours.

*

More drink links…

Pomegranate Molasses & Gin recipe diagram on kokblog

Akvavit recipe diagram on kokblog

Engineers guide to drinks post by Flowing Data

Plain Sourdough Bread

About two years ago I started my two sourdough starters, wheat and rye. Both of them are still active and have been with me back and forward to Sweden, London and Brooklyn. This summer I will bring them to Sicily and Amsterdam.

The breads I bake are often simple, with or without extra flavor (for e.g. Caraway, fennel or anise seeds, rosemary etc). The flours I mostly use are regular unbleached flour, whole wheat, dinkel or rye flour (mixed with regular flour or 100%). I have also baked with the addition of sunflower seeds, linseeds, prunes and with beer or my home made kefir instead of water. I also bake sourdough knäckebröd.
(I will share more of this eventually). The variations are endless, but I am always amazed how good just flour, water and a little salt can taste.

Plain Sourdough Bread
adapted from Peter Reinhart’s recipe of San Francisco Sourdough Bread, “artisan  bread every day”, Ten Speed Press, 2009.

gives 1 large, 2 medium or 3 smaller loaves

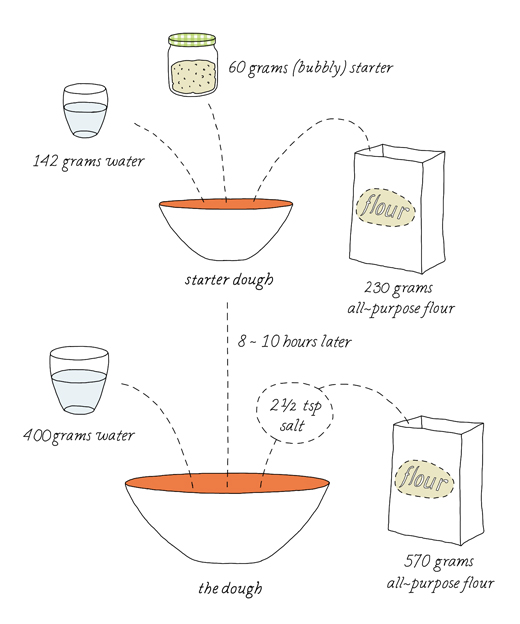
starter dough

60 grams (about ¼ cup, 60 ml) lively starter (rye or wheat), at room temperature
142 grams (2/3 cup,  a little less then 150 ml) water, at room temperature
230 grams (1 2/3 cups, 400 ml) all-purpose flour (unbleached)

the dough
(8-10 hours later)
all of the first starter dough
400 grams (1 ¾ cup, 400 ml) water, at room temperature
570 grams (4 cups, 945 ml) all-purpose flour (unbleached)
2½ teaspoon salt

starter dough (I suggest in the morning)
Mix together starter with water and flour until well blended and you can form a ball (this starter dough should feel like a dough and be sticky). Transfer to a slightly floured flat surface and knead for about a minute. Place the dough in a bowl and cover with plastic wrap. Let rise for 8-10 hours (or overnight).

the dough (for e.g in the evening)
Divide the dough into 10 equal pieces. Place them in a bowl and pour over the water. With your fingers or a spoon loosen the pieces up in the water.
Add the flour and salt and mix together until well blended.
Let the dough rest uncovered for about 5 minutes.

The dough should feel slightly sticky and be flexible (add more flour or water if necessary). Transfer the dough to a slightly floured flat surface and knead for about 1-2 minutes.
Let the dough rest uncovered for 10 minutes.

Stretch and fold the dough. Form the dough to a ball and place in a bowl (slightly oiled), cover with some plastic wrap. Repeat the stretch and fold 1 – 2 times with 10 – 30 min rest in between.

Let the dough rise at room temperature for 1½ hour to 2 hours and place it in the fridge overnight.

The dough should have grown a little larger and it will increase in size some more in the fridge. (if you want to skip a slow rise in the fridge just let the dough rise outside for 3 – 5 hours before shaping).

Take the dough out of the fridge at least 4 hours before you plan to bake the bread in the oven.

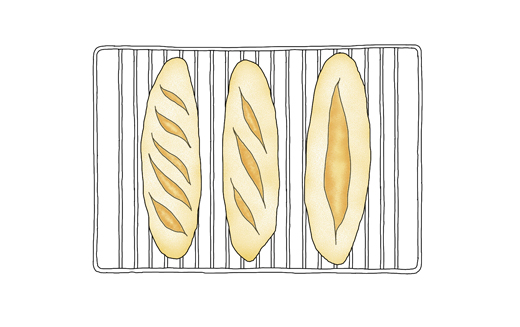
After about 2 hours, shape the bread into 1, 2 och 3 loaves.

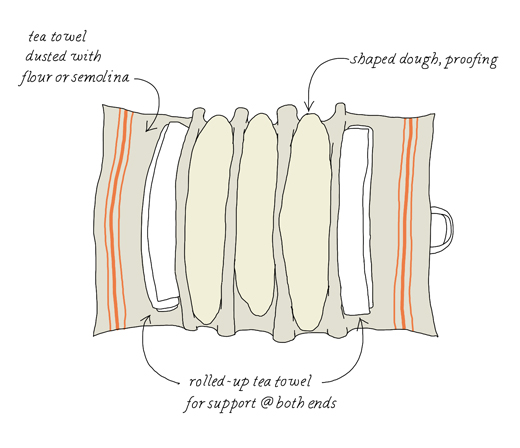
Flour all around and place on a floured (all purpose or semolina flour) tea towel (or use a bakers couche), see illustration above. Cover with a tea towel and let proof for about two hours.

About ½ hour before baking, preheat the oven to 250ºC (480ºF). Place a baking sheet in the oven plus a smaller baking tin (for water to create steam while baking) on a rack underneath. If using a baking stone (which I don’t) you will need to preheat the oven earlier.

When it’s time, take out the warm baking sheet from the oven. Carefully transfer the shaped dough and drop each one onto the hot surface. Score the dough in a pattern you like with a sharp knife or a bread slashing tool (I use my sharp serrated bread knife).

Place the baking sheet in the oven. Pour some water, hot or cold into the baking tin below. Close the door.

After 15 minutes, open the oven door to let out some steam. The bread should have risen up nicely and started to get some nice golden color. Depending on size, bake for another 15 to 30 minutes.
Repeat opening the oven door every 5 to 10 minutes (I have been told that this should give the bread a nice crust). You can also turn the breads upside down to get a nice brown color all around.
The bread is done when it sounds hollow when knocking on the bottom. If you are not sure just bake it a little longer.

Let the breads cool on a cooling rack before slicing, at least 1 hour.

This bread is a quite simple bread that works by itself, dipped in olive oil or spread with butter. Its also great with cheese (goat cheese with honey and thyme is my favorite), thinly sliced dried sausage or toasted with jam for breakfast.

* You can of course shape this bread into rounds as well. Place them in bread baskets (banetons) or like me in small serving bowls lined with a floured tea towels.

some more links

Sourdough Bread with Rye
Sourdough knäckebröd by kokblog
How to make a sourdough starter – movie by Iban Yarza (this is how I learned it)

3-2-1 Contact! – notes by Andrew Janjigian on how he feed levain (starter).
Pain de Martin’s bread movies
More shaping by Mark @ the Back Home Bakery
scoring bread post by the Fresh Loaf
Dan Lephard’s sourdough starter with raisins and yogurt post by Azelia’s Kitchen