Category Archives: sweet

Flaky Pie Crust: Apple & Lemon Galette

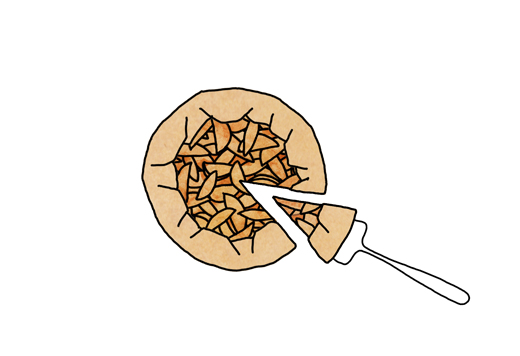
A flaky pie crust is delicious and perfect for sweet as well as savory pies and tarts. I use it mostly when making a free form galette like here below, but you can also bake it in a pie pan as a tart decorated with lattice, or like a classic covered pie.

And it’s a piece of cake to make it yourself. You just need to follow a few simple rules. To achieve a flaky rising crust use cold ingredients and at the same time develop just enough gluten for the dough to hold together. As the gluten is formed (from the protein in flour) when you are working the dough it’s important not to overwork it, as it will just result in a tough crust (which is better suited for something else). Keeping the fat (butter or lard) as visible solid pieces will magically create rising flaky layers when baked.

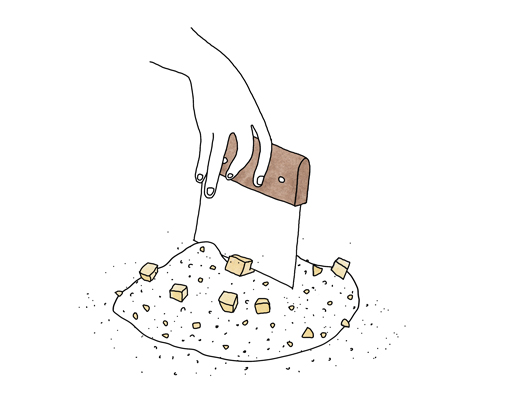
If you are only making a small tart like my recipe here, you can easily do it by hand or with a simple dough scraper as shown in my illustration below. If doing it with your bare hands, just make sure to rub the butter and flour lightly and quickly to avoid melting the butter with your warm fingertips. I recommend using a food processor if you are planning to make several batches at the same time, just make sure to pulse gently so you don’t overheat or cut the butter too much.
As it’s apple season I suggest to make a galette and fill it with apple slices that are cooked in butter, brown sugar, and lemon juice. But you can fill with many other seasonal things all year around; pears, peaches, strawberries, or rhubarb. And by leaving out the sugar in the dough, it can be used for savory tarts too. My favorite is a combination of sauteed mushrooms, roasted butternut squash,  fresh tomatoes, and goat cheese.

I think this apple & lemon galette is a fantastic dessert for any Thanksgiving table. Serve it slightly warm with vanilla ice cream or heavy whipped cream. Happy Thanksgiving!

Please note that you will need to double the pie crust recipe if making a covered classic pie or a lattice decorated pie. Adjust measures and baking time accordingly.

Flaky Pie Crust for Apple & Lemon Galette
serves 6 to 8

flaky pie crust
1 ¼ cups (6.25 ounces, 180 grams) all-purpose flour
½ cup (4 oz, 113 g) cold unsalted butter, cut in chunks
1 tablespoon sugar (leave out if making a savory pie)
¼ teaspoon sea salt
1/3  cup ice cold water

filling
4 to 5 (about 1.5 oz, 700 g) crisp apples
4 tablespoons brown sugar
4 tablespoons (2 oz, 57 g) unsalted butter
juice of ½ lemon, about 3 tablespoons

a few handfuls of unsweetened coconut shreds

To prepare the pastry, place the flour, sugar, and salt directly on a flat surface. Add the butter on top. With a dough scraper (see diagram) chop the butter into roughly bean-size pieces. At the same time, toss the butter around to make sure it gets well coated with the dry ingredients. Add the ice water a little at a time and work the dough quickly until you can form a rough ball without any dry flour, beautifully marbled with visible “lumps” of butter. If needed add more ice water, one tablespoon at the time. Flatten the ball into a disc, wrap it with parchment paper and let rest in the refrigerator for at least 1 hour and up to a few days.

To prepare the filling: Peel and core the apples. Slice them thinly, approximately ¼ inch (about 6 mm) thick. In a saucepan melt the butter together with the sugar, stir occasionally. When the butter is melted add the apples followed by the lemon juice. Stir the apples to make sure they get evenly coated with the butter sauce. Cook on medium heat, until apples are slightly soft, stir occasionally. Strain the apples, but reserve the buttery liquid as it will be used as a glaze for the apples. Set aside to cool completely.

Preheat the oven to 400 F (200 C). Grease a baking sheet or line it with parchment paper or silicone mat.

To roll out the dough, place the dough on a flat surface and dust lightly will all-purpose flour. If the dough is very stiff, you can soften it first by patting the dough with the rolling pin. This will make the dough softer and easier to roll. Roll the dough from the center and out, while continually turning the dough quarterly, to roughly 12 to 13 inch (30 to 36 cm) diameter. If the dough sticks to the surface, dust the surface lightly with more flour. If your kitchen is very warm you will need to pop the dough into your freezer for about five minute. This will prevent the butter from melting.
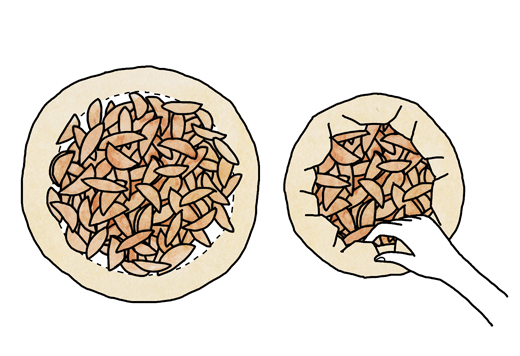
 

Dust off any loose flour on the rolled-out dough and place it on the prepared baking sheet. Sprinkle over the coconut shreds, leaving about 2 inch (almost 6 cm) border all around the edge. Arrange the apples on top. Fold the edges over and pinch overlapping dough together (see diagram).

Bake on the middle rack until crust is golden brown and fruit is baked through, about 25 to 30 minutes. Last 10 minutes, brush fruit with the apple butter sauce.

Serve warm with heavy whipped cream or vanilla ice cream.

*

related links

Puff pastry
illustrated kokblog recipe

Summer Fruit Galette
by David Lebovitz

10 Galettes That Are Easier Than, Well, Pie
Bon Appétit

Ginger & Lime Tart
illustrated kokblog recipe

Caramelized Apple Tart
illustrated kokblog recipe

more Thanksgiving ideas…

Duck Liver Starter
a good use of the liver when cooking a whole bird
(kokblog recipe)

Tired of dry Turkey? Try my
Duck in Port (kokblog recipe)

An Alternative Menu for Thanksgiving
with Anna Brones

How to make struvor (Swedish rosettes)

Last summer, when I helped my mother pack down her house that she’d lived and worked in for almost 50 years, I found her old struvjärn. Obviously I snuck it out right away, slightly afraid that she or any of my siblings might object! In Sweden struvor (rosettes in English) are a deep fried pastry that’s most common around Christmas but I think they work all year round, by themselves or together with chocolate sauce and ice cream.

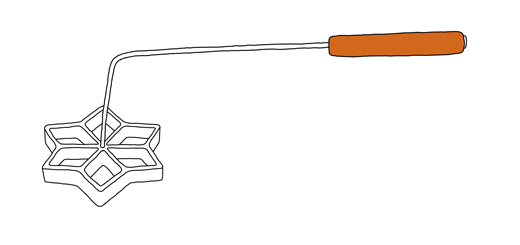
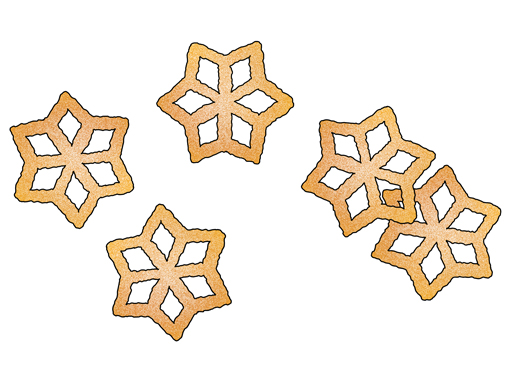
These cookie-like pastries are made with a struvjärn which is preheated in hot oil, dipped into a pancake like batter, and then deep fried until golden brown, crisp, and light. The iron tool comes in many different decorative designs like stars, snowflakes, butterflies, and hearts. They are best eaten freshly made, dipped in granulated sugar spiced with cardamom. The granulated sugar gives an extra crunch to this airy deliciousness.

The batter for the rosettes is pretty much the same batter you use to you make Swedish pancakes or crepes. In general the batter is just flavored with a pinch of salt and occasionally with a dash of vanilla. In US it’s common to add sugar to the batter but in most Nordic recipes it’s not. The Finnish struva, which are called tippaleipä (similar to funnel cake) are made with yeast and simply piped out with a pastry bag (or a bag with a cutoff corner). Talking about it on InstagramI learnt that there are several similar pastries around the world, (see list below). If you know of any other variations and types, please share in the comments and I will add it to my list.

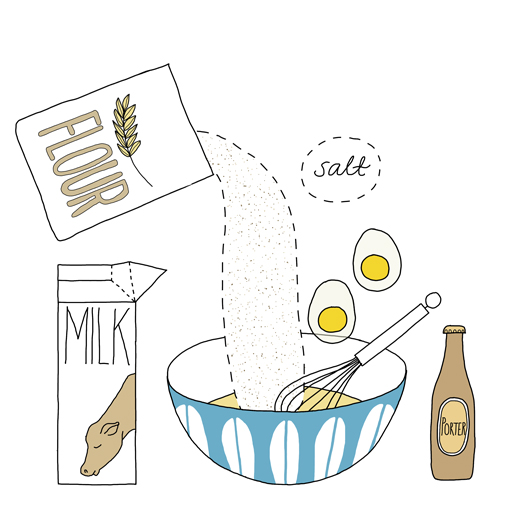
The recipe here is originally a recipe by Johan Sörberg which I liked because he suggests to add a few tablespoons of porter to the batter. Instead of porter you can use stout or any other beer. Except for the addition of cardamom to the topping, I haven’t really changed this basic recipe more than made it work in both metric and imperial measurements.

Serve the rosettes as they are or together with vanilla ice cream. They are also delicious to  dip in chocolate sauce.

Struvor (Swedish Rosettes)
plenty to feed 6 to 8 for dessert or a special fika

batter
1 ¼ cup (300 ml) whole milk
2 eggs
pinch of salt
2 ½ tablespoon porter (or stout)
1 ¼ cup (6.25 oz, 180 g) all purpose flour

1 cup (250 ml) neutral vegetable oil such as sunflower oil, plus more if needed

topping
granulated sugar
ground cardamom, to your liking (or ground cinnamon)

Whisk together milk, eggs, salt, and porter. Sift in the flour and mix until a smooth batter.

In a saucepan, heat up the oil to at least 355°F (180°C).

Prepare a plate with enough sugar to dip the finished pastries in. Add the ground cardamom to your taste and mix well.

When the oil has reached the right temperature, dip the rosette iron into the hot oil and let it heat up for a few seconds, then dip it in the batter. The batter should just reach the top edge of the rosette (if the rosette is totally covered you will have a problem releasing the fried rosette from the iron).

Now dip the battered iron into the hot oil and let it fry until golden, less than a minute. Shake the iron or use a fork to loosen the rosette from the iron, let it fry a little longer to make sure both sides get a nice color. With a large tweezer or a slotted spoon, transfer the rosette to a paper towel to drain before dipping into the sugar & cardamom mixture. Repeat until all the batter is finished.

Best eaten fresh but leftover pastries can be stored, when completely cooled, in an airtight container. Leftover batter can be stored in the fridge for at least 1 to 2 days. The batter can also be used for thin pancakes.

NOTE: Rosette irons are available in many stores online. But you can also try to pipe the batter out with a bottle or plastic bag as when making funnel cake. 

*

similar pastries around the world

Rosettes (US)
the Spruce

Tippaleipä (Finland)
similar to funnel cake but made with yeast – by Anna Billing

Funnel Cake(US)
made with baking powder and piped out – Smitten Kitchen 

Kokis (Sri Lanka)
with coconut milk, rice flour & turmeric 

Kuih Loyang (beehive cookies, Malaysia)
with coconut milk & rice flour – Lisa’s Lemony Kitchen 

Bunuelos de Aire (Mexico)
Abuela’s Kitchen

Kue kembang goyang (Indonesia)
made with coconut milk & rice flour – Borneo recipes

Filhós de forma (Portugal)
with orange – by Mónica Pereira da Silva

Frittelle croccanti Altoatesine (Italy)
(roughly translates to “South Tyrolean fritters”)

Churros (Spain)
Cannelle Vanille

Xuxos & Churros (Spain)
kokblog post

Krustader (Nordic)
made with a special type of iron that creates shell like cups – the shells can be filled with either sweet or savory fillings –
via Smagsløgene

*

credits:
Animation & illustrations by Johanna Kindvall
Music in movie: Talkies by Huma-Huma

Celebrating Fat Tuesday with Semlor

2017-semlor_2017-5February is traditionally the month I would go from one bakery to another to hunt down the best semlor in town. But since moving abroad that task has been put on hold.
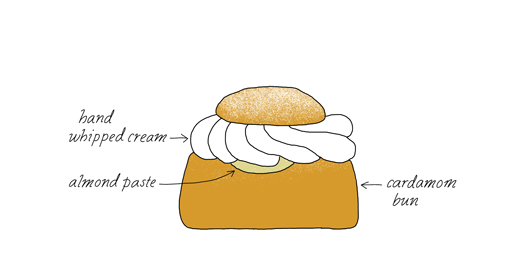
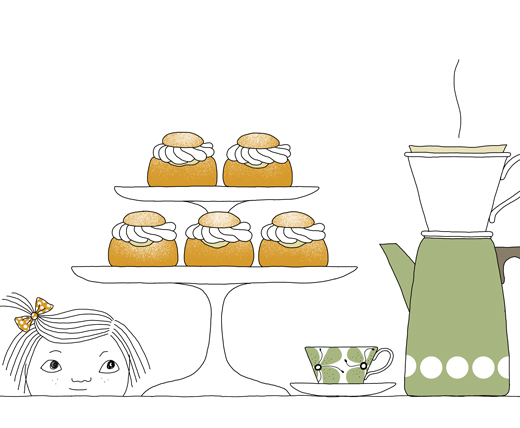
Semlor, also called fettisbullar, is a cardamom bun filled with almond paste and heavy whipped cream. Comfortingly delicious. Traditionally they should be eaten on Fat Tuesday before lent, but Swedes start having them as soon as they finished their Christmas’ ginger cookies and keep enjoying them until it’s time for Easter candy.

From a distance, I have noticed that in the last few years this wonderful almond paste filled cardamom bun has started to come in different varieties and flavors. Sometimes even in different shapes. As much as I love chocolateprincess cake, or licorice I think my favorite always will be the traditional combination of cardamom, almond paste and hand whipped cream.

This year, Fat Tuesday (Shrove Tuesday, Mardi Gras, Paczki Day or Pancake Day) falls on Tuesday, February 28. So its time to get the ingredients ready and start baking.
2017-semlor_2017b

Semlor
recipe from Fika: The Art of The Swedish Coffee Break 
by Anna Brones and Johanna Kindvall

makes: about 12 to 16 buns

for the buns
7 tablespoons (3.5 oz, 100 g) unsalted butter
1 cup (240 ml) milk
2 teaspoons active dry yeast
2 eggs
1/4 cup (1.75 oz, 50 g) sugar
3½ cups (1.12 lb, 495 g) all-purpose flour
1 teaspoon baking powder
½ teaspoon salt
2 to 3 teaspoons whole cardamom seeds, crushed

filling
2 cups (10 oz, 285 g) blanched almonds
¼ cup (1.75 oz, 50 g) sugar
1 teaspoon pure almond extract
½ to 1 cup (120 to 240 ml) milk

to finish
½ to 1 cup (120 to 240 ml) heavy whipped cream
powdered sugar

In a sauce pan, melt the butter and then add in the milk. Heat until the liquid is warm to the touch (about 110ºF/43°C). In a cup, dissolve the yeast in 2 to 3 tablespoons of the warm liquid. Stir and let sit for a few minutes until bubbles form on top.

In a large bowl, whisk together one of the eggs with the sugar. Pour in the butter and milk mixture including the yeast. Stir until well blended.

Mix in the flour, baking powder, salt and cardamom. Work the dough until well combined. Transfer dough to a lightly floured flat surface, and knead until dough is smooth and elastic, about 10 minutes. The dough should feel moist so try not to add more flour to the dough (which could result in dry buns).

Place dough in a bowl, cover with a dampened tea towel and let rise at room temperature for 1 hour.

On a flat surface, divide dough into 12 to 16 equal pieces and roll each into individual rounds. Place them with 2 inches (2.5 cm) apart on a greased baking sheet (or line with a silicon baking mat). Cover with a dry tea towel and let rise for 30 to 45 minutes. (To test when they are ready to bake, poke your finger gently into one of the buns; the indent should slowly spring back, about 3 seconds).

Preheat the oven to 400°F (200°C).

When you are ready to bake, beat the last egg with a fork and brush each round all over the top. Bake until the tops of the buns are golden brown, 10 to 15 minutes. Remove the buns from the oven and transfer to the counter. Cover with a tea towel and let cool completely.

To make the almond paste, in a food processor grind the almonds until finely ground. Add in the sugar and almond extract and pulse until mixture sticks together.

With a knife, cut a “lid” off the top of each bun. Scoop out a portion of the inside and place the crumbs together with the almond paste in a large bowl. Mix it well together and add as much milk as needed to create a thick and smooth filling.

Fill each bun with the filling, followed by some whipped cream. Top with the “lid” and dust with confectioners’ sugar.

Brew some coffee and serve immediately.

Note: Semlor doesn’t store well, so if you are not planning to eat them all in one go, I suggest you only prepare as many as you need. Freeze the rest of the buns as soon they are cool.

*

related links

Whole Wheat Semlor by Anna Brones @ Food52

Polish Paczki (Doughnuts) by Barbara Rolek at Spruce

Mardi Gras recipes in New York Times

22 New Orleans Classics to Celebrate Mardi Gras  – SAVEUR

Semolina Pancakes – kokblog recipe

Paris-Brest
(just because they remind me of semlor)

more Semlor

and

French Crepes
and the La Chandeleur tradition (February 2)
by Clotilde Dusoulier

*

Pssst the drawing on the top is available as a print here.

Joulutorttu – Finnish Christmas Tarts

kokblog-joulutorttu-with-coffee-02

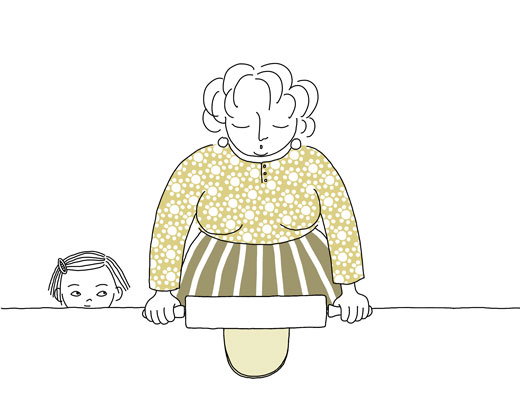
My grandmother was phenomenal in the art of making puff pastry, so good that she made several batches every year that she portioned out to everyone in the family, neighbors and near by acquaintances that took the advantage of her skill. I’m sure she loved it and occasionally she tried to pass her technique along but to my knowledge nobody really understood how she did it with such grace and no fuss.

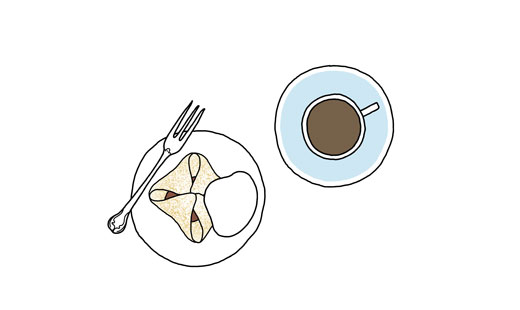
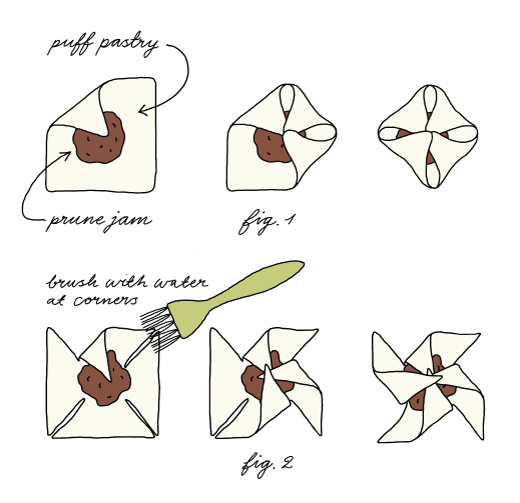
Every Christmas as long as I can remember my grandmother and later my mother have been treating me with Joulutorttu (Finnish Christmas Tarts). Joulutorttu are pinwheel shapes puff pastries filled with prune jam dusted with powdered sugar. Traditionally the tarts are shaped like fig. 2 in the diagram but they can be shaped as simple as a classic Danish (fig 1).

Well, last year I figured it was about time for me to learn the art of puff pastry and obviously much of it get shaped into joulutorttu. My version here is filled with jam where the prunes is simply cooked with just port. I’m sure my grandmother would have liked my progress, especially if shared with a strong cup of tea and a game of canasta.  

Both jam and puff pastry can be made beforehand so you can assemble just as many as you want and need all through the holiday.

Happy holiday everyone.

kokblog-joulu-method

Joulutorttu (Finnish Christmas Torts)
makes about 14

1 batch of puff pastry

prune jam
1 cup (about 200 grams) pitted prunes, cut in half
½ cup (120 milliliters) sweet Marsala wine (or port)

to finish
1 egg, beaten
powdered sugar

Cut the prunes in quarters and soak them in port for 1 to 2 hours. The prunes should become soft.

In a small pot, cook the prunes with the port on medium low heat until thick and the fruit has fallen apart, about 10 minutes. Add more wine (or water) if the jam seems too dry. Let cool slightly before placing the jam into a food processor. Pulse until smooth and thick.

Leftover jam can be stored in a clean glass jar in the refrigerator for up to a week. This jam is also awesome on on toast together with cheese.

Preheat oven 425°F (220°C).

Roll out portions of puff pastry until just over 1/8 inch (approximately 0.5 centimeter) thick. Cut out 3 by 3 inch (8 by 8 centimeters) squares, place a spoonful of jam on each square. Shape each square by cutting each corner, like in fig. 2 or shape them as shown in fig. 1. Brush corners with a little water before closing the shape.

Brush each tart with the egg and bake for 10 to 15 minutes. Serve slightly warm, dusted with powdered sugar, with heavy whipped cream.

*

Links to other traditional Nordic holiday baking:

Joulutorttu with a ricotta puff pastry – by Peggy Saas

London Eats Joulutorttu

Ginger Spice Cake by Anna Brones and Johanna Kindvall

Glögg – Swedish Mulled Wine

How to host a glögg party by Madame Fromage

Pepparkakor with diagram on how to build a gingerbread house
recipe & text by Anna Brones  – diagram & illustrations by Johanna Kindvall

Lussebullar by Anna Brones (illustrated by Johanna Kindvall)

Scalded Rye Bread with Raisins – kokblog recipe

More Swedish holiday baking in the Fika book.

How to make Puff Pastry

kindvall-PuffPastry-grandma

I have a confession, I love puff pastry! This buttery and flaky pastry works equally well with sweet or savory dishes. And luckily it’s not that hard to make yourself. A little time consuming, yes. But you can definitely do it and it will surely impress your guests! In between folds you can take care of laundry, read a book, organise your pantry or go for a run. You can also do some other cooking experiment or have a friend over for wine.  So roll up your sleeves and get ready to roll.

Puff Pastry
about 1¼ lb (560 grams) puff pastry

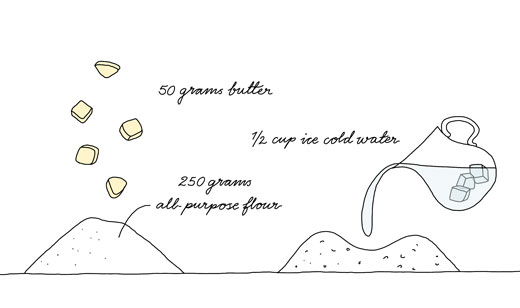
1 ¾ cups (8.75 ounces, 250 grams) all-purpose flour (extra if needed) 
14 tablespoons (7 ounces, 200 grams) unsalted butter
½ to 1 teaspoon salt, optional
½ cup (130 ml) ice water

Place all-purpose flour directly onto a flat surface, preferably a cold material such as a stone or stainless steel counter top. Cut 3.5 tablespoons (1.75 ounces, 50 grams) of the butter in smaller pieces and pinch the butter into the flour until you have a coarse crumb. Don’t over work, you should still have bits of butter in there. Make a well in the crumbly dough and poor in the ice cold water. Work together quickly and form a rough ball. Cover and refrigerate for at least 30 minutes.

kindvall-PuffPastry-dough-2

Shape the remaining butter, 10.5 tablespoons (5.25 ounces, 150 grams) into an approximately 5 inch (about 13 cm) square block. Wrap in plastic foil and refrigerate.

Assembly
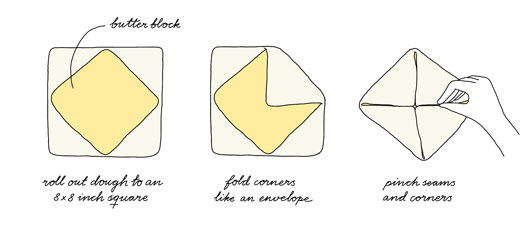
Cut a deep cross in the dough ball. Fold every corner out and roll the dough with a rolling pin to an approximately 8 inch (20 cm) square. Place the butter block diagonally on top of the dough. Fold every corner into the middle (without stretching), like folding an envelope. Pinch the seams together slightly.

kindvall-PuffPastry-envelope

1st – 2nd fold
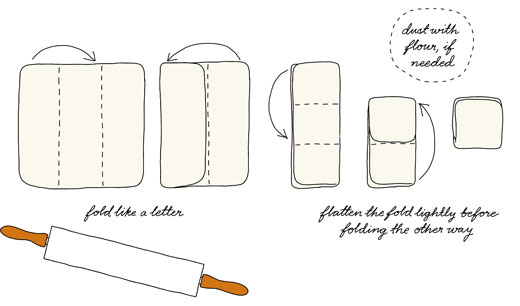
Turn the package up side down. Dust a little flour on both sides and roll it out carefully to approximately 12 inch (about 30 cm) square. Make a three fold (like folding a letter, see diagram). Flatten the fold slightly and fold a 2nd time the other way. Cover the dough and let rest in the fridge for 30 minutes.

kindvall-PuffPastry-folding

3rd – 4th fold
Roll the dough to approximately a 13 inch (33 cm) square. Make one 3 fold one way and another 3 fold the other way. Let rest in the fridge for 30 minutes.

5th – 6th fold
Repeat as in 3rd – 4th fold.
Let the dough rest again for 30 minutes before using. If using it later, freeze in a well wrapped freezing bag, whole or in pieces with wax paper in between.

tips
* keep all ingredients cold
* don’t overwork the dough
* if your kitchen is very hot you will need to rest the dough in the fridge between every fold.
* if you feel that the dough starts to get too warm, refrigerate immediately
* before baking shaped pastries let them rest for 15 minutes on a cold baking sheet before baking them in the oven, it will keep the shape better

*

suggested things to do with puff pastry

Caramelized Apple Tarte by Clotilde Dusoulier
Palmiers by London Eats
Peach Tarts with Goat Cheese & Honey by Some the Wiser
Joulutorttu (Finnish Christmas Tarts) by My Dear Kitchen in Helsinki
Butternut Squash and Pecorino Tart by Karen Biton-Cohen @ The Kitchn
Almost a Pissalasiere by La Tartine Gourmande