Pickled Mustard Herring

KINDVALL-herring_updated

This year I will be celebrating midsummer here in NY. Midsummer is the day when Swedes like me celebrate the longest and brightest day of the year. We eat plenty of herring, new potatoes (that you buy freshly picked and dirty), aged cheese on “knäckebröd“, drink aquavit and sing songs. The dessert is always strawberries which are often eaten plain with just a little sugar and cream (either whipped or mixed with milk.) Some make creamy strawberry cakes while I serve mine with dark chocolate cake and whipped cream.

For practical reasons the midsummer holiday is always on the Friday closest to the actual summer solstice day which this year will be on Friday the 22nd of June.

The traditional herring you eat for midsummer is Matjes. It’s an excellent herring typically spiced with sugar, allspice, cinnamon and cloves. Traditionally you eat this type of herring with sour cream topped with chopped chives and new potatoes & fresh dill. I love this meal so much that I keep eating it throughout the whole summer.

Other common flavors are mustard, onion, lemon or dill herring. More rare or rather unexpected flavors are tomato, garlic or curry herring (not my cup of tea though). You can find these different types at any supermarket in Sweden or more homemade styles in most Swedish fishmongers.

If you can get hold of fresh herring, the best experience is to cure and flavor herring yourself. This can be a tough task if you are outside Scandinavia. In New York City I have only seen fresh herring a couples of times. In the city it’s possible to find simple cured herring in vinegar. You don’t really need to do anything if you find this kind of herring but with just a few simple additions like mustard and dill you will raise this fish to another level (see below).

the cure
(if you can get hold of fresh fish otherwise skip this part)

  • about 1 lb filets of fresh herring*
  • ½ cup white vinegar (6%)**
  • 2/3 cup water
  • 2 tablespoon sugar
  • 2 tablespoon salt

Rinse the herring in cold water. If you like you can skin the herring but I normally do that after the cure as it gets off easier then. Mix the white vinegar together with the salt and the sugar. When the sugar and salt are totally dissolved in the liquid add the water. Place the herring in a bowl and pour the vinegar mixture over. Set aside in the fridge for about 24 hours. Stir in between to make sure that all fillets gets properly cured. Its done when all fillets have become white in color.

Let the fillets drain properly in a strainer while you prepare the sauce. Remove the skin with your fingers or use a knife to peel it off. Cut the fillets with a scissor into bite size pieces.

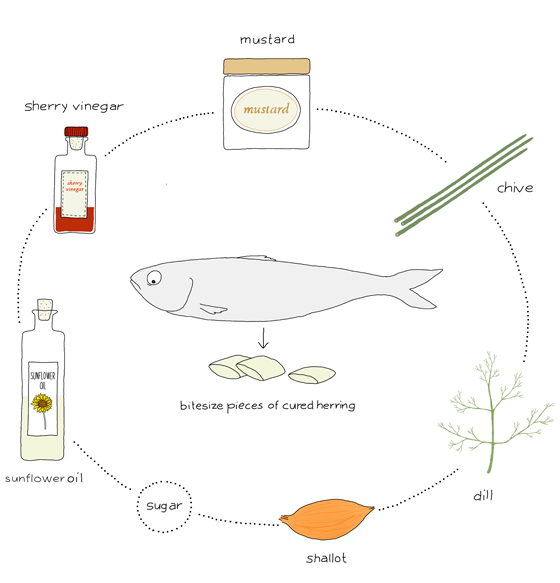
mustard herring

  • about one lb cured herring(as above or get simple herring in vinegar. Only use the herring pieces, removing all liquid, onion, etc.)
  • 3 tablespoons sweet mustard
  • one tablespoon dijon mustard
  • one tablespoon brown sugar
  • one teaspoon sherry vinegar (apple cider vinegar works as well)
  • 50 ml sunflower oil (or other neutral vegetable oil)
  • ½ cup dill
  • one shallot

for decoration
chopped chives

Mix together mustard, sherry vinegar and sugar. Add carefully the  oil drop by drop while stirring. Chop the shallot and dill finely and add it to the sauce. Season with salt and freshly milled black pepper. Place the herring pieces into the sauce and stir carefully around so the sauce gets around the fish evenly. Let the fish rest for a couple of hours, preferably 24 hours but I can never wait that long. Before serving chop the chives into 1/4” pieces and sprinkle on top. Serve the herring with new potatoes or just on dark rye bread with sliced boiled eggs. Enjoy!

* It’s not impossible to fillet the fish yourself but you need some practice. This is one way: Cut off the head and tail. Open up the stomach with a small knife (or even your fingers) to take out the innards. Make it as clean as possible. Now comes the tricky part where you use your thumbs to loosen the backbones by pressing your thumb under it. When it starts to loosen grab the top of the backbone and pull it off. You now have both fillets connected together. Remove the fins with a scissor and rinse the fillet in cold water. You will get a hang of it after some practice. If you think this is too messy, just ask your fishmonger to do it for you.

** If you only find 5% white vinegar you should use a little less water.

Before buying any fish check with Seafood Watch for the most sustainable options.

Thei article was originally published at EcoSalon on 19 June 2012.

Sofi’s Caramelized Rhubarb Jam

Currently I’m in Sweden taking care of an old house in the countryside. It’s as beautiful and lovely as its sounds. In the garden there is rhubarb, stinging nettles and leeks. The strawberries are flowering which shows that there will be delicious and fresh treats to pick in a couple of weeks . The deep red poppies are surrounded by bumblebees and the fish are jumping in the pond.

This weekend I had some dear friends over for dinner. I had successfully baked sourdough bread which we enjoyed with dried sausage, aged goat cheese and olives while my friend Johan Kohnke prepared the rooks that was one of the sensations of the evening. The rooks are a delicacy similar to quail. In this part of Sweden there is an old tradition for farmers to hunt them as the birds often collect the seeds from the new seeded fields. Instead of just feeding them to the pigs, my friends and I had the pleasure to enjoy them with a creamy porcini mushroom sauce spiced with plenty of wine and herbs from the garden.

For dessert my Sofi Meijling made a Cardamom Panna Cotta with a jam she cooked with freshly picked rhubarbs from my vegetable plot. The panna cotta was made with both heavy cream and Greek yogurt (about 50/50) which gave the pannacotta a slight sour flavor (see example of other panna cotta recipes below). Sofi used about one teaspoon crushed cardamom to flavor this evening’s final dish.

This rhubarb jam was such a great reminder of how much I love having a vegetable garden. You don’t really need mush to make something so simply delicious.

Sofi’s Caramelized Rhubarb Jam
(for about 4 people as topping to pannacotta or ice cream)

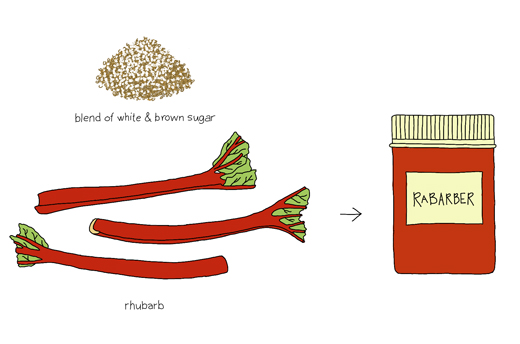
About 6 rhubarb stalks
2 tablespoons regular sugar
2 tablespoons brown sugar (Sofi used Swedish farin which is a similar sugar type)
1/3 cup water

Melt the sugar in a pan together with the water and let it cook for awhile. Keep an eye on the sugar so it doesn’t burn and stir a little now and again. You may need to lower the heat to medium. Clean the rhubarb and cut them into one inch long pieces. When the sugar is thick and sticky add the rhubarb and let them simmer until soft but not totally mushy. Set aside to cool before serving.

If you think this jam is too simple you can spice it up with either ginger, cardamon or licorice root.

The jam is also great together with aged cheese on bread but then I recommend you make a larger batch (just add more of everything).

Here are some Pannacotta recipes:

Hugh Fearnley-Whittingstall makes Yoghurt and Vanilla Panna Cotta

Jules Clancy makes Panna Cotta with Mascarpone and serves it with pot roasted pears.

Ilva Beretta spices her Panna Cotta with lavender.

This article was originally published at EcoSalon on 16 June 2012.

Mazariner – a Swedish Pastry Classic (collaboration)

Story by Anna Brones • Illustration by Johanna Kindvall • Recipe by both

Put two Swedes who love to cook in a kitchen together and there will be an immediate discussion of what baked good needs to be concocted for afternoon coffee. After all, we don’t mess around with our coffee breaks, and a serious coffee break deserves a serious pastry. So we settled on mazariner.

Mazariner are the darling of Swedish cafes, a balance of buttery pastry and almond filling topped with a thin layer of icing; the type of thing you bite into and wonder where this food has been all of your life. They’re just fancy enough that you don’t keep them on hand at all times, but you don’t have to put them on a serving tray.

Made in small oval tart tins, they can seem daunting to make, but as it turns out, are easy enough that you don’t need to cruise to your local IKEA to track down the mass produced version – although they do have them if you’re in a Swedish food pinch.

Our recipe search started with a few Swedish cookbooks and a call to my mother who was immediately reciting the ingredients from a page she had ripped out of a Swedish magazine sometime in the late 80s – when you come across a good recipe, you hold on to it. Johanna, being a more skilled pastry “chef” than myself did a creative combination of the many versions, and we both decided that plain icing just wouldn’t suffice. Add a little orange juice and you have a real masterpiece.

Make a batch of these, brew a French press and it will almost be like you’re sitting at a cafe in Stockholm. Almost.

mazariner

dough
7 oz butter (almost 2 sticks)
2 cups regular flour
¼ cup sucanat or organic cane sugar
2 teaspoons whole cardamom (crushed in a mortar, or slightly ground in a coffee grinder)
one small egg

filling
one cup blanched, ground almonds (can be replaced with almond meal)
2 bitter almonds (about 1 teaspoon almond extract, or more depending on how strong you want the taste)
2.5 oz butter
½ cup sucanat or organic cane sugar
3 small eggs

icing
juice from an orange
¼ cup confectioner’s sugar

In a large wide bowl cream together butter, egg and sugar. With your hands, mix in flour – this can be done either in the bowl or directly on a clean counter top. Crush the cardamom with a mortar and pestle as fine as you wish. If you don’t have a mortar or grinder, you can use pre-ground cardamom. Add it to the dough and blend well. Let the dough rest in a cool place for at least 30 minutes.

While the pastry dough rests, blanch the almonds by pouring boiling hot water over them and letting soak for a few minutes. They are ready when the skin slips off easily. Skin all of the almonds and grind them into a fine meal in a food processor. In a small saucepan, melt the butter and set aside to cool. Whisk the eggs together with sugar to a porous batter and add in almonds, almond extract (if you didn’t use bitter almonds) and butter. Stir together until well blended.
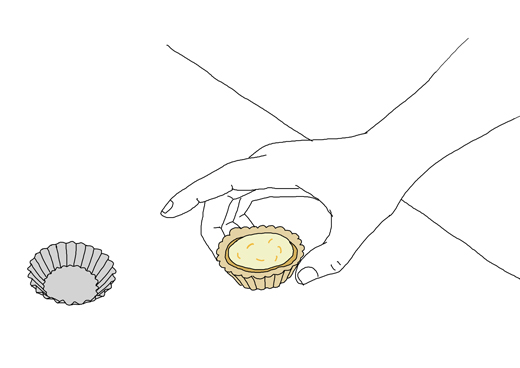
Grease small tartlet tins* (see illustration above) with butter. Line the molds with a thin layer of dough (about 1/8”) and fill them almost to the top with the almond mixture. If there is any leftover dough you can freeze it and use it some other time.
Bake in the oven at 400°F for about 15 minutes. The cakes should have got a slightly brown color on top. Let them cool a little before removing the cakes from the mold.

While the mazariner bake, prepare the icing. In a small bowl add the confectioner’s sugar and drip in some orange juice. The icing should be a little thick but still easy to drizzle over the mazariner. Wait until the mazariner have cooled before icing them.

Serve the mazariner for an afternoon tea or coffee break, you’re sure to make some new friends if you pull these out.

*If you don’t have small single cake molds as described you can use mini muffin trays or similar forms. In Sweden, disposable aluminum forms are often used, but stay away from single-use containers and do the best with what you have. We always encourage creativity!

Other Swedish baked classics

Semlor – cardamom rich bun is filled with almond paste and heavy whipped cream
Kanelbullar – Swedish Cinnamon Bun
Lussebullar – Saffron Buns
Pepparkakor – Ginger Bread Cookies (at EcoSalon)

This article was originally published at EcoSalon, 15 May 2012


Four-Cheese Ravioli with Tomato Sauce (by Stephane Lemagnen)

One small reason I draw my food is that my cooking results will probably never look as good as Stephane Lemagnen’s creations. It’s silly of me to compare (and I’m not really trying), as Stephane happens to be a well trained chef. On his site Zen Can Cook he shows mouth watering examples of his ability. If you visit the site you’ll also notice that his photography skills aren’t bad either. His cooking and recipes are creative and a great inspiration for many other cooks all over the world. Even if his creations look complicated most of the recipes are easy to follow and can be cooked in a regularly equipped kitchen like mine. My aquavit pork buns were created based on Stephane’s way to cure pork belly.

Stephane grew up in Gascony, France and trained as a cook in the Pays Basque and Paris. In 2006 he opened the avant-garde dessert bar, Room 4 Dessert here in New York City where he offered modern cuisine in the form of a dessert tasting menu. Today, Stephane works as a full time private chef for a well known (secret) client. Lucky them! Recently Stephane started Zenspotting, a space for chefs and serious amateur cooks to publish their photos with links to interesting recipes. I’m flattered to be part of it.

Stephane and I met through twitter two years ago. Ever since then we have had great and inspiring exchanges by email or tweets. I’m happy to host Stephane and I’m really happy how this simple cheese ravioli turned out. Enjoy.

Four-Cheese Ravioli with Tomato Sauce
by Stephane Lemagnen

I’m thrilled to see one of my recipes come to life through Johanna’s illustrations. I have admired her work for a numbers of years now and always loved her recipes and her artistic way of explaining how things are done. And it’s even better with a glass of aquavit! Kokblog is clever, delicious and visually pleasing and it made me wish I stuck with those art classes in 5th grade.

Ravioli are also clever and delicious little morsels of happiness, and for me they are at their best when left simple. An oozy, cheesy filling in a soft envelop of pasta with a tomato sauce flavored with hints of fresh basil is often all you need to put a smile on people’s face. And it’s as easy as… the illustrations. Drawing, in fact, is much harder than ravioli-making and eating them is definitely easier than both. They can be enjoyed right away, or made in batches and frozen for future use which makes them great little discoveries to be made in your freezer.

for the pasta dough

3 cups all-purpose or “00″ flour, plus more for dusting work surface
1/2 teaspoon salt
4 whole eggs
4 yolks
2 tablespoons olive oil

for the cheese filling

8 ounces ricotta (drained)
4 ounces Montasio cheese (grated)
4 ounces Gorgonzola (crumbled)
4 ounces Italian Fontina cheese (grated)
1 egg
½ cup basil leaves, chopped
salt and pepper
nutmeg

to finish

Tomato sauce
Basil

for the pasta dough

Combine the flour, the salt, the eggs, yolks and olive oil in a Kitchenaid bowl and combine on low speed using the dough hook (this also could be done by hand in a large bowl). Increase the speed until you get a rough dough. This should take 1 or 2 minutes.
When the mixture comes together transfer to a floured clean surface and knead the dough, turning the inside-out, until you obtain a dough that’s smooth on the outside, adding flour every time the dough starts to feel sticky. The whole process should take less than 5 minutes. Wrap the dough in plastic wrap and let it rest in the refrigerator for at least 2 hours, or overnight.

Take the dough out from the fridge and place it on a floured surface. Cut it in 4 equal pieces. With a rolling pin make rectangle with the pieces of dough, so that they fit inside the pasta machine. Start rolling pasta sheets on the thickest setting and cut in half (so it doesn’t get too long). Keep rolling reducing the setting every time.
You should be able to see your hand through the pasta sheets when you have reached the right thickness. You want it thin but not so thin that it becomes fragile.

Make an egg wash by beating an egg with a tablespoon of water. Cut sheets of pasta so they have about the same length and lay them on a floured surface.

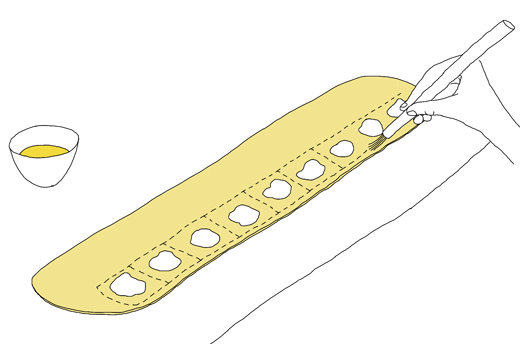
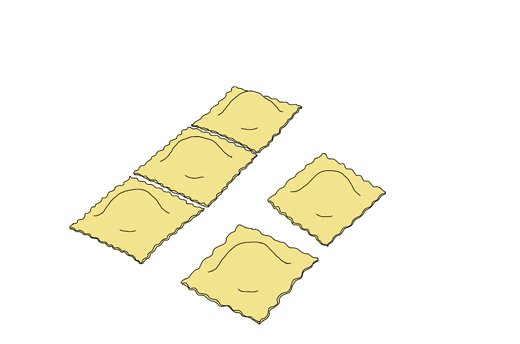
Pipe little mounds of stuffing on the pasta sheets. Brush the edges and the middle sections with egg wash. Cover with another sheet of pasta. Seal with your fingers and push out any air pockets. Use the back of a pastry cutter the size of the mounds to seal each ravioli. Now use a pasta cutter or pastry cutter to portion the raviolis. Reserve on a single layer on a tray dusted with semolina flour.

for the filling

Combine all the ingredients by hand, or in a food processor. Season to taste. Place in a pastry bag with a round 1/2 inch tip.

to finish

Bring a pot of salted water to a boil. Drop the ravioli in the water and cook until they come back to the surface. About 5 minutes. Drain them and toss with tomato sauce. Garnish with basil.

for the tomato sauce

3 tablespoons olive oil
1 small onion, finely chopped
1 clove garlic, finely chopped
1 28 oz. can San Marzano whole peeled tomatoes, including the juice, (or in season 1 3/4 pound of fresh tomatoes, peeled, seeded, and chopped)
2 tablespoons tomato paste
1 large pinch of sugar
1 pinch hot pepper flakes
fresh basil leaves

Heat the olive oil in a saucepan. Add the chopped onion and stir to coat. Reduce the heat to low and let it cook for 15 to 20 minutes, stirring occasionally until soft and translucent. Meanwhile, place the tomatoes in a bowl and crush them with your hands or using a potato masher. Add the garlic to the cooked onions and cook for a minute more. Add the tomatoes, including the juice, a few leaves of basil, the tomato paste and pinch of sugar. Season with salt and pepper and bring to a very low simmer. Cook for 15 to 20 minutes more, stirring occasionally, until it gets thicker. Remove from the heat, if you want you can blend the sauce for a few seconds for a smooth consistency.

Here are some other Ravioli recipes by Stephane:

Veal Ravioli with Culatello, Radiccio, Chanterelles & Sage
Langoustine Ravioli with Citrus-Coconut Sauce, Thai “Bird’s Eye” Chili & Fava Beans
Five-Herb Ravioli with Chanterelles, Roasted Tomato Coulis and Basil Oil

More ravioli reads on Kokblog, Duck Egg Raviolo
Pasta Shaping Work Shop on kokblog

Two Different kinds of Pesto: Sorrel and Basil & Celery

Some may think it’s silly to grow your own sorrel when you have it growing wild just around the corner. As the cultivated sorrel has a slightly milder and nicer flavor I believe its a great idea to include this sour and lemony herb in a  garden plot.

Its best is to harvest the young light green leaves, as when the leaves gets older and larger (darker green) they get tough and unpleasantly sour. Sorrel can be cooked like spinach for soups and omelets or raw in salads and pesto (see below). I also think the sourness in this pesto works terrifically well with fish, poached or cured. Spread on cracker this sorrel pesto can be a simple and delicious appetizer.

Sorrel Pesto

about 2 cups of young sorrel leaves
2 garlic cloves
a handful of walnuts
fresh red chili to your own taste (I use about ½”- 1″ depending on hotness)
½ cup grated parmesan
olive oil
a few sprigs of parsley (optional)
season with: salt and pepper

Pick about 2 cups of very young Cultivated Sorrel leaves. Rinse the leaves in cold water and drain while you prepare the other ingredients. Chop the walnuts and the chili a little. Grate the Parmesan roughly.
When the sorrel is dry, run them in the food processor (or use a mortar and pestle). Add chopped garlic and run the machine a bit before adding chili, walnuts, (parsley) and parmesan. Drizzle some olive oil over. Blend the mixture carefully as it should have a crunchy texture. If necessary add some more olive oil. Season with salt and fresh pepper.

Note: Sorrel contains plenty of vitamins but the plant contains some oxalic acid which is not healthy if eaten too much (especially if your body easily creates kidney stones). I think to have sorrel on a few occasions over the summer can hardly harm you.

This spring I have seeded plenty of basil and they are now all growing on my window sill. They are doing well but are still too small to be harvested. If you don’t have the patience to seed basil you can of course buy a plant from the plant shop. You can also sometimes find small pots at the vegetable shop which work really well replanted in a larger and nicer pot. I use basil to spice up almost any vinaigrette and as a main herb when making hazelnut baked cauliflower. Why not try basil as a flavor in cocktails! I like it with cucumber in my favorite summer drink pimm’s cup. Even if it’s well known, I still think basil on fresh tomatoes and mozzarella is magical.

This basil pesto is made with the addition of celery stems (and leaves) that gives a nice grassy flavor. Instead of pine nuts I use walnuts (or roasted sunflower seeds). I use this basil pesto with spaghetti, as side to vegetable patties or on bread topped with tomatoes.

Basil & Celery Pesto

2 stems of celery
about 2 cups basil leaves
two cloves of garlic
handful walnuts (or sunflower seeds)
½ cup fresh grated parmesan
olive oil
salt and pepper

Rinse the basil leaves carefully under cold water. Set aside and let dry while preparing the other ingredients. Chop the celery and garlic into small pieces. If the celery comes with leaves I would add them to the pesto as well. Mix all ingredients in a blender, starting with the basil, garlic and some olive oil. Add the celery, walnuts and lastly the grated cheese. Season with salt and pepper. Add as much olive oil as you like. Use less if you like to spread the pesto on bread and more if serving with pasta.

Both of these pesto variations, when packed nicely in a jar, are a great summer present – especially when you have a place in your garden where sorrel or basil grows better than any flowers.

If you like to learn more about sorrel I suggest reading Sarah Smith’s article about sorrel at The Foodie Bugle and Clotilde Dusoulier’s 50 Things To Do With Fresh Sorrel post.

Over at Food52 you can follow Amy Penningtons City Dirt column on how to grow plants from seeds etc.

this article was originally published at Ecosalon