Tag Archives: Johanna Kindvall

Mazariner – a Swedish Pastry Classic (collaboration)

Story by Anna Brones • Illustration by Johanna Kindvall • Recipe by both

Put two Swedes who love to cook in a kitchen together and there will be an immediate discussion of what baked good needs to be concocted for afternoon coffee. After all, we don’t mess around with our coffee breaks, and a serious coffee break deserves a serious pastry. So we settled on mazariner.

Mazariner are the darling of Swedish cafes, a balance of buttery pastry and almond filling topped with a thin layer of icing; the type of thing you bite into and wonder where this food has been all of your life. They’re just fancy enough that you don’t keep them on hand at all times, but you don’t have to put them on a serving tray.

Made in small oval tart tins, they can seem daunting to make, but as it turns out, are easy enough that you don’t need to cruise to your local IKEA to track down the mass produced version – although they do have them if you’re in a Swedish food pinch.

Our recipe search started with a few Swedish cookbooks and a call to my mother who was immediately reciting the ingredients from a page she had ripped out of a Swedish magazine sometime in the late 80s – when you come across a good recipe, you hold on to it. Johanna, being a more skilled pastry “chef” than myself did a creative combination of the many versions, and we both decided that plain icing just wouldn’t suffice. Add a little orange juice and you have a real masterpiece.

Make a batch of these, brew a French press and it will almost be like you’re sitting at a cafe in Stockholm. Almost.
mazariner

dough
7 oz butter (almost 2 sticks)
2 cups regular flour
¼ cup sucanat or organic cane sugar
2 teaspoons whole cardamom (crushed in a mortar, or slightly ground in a coffee grinder)
one small egg

filling
one cup blanched, ground almonds (can be replaced with almond meal)
2 bitter almonds (about 1 teaspoon almond extract, or more depending on how strong you want the taste)
2.5 oz butter
½ cup sucanat or organic cane sugar
3 small eggs

icing
juice from an orange
¼ cup confectioner’s sugar

In a large wide bowl cream together butter, egg and sugar. With your hands, mix in flour – this can be done either in the bowl or directly on a clean counter top. Crush the cardamom with a mortar and pestle as fine as you wish. If you don’t have a mortar or grinder, you can use pre-ground cardamom. Add it to the dough and blend well. Let the dough rest in a cool place for at least 30 minutes.

While the pastry dough rests, blanch the almonds by pouring boiling hot water over them and letting soak for a few minutes. They are ready when the skin slips off easily. Skin all of the almonds and grind them into a fine meal in a food processor. In a small saucepan, melt the butter and set aside to cool. Whisk the eggs together with sugar to a porous batter and add in almonds, almond extract (if you didn’t use bitter almonds) and butter. Stir together until well blended.
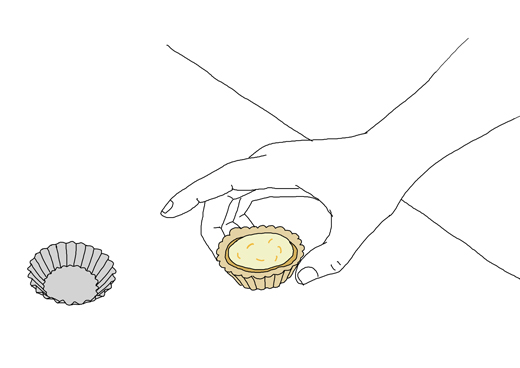
Grease small tartlet tins* (see illustration above) with butter. Line the molds with a thin layer of dough (about 1/8”) and fill them almost to the top with the almond mixture. If there is any leftover dough you can freeze it and use it some other time.
Bake in the oven at 400°F for about 15 minutes. The cakes should have got a slightly brown color on top. Let them cool a little before removing the cakes from the mold.

While the mazariner bake, prepare the icing. In a small bowl add the confectioner’s sugar and drip in some orange juice. The icing should be a little thick but still easy to drizzle over the mazariner. Wait until the mazariner have cooled before icing them.

Serve the mazariner for an afternoon tea or coffee break, you’re sure to make some new friends if you pull these out.

*If you don’t have small single cake molds as described you can use mini muffin trays or similar forms. In Sweden, disposable aluminum forms are often used, but stay away from single-use containers and do the best with what you have. We always encourage creativity!

Other Swedish baked classics

Semlor – cardamom rich bun is filled with almond paste and heavy whipped cream
Kanelbullar – Swedish Cinnamon Bun
Lussebullar – Saffron Buns
Pepparkakor – Ginger Bread Cookies (at EcoSalon)

This article was originally published at EcoSalon, 15 May 2012


Four-Cheese Ravioli with Tomato Sauce (by Stephane Lemagnen)

One small reason I draw my food is that my cooking results will probably never look as good as Stephane Lemagnen’s creations. It’s silly of me to compare (and I’m not really trying), as Stephane happens to be a well trained chef. On his site Zen Can Cook he shows mouth watering examples of his ability. If you visit the site you’ll also notice that his photography skills aren’t bad either. His cooking and recipes are creative and a great inspiration for many other cooks all over the world. Even if his creations look complicated most of the recipes are easy to follow and can be cooked in a regularly equipped kitchen like mine. My aquavit pork buns were created based on Stephane’s way to cure pork belly.

Stephane grew up in Gascony, France and trained as a cook in the Pays Basque and Paris. In 2006 he opened the avant-garde dessert bar, Room 4 Dessert here in New York City where he offered modern cuisine in the form of a dessert tasting menu. Today, Stephane works as a full time private chef for a well known (secret) client. Lucky them! Recently Stephane started Zenspotting, a space for chefs and serious amateur cooks to publish their photos with links to interesting recipes. I’m flattered to be part of it.

Stephane and I met through twitter two years ago. Ever since then we have had great and inspiring exchanges by email or tweets. I’m happy to host Stephane and I’m really happy how this simple cheese ravioli turned out. Enjoy.

Four-Cheese Ravioli with Tomato Sauce
by Stephane Lemagnen

I’m thrilled to see one of my recipes come to life through Johanna’s illustrations. I have admired her work for a numbers of years now and always loved her recipes and her artistic way of explaining how things are done. And it’s even better with a glass of aquavit! Kokblog is clever, delicious and visually pleasing and it made me wish I stuck with those art classes in 5th grade.

Ravioli are also clever and delicious little morsels of happiness, and for me they are at their best when left simple. An oozy, cheesy filling in a soft envelop of pasta with a tomato sauce flavored with hints of fresh basil is often all you need to put a smile on people’s face. And it’s as easy as… the illustrations. Drawing, in fact, is much harder than ravioli-making and eating them is definitely easier than both. They can be enjoyed right away, or made in batches and frozen for future use which makes them great little discoveries to be made in your freezer.

for the pasta dough

3 cups all-purpose or “00″ flour, plus more for dusting work surface
1/2 teaspoon salt
4 whole eggs
4 yolks
2 tablespoons olive oil

for the cheese filling

8 ounces ricotta (drained)
4 ounces Montasio cheese (grated)
4 ounces Gorgonzola (crumbled)
4 ounces Italian Fontina cheese (grated)
1 egg
½ cup basil leaves, chopped
salt and pepper
nutmeg

to finish

Tomato sauce
Basil

for the pasta dough

Combine the flour, the salt, the eggs, yolks and olive oil in a Kitchenaid bowl and combine on low speed using the dough hook (this also could be done by hand in a large bowl). Increase the speed until you get a rough dough. This should take 1 or 2 minutes.
When the mixture comes together transfer to a floured clean surface and knead the dough, turning the inside-out, until you obtain a dough that’s smooth on the outside, adding flour every time the dough starts to feel sticky. The whole process should take less than 5 minutes. Wrap the dough in plastic wrap and let it rest in the refrigerator for at least 2 hours, or overnight.

Take the dough out from the fridge and place it on a floured surface. Cut it in 4 equal pieces. With a rolling pin make rectangle with the pieces of dough, so that they fit inside the pasta machine. Start rolling pasta sheets on the thickest setting and cut in half (so it doesn’t get too long). Keep rolling reducing the setting every time.
You should be able to see your hand through the pasta sheets when you have reached the right thickness. You want it thin but not so thin that it becomes fragile.

Make an egg wash by beating an egg with a tablespoon of water. Cut sheets of pasta so they have about the same length and lay them on a floured surface.

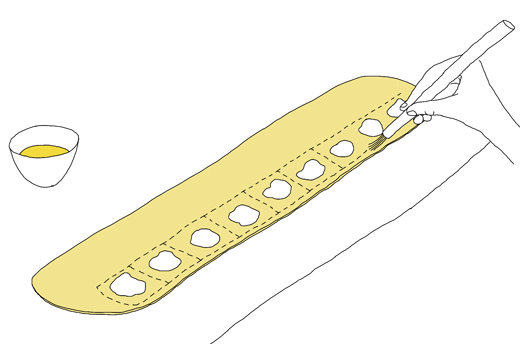
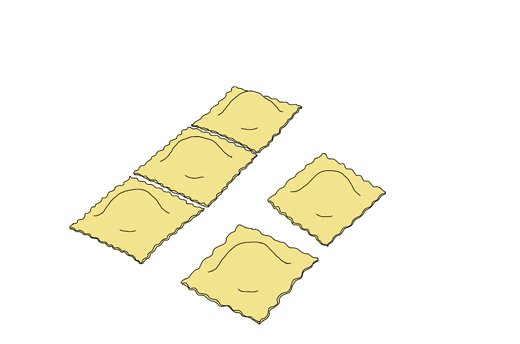
Pipe little mounds of stuffing on the pasta sheets. Brush the edges and the middle sections with egg wash. Cover with another sheet of pasta. Seal with your fingers and push out any air pockets. Use the back of a pastry cutter the size of the mounds to seal each ravioli. Now use a pasta cutter or pastry cutter to portion the raviolis. Reserve on a single layer on a tray dusted with semolina flour.

for the filling

Combine all the ingredients by hand, or in a food processor. Season to taste. Place in a pastry bag with a round 1/2 inch tip.

to finish

Bring a pot of salted water to a boil. Drop the ravioli in the water and cook until they come back to the surface. About 5 minutes. Drain them and toss with tomato sauce. Garnish with basil.

for the tomato sauce

3 tablespoons olive oil
1 small onion, finely chopped
1 clove garlic, finely chopped
1 28 oz. can San Marzano whole peeled tomatoes, including the juice, (or in season 1 3/4 pound of fresh tomatoes, peeled, seeded, and chopped)
2 tablespoons tomato paste
1 large pinch of sugar
1 pinch hot pepper flakes
fresh basil leaves

Heat the olive oil in a saucepan. Add the chopped onion and stir to coat. Reduce the heat to low and let it cook for 15 to 20 minutes, stirring occasionally until soft and translucent. Meanwhile, place the tomatoes in a bowl and crush them with your hands or using a potato masher. Add the garlic to the cooked onions and cook for a minute more. Add the tomatoes, including the juice, a few leaves of basil, the tomato paste and pinch of sugar. Season with salt and pepper and bring to a very low simmer. Cook for 15 to 20 minutes more, stirring occasionally, until it gets thicker. Remove from the heat, if you want you can blend the sauce for a few seconds for a smooth consistency.

Here are some other Ravioli recipes by Stephane:

Veal Ravioli with Culatello, Radiccio, Chanterelles & Sage
Langoustine Ravioli with Citrus-Coconut Sauce, Thai “Bird’s Eye” Chili & Fava Beans
Five-Herb Ravioli with Chanterelles, Roasted Tomato Coulis and Basil Oil

More ravioli reads on Kokblog, Duck Egg Raviolo
Pasta Shaping Work Shop on kokblog

Cured Trout for Easter

It’s Easter again and I’m planning to treat myself and guests to some cured trout. To cure trout I use the same method and ratio as when I make traditional Scandinavian gravlax. The recipe below is plain and simple. Not much more is needed for this delicate treat, but if you want to try something different you can add other flavors. Ederflower, ginger, crushed juniper or a shot of aquavit work really well. The list is endless.

Besides salmon and trout you can use this same method to cure other types of fish. Mackerel is an excellent option, and Keiko over at food blog Nordljus cured a good looking seabass with a scent of licorice. As I love licorice, I decided to add some toasted fennel seeds to my cure this Easter, which I think will go really well with the mild trout flavor.

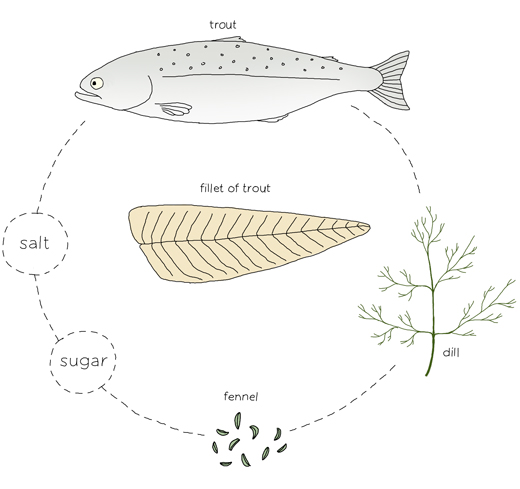
for the curing you will need

1 kilo (2 lb) trout fillet
1 teaspoon freshly milled white pepper
4 tablespoons salt
4 tablespoons sugar
bunch of dill

toasted whole fennel seeds (optional)

for decoration
fresh dill
lemon

Note: The trout should be frozen one or two days before you start the curing. The freezing will eliminate unnecessary bacteria.

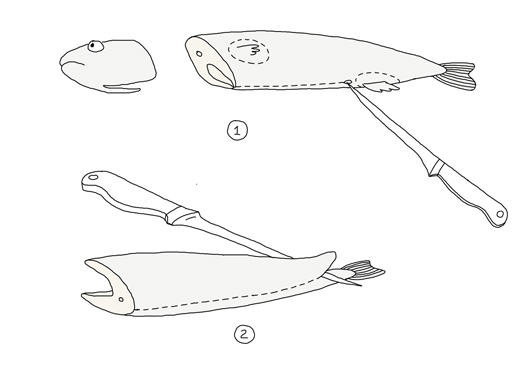
It’s not hard to fillet your trout yourself. The benefit is that you can use the remaining parts (except for the guts) to make an excellent stock together with bay leaves, carrot, celery, onions, dills stalks, some herbs like thyme, salt and pepper.

If you still think this is too messy, ask your fishmonger to fillet the fish for you but remind them that the skin should be kept on.

When you have your fillets ready. Rinse them in some cold water and pull out, if there are any, remaining bones with a pair of pliers.

Mix together salt, sugar and pepper. Rub the fillet with some of the mixture and sprinkle the rest on top of the fillets. Wash the dill and chop finely. Put the fillets together, meat against meat with the chopped dill and (if you like) some toasted fennel seeds (slightly crushed) in between. Wrap the fish in a plastic foil. Let the fish cure in the fridge with something heavy on top for 48 hours. Turn them now and again.

After two days, unwrap and clean the fillets. Start to slice the trout at the end of the fish into thin diagonal slivers using a fillet knife (or any other suitable knife). Garnish with some dill branches and slices of lemon. They can be served on toast or dark bread. However this fish is sensational on a thin “knäckebröd” topped with a drip of Hovmästarsås. Enjoy!

Hovmästarsås
Stir together 3 tablespoons mustard, 1 egg yolk, 1 tablespoon apple cider vinegar, 1 tablespoon brown sugar with plenty of chopped dill. Slowly start dripping in a little less than a 1/2 cup of olive oil into the mixture while stirring continuously (just like you make mayonnaise). If you add the oil too quickly the mixture can separate. The result should be a thick sauce. Season with salt and fresh ground pepper.

Before buying any fish check with Seafood Watch (US) for the most sustainable options.


This article was originally published at Ecosalon, 5 April 2012

Minty Zucchini Salad

Every summer I enjoy fresh mint from my own little garden. I grow three quite common types: pepper, lemon and water mint. All three work really well for cooking and I use them regularly in teas or as a flavor in different kinds of drinks. A few crumpled leaves together with elderflower cordial are a perfect match (with or without gin). Crushed with ice and Lime Mint makes for fantastic mojitos or a refreshing ingredient in a Pimm’s Cup.

It’s easy to grow mint but if you’re not careful, mint plants can rapidly take over your garden plot. Their roots are aggressive and hard to exterminate, so best to plant them in pots or at an unused part of the garden where they can grow freely without interfering with other growing treasures.

There are many different types of mint, some more common and others more rare. A more rare example are mint plants that have the scent of different kinds of fruits such as pineapple and strawberries. There is even a mint that has a clear flavor of chocolate. Not sure what I would do with this kind of mints but it’s funny as pineapple, strawberries and chocolate are all great companions to mint. For example in this strawberry salad, you can switch basil for regular mint.

Earlier this year in Marrakesh, I got inspired by the simple way they use mint in different kinds of salads. The salads were often just tomato, peppers and red onion cut into tiny pieces and blended together with finely chopped mint leaves, a squeeze of lemon and olive oil. Simple and delicious.

Anna Brones‘s mother makes a fresh mint pesto and it sounds perfect drizzled over a potato salad or even a grilled lamb chop. When the summer is here you may prefer something cool to eat instead of hot meals from the stove. A fresh red pepper and tomato salsa is an excellent choice. And a watermelon and feta salad makes a perfect starter or as a side for grilled meat and vegetables.

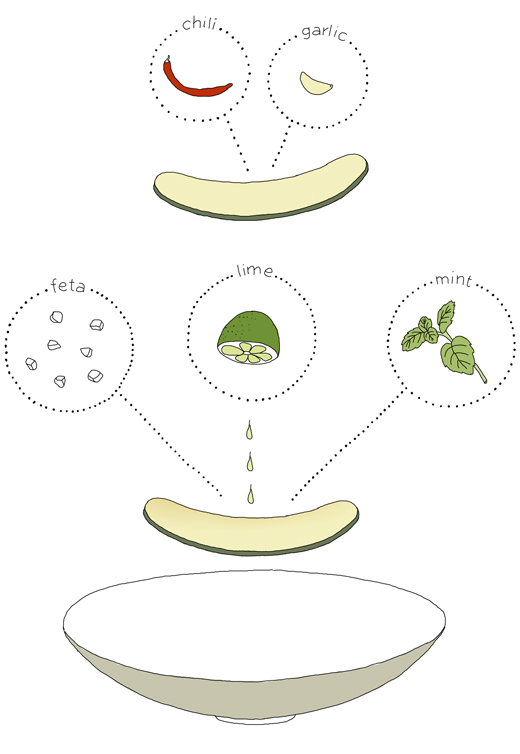
One of my latest treats is this simple and warm Zucchini & Feta Salad that is great to serve together with vegetable patties.

Warm Zucchini & Feta Salad

(for 2-4 people)

one – two zucchini
olive oil
some salt
some chili (fresh or flakes)
one or two clove of garlic
lime
¼ lb (100 g) feta
about 10 leaves of fresh mint

Wash the zucchini and cut thin slices along the long side (you may want to cut the zucchini in half crosswise first). Sprinkle some salt and olive oil over. Heat up a pan with some chili and fry the zucchini slices at a semi high heat (you may also put them on the grill or roast them if you like). Just take a few at a time as they shouldn’t touch each other while cooking. When the slices start to brown, turn them over. Just before they are done squeeze some garlic over. When the garlic has melted and the zucchini has a nice color, transfer them over to a serving dish. Repeat until all zucchini slices are done. Squeeze some lime and drip it all over the salad. Cut or crumble the feta and sprinkle it over the salad together with finely chopped mint. Season with salt and pepper if needed. Serve immediately.

 This recipe was originally published at EcoSalon on 22 March 2012

Spätzle – German Egg Noodles

Årsta fältet, a flat field in a suburb of Stockholm, may not be the most exotic place to visit in the capital city of Sweden. But somewhere in that field I had one of my most peculiar food memories ever. It was there I ate spätzle (or maybe it was Hungarian nokedli) for the first time in my life. The spätzle was served with a rich goulash that we made in a hanging cast-iron pot over an open fire. This is that kind of moment that is hard to recreate.

The goulash was amazing but it was the spätzle that won my heart. Since then I’ve been treated to spätzle again and again and I love it as much every single time. However not many cooks have been able to share their recipe as they cook it by instinct without any instructions. Fair enough, I just had to start figuring out my own way.

I started by playing around with different recipes I found online. The result was often not that great which probably had more to do with the choice of flour than the recipe. I discovered that, for example, pastry flour (why use that in the first place?) made the batter taste really floury in an unpleasant way. I also tried adding fresh grated potatoes but then it became halušky (potato noodles). At some point I gave up and started to use just regular wheat flour. The result made me very happy and pleased!

Recently I followed Steen Hanssen’s recommendation to use dinkelmehl (spelt flour). The spätzle became darker and had a slight nutty taste. I liked it.

for the batter
(2-3 people)

3 eggs (depending on size)
¼ cup of lukewarm water
about 1¼  cups of spelt flour or regular flour
pinch of salt
some freshly grated nutmeg
a couple of tablespoons of butter

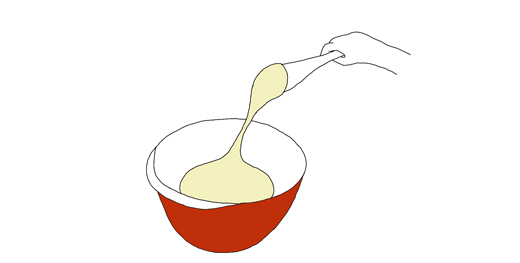
Heat up some water until its just lukewarm. Mix together eggs, water, nutmeg and a pinch of salt. Gradually start adding flour, little by little. Make sure to avoid creating lumps. The dough has got enough flour when its a little stretchy and easily falls off you spatula without breaking. If you get the dough too stiff, just add some more water. Let the dough rest for about half an hour.

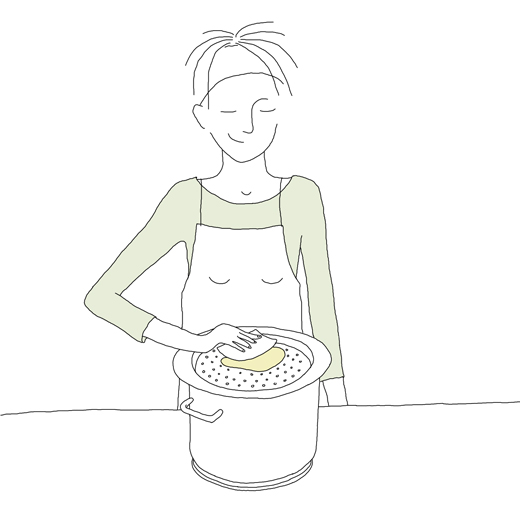
There are many different ways to “form” the spätzle and its probably very individual which method you may prefer. I have tried some techniques with more or less success. I think using a spätzle lid is the easiest and my kitchen doesn’t ends up in a mess (see image above).

Heat up some salted water in a large pot that will fit the spätzle lid nicely (see below for other methods). Bring the water to a boil. Lower the heat. Place the lid on top of the pot and add ¼ of the dough on top. Start to press the dough down with a spatula (often comes w/ the lid). Stir around the spätzle a little so they don’t stick together. The spätzle are done after about 2-3 minutes when they float up to the surface. Use a skimming ladle to fish them up. Repeat above steps until the dough is finished. Adjust the heat if necessary. Add some melted butter to the spätzle so they don’t stick together.

Serve the  spätzle with a rich goulash, creamy mushrooms or baked in the oven topped with cheese.

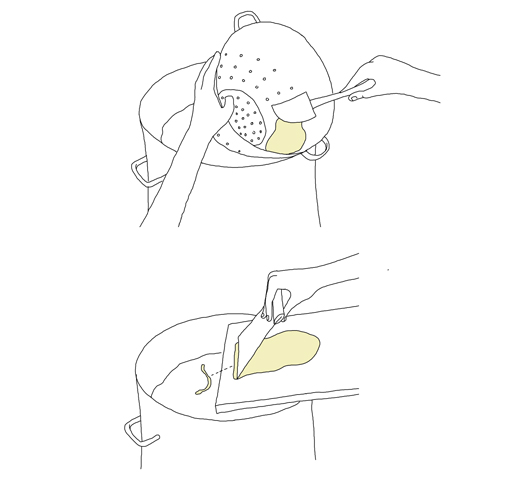
Other methods (and there are more)
Another technique is to use a pasta strainer, preferably those with larger wholes. My stainless steel strainer worked fine, even if it was a little clumsy, the spätzle came out pretty nice, tiny and delicate! Just let the strainer rest at an angle on the edge of the pot (see image above) and use a soft spatula to press down the batter through the holes into the hot water.

If you want larger spätzle you can use a smaller chopping board and a chef knife or a bench scraper. Place one batch of dough on the chopping board and let it rest at an angle at the edge of the pot. Start to cut small pieces of the dough right into the boiling water. It worked okay and probably would be better with practice.

Recipe and drawings was originally published at EcoSalon, on 11 March 2012